Cisco 79XX - Series Overview
Goal
The purpose of this article is to help users understand the 79XX phone and its button layout, features, Message Waiting Indicator (MWI), Directories, Headset, and Display Phone Layout.
Cisco 79XX Series - Phone Layout:
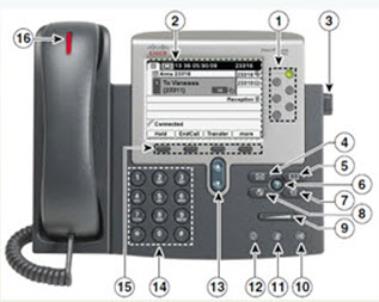
- Programmable buttons - Provide access to phone lines and speed-dial numbers.
- Phone screen - Displays the call features.
- Footstand button - Enables you to adjust the angle of the phone base.
- Messages button - Auto-dials your voice message service (varies by service).
- Directories button - Opens/closes the Directories menu. Use this button to access call logs and directories.
- Help button - Activates the Help menu.
- Settings button - Opens/closes the Settings menu. Use this button to change phone screen contrast and ring settings.
- Services button - Opens/closes the Services menu.
- Volume button - Controls the handset, headset, and speakerphone volume (off-hook) and the ringer volume (on hook).
- Speaker button - Toggles the speakerphone on/off. When the speakerphone is on, the button is lit.
- Mute button - Toggles the microphone on/off. When the microphone is muted, the button is lit.
- Headset button - Toggles the headset on/off. When the headset is on, the button is lit.
- Navigation button - Enables you to scroll through menus and highlight items. When the phone is on the hook, displays phone numbers from your Placed Calls log.
- Phone Keypad - Enables you to dial phone numbers, enter letters, and choose menu items.
- Softkey buttons - Each button activates a softkey option (displayed on your phone screen).
- Handset light strip - Indicates an incoming call or new voice message.
Phone Features:
Customized Personal Settings
- The contrast on LCD Screen
- Volume Control
- Ring Types
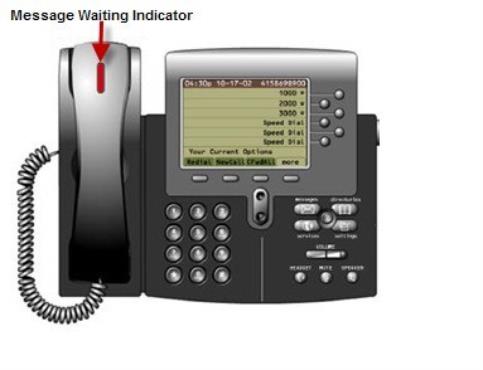
Message Waiting Indicator:
- New Messages
- Incoming Call
Directories:
- Missed Calls
- Received Calls
- Placed Calls
- Corporate Directory
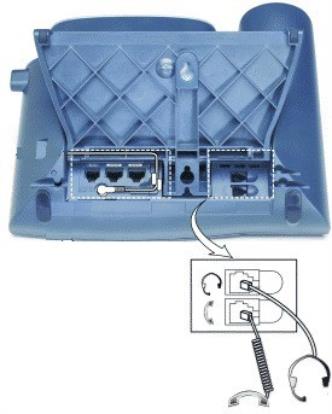
Headset:
- Plantronics - Go to the Plantronics website for details.
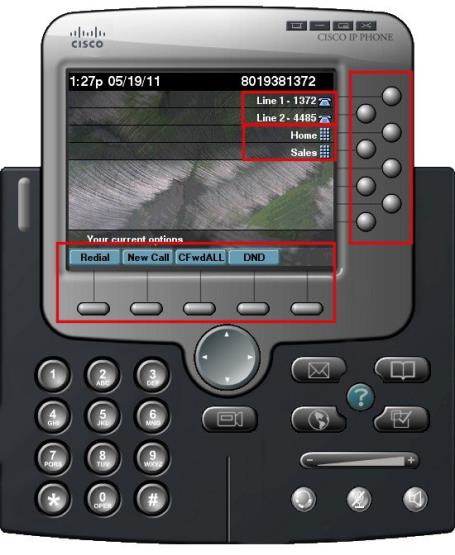
Display Phone Layout:
Your Cisco phone display functions are divided into four areas:
- Touch screen: A touch screen is available on select Cisco IP Phone models. You can select or tap the touch-sensitive items with your fingertip, as opposed to using the phone buttons.
- Soft keys: The soft keys, found at the bottom of the phone screen, are designed to guide users through call features and functions. Different soft keys will be displayed based on your phone’s status: when your phone is not in use, when you’re on a call, or if you have a caller on hold.
- Line buttons: On your screen, you will see all of the extensions you have configured on your phone, which are indicated by the phone icon. To the right are the line buttons that allow you to place calls from any of those extensions. You can have anywhere between 1 and 8 line buttons depending on your model of IP phone.
- Speed dial buttons: Any line buttons that are not configured with an extension can be utilized for speed dial buttons which will be indicated by a keypad icon.
Common Issues/Related Articles
Factory Reset:
- 7940 and 7960: Cisco - Phone: 7940 and 7960 Factory Reset Procedure
- 7920: Cisco - Phone: 7920 Factory Reset Procedure
- 7942 and 7962: Cisco - Phone: 7942 and 7962 Factory Reset Procedure
- 7945, 7965, and 7975: Cisco - Phone: 7945, 7965, 7975 Factory Reset Procedure
- 7921: Cisco - Phone: 7921 Factory Reset Procedure
- 7925: Cisco - Phone: 7925 Factory Reset Procedure
79XX Features:
- Cisco - Phone: iDivert - 79XX Series
- Cisco - Phone: Pickup - 79XX Series
- Cisco - Phone: Extension Mobility - 79XX Series
- Cisco - Phone: Joining Calls - 79XX Series
- Cisco - Phone: Receiving Calls - 79XX Series
- Cisco - Phone: Call Park - 79XX Series
- Cisco - Phone: Speed Dials - 79XX Series
- Cisco - Phone: Transferring a Call - 79XX Series
- Cisco - Phone: Do Not Disturb (DND) - 79XX Series
- Cisco - Phone: Answering Additional Calls - 79XX Series
- Cisco - Phone: Cisco Function Directories - 79XX Series
- Cisco - Phone: Switching Between Calls - 79XX Series
- Cisco - Phone: Cisco Function Settings - 79XX Series
- Cisco - Phone: Cisco Function Buttons - 79XX Series
- Cisco - Phone: Returning to Initial Call - 79XX Series
- Cisco - Phone: Placing a Call on Hold - 79XX Series
- Cisco - Phone: Meet Me Conference Call - 79XX Series
- Cisco - Phone: Cisco Call Forwarding All - 79XX Series
- Cisco - Phone: Placing a Call - Internal, External, 911 or 411 - 79XX Series