Skype For Business: How to record and play back a Skype for Business (Lync) Meeting
Record your Skype for Business (Lync) Meeting
1. Click More Options > Start Recording.
If the recording option is dimmed, your audio might not be connected. Click the mic/phone icon to connect audio, then try again.
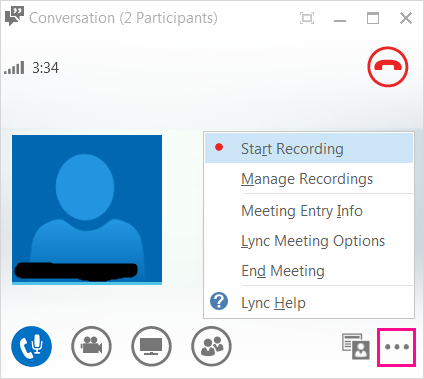
2. Use the controls at the bottom of the meeting to pause, resume, or stop the recording.

- To see who else is recording, point to the red recording button.
- When you’re done, click Stop Recording.
- Skype for Business (Lync) automatically saves the recording in MP4 format that plays in Windows Media Player and Zune.
3.You can exit the meeting while the recording is being processed.
Play and share a recording
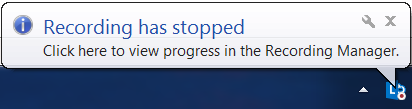
When your recording has been processed, you can access it to play or send to others. Skype for Business (Lync) displays a message when the recording is ready. You can click the alert to open Recording Manager, or if you miss that, click Tools on the Skype for Business (Lync) main window, then Recording Manager.
In the Recording Manager window:
- Click your recording to highlight it, then click Play on the right side of the window.
- You can also rename or delete your recording here.
- To share your recording with others, click Browse to locate it, then copy the file to post on a shared location, such as OneDrive or an internal SharePoint site.
4. If you cannot post the recording, check to make sure you have enough space on the page.
TIP: Recordings are saved in the Videos/Skype for Business (Lync) Recordingsfolder on your computer.
For more information, see Lync recording manager.
APPLIES TO: Lync 2013 for Office 365, Skype for Business, Lync 2013