MS Teams Atmos Call Recording - User Training Guide
Logging In
- Navigate to the URL provided during your Atmos setup. This is typically https://companyname.cloudrecording.net.
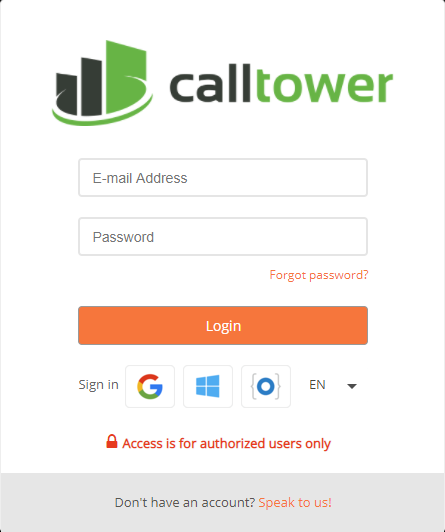
- Enter the your email address and password in the login page. If logging in for the first time, your initial password is in the welcome email from no-reply@callcabinet.com.
- If you forget your password, click on the Forgot password link to reset via email.
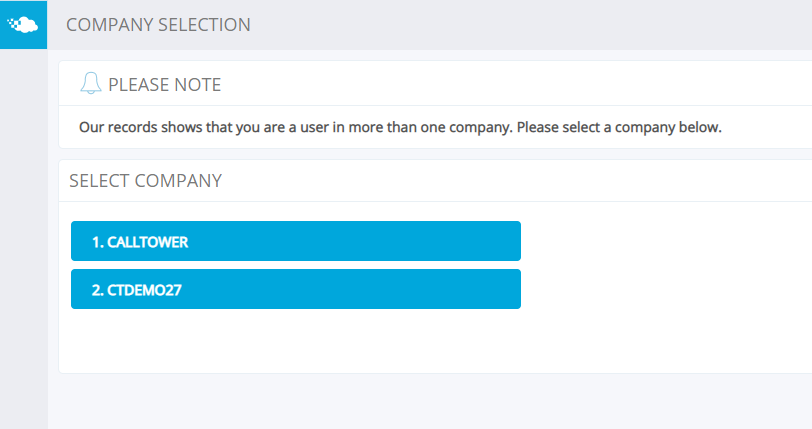
- If your account is associated to multiple companies, you will be directed to a page to allow you to select which company to view. Otherwise, you will go directly to your Dashboard / Home Page.
Home Page
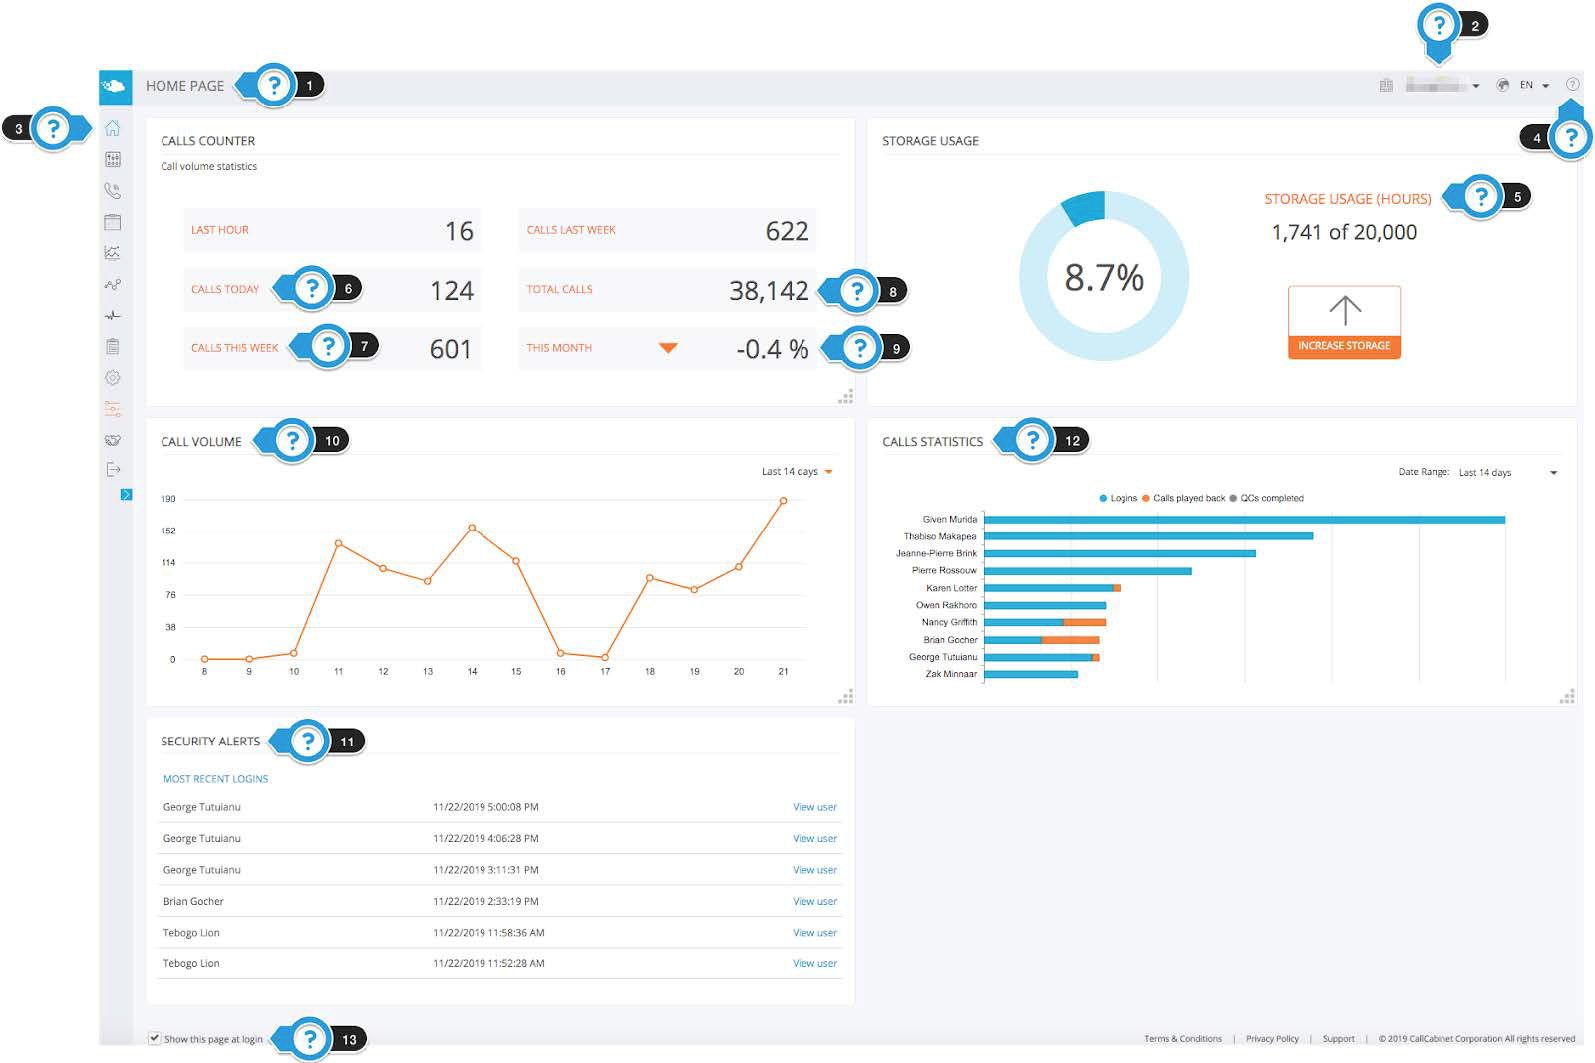
The Atmos landing page shows the call counts, call volume, storage usage, calls statistics and security alerts. The points below correspond to the numbered arrows above.
- This indicates that you are on the Home Page.
- The company – If you have more than one company you will be able to switch between them, the dropdown list will also give you the options to change your password and log out of Atmos.
- The Atmos menu bar is positioned vertically and allows site-wide navigation to all of the Atmos pages. You can easily identify each icon by hovering over them, a tooltip will identify the icon as well as provide you with the ability to expand out. The icons in order are “Home Page”, “QC Dashboard”, “Call Listing”, “Customer Log”, “Reports”, “Analytics”, “Client Heartbeats”, “Quality Control”, and “Settings”.
- The help icon will take you to the Atmos User Guide (this page).
- “Storage Usage (Hours)” – This is the total number of uploaded hours of calls stored in your account. Storage plans can be increased as needed before or once capacity is reached.
- “Calls Today” – This is a display of the total number of recorded calls that your company has recorded for the current day.
- “Calls This Week” – This is a display of the total number of recorded calls that your company has recorded for the current week.
- “Total Calls” – This is a display of the total number of recorded calls that your company is currently storing within Atmos (this information is generated once daily).
- “This Month” – This is the increase/decrease difference in usage for the current month against the previous month.
- “Call Volume” – This is a graphical representation of the number of calls that have been recorded. You can use the drop-down menu to select the last 14-days, 1-month, or 6-months.
- “Security Alerts” – These are alerts/notifications of the recent user login activity.
- “Call Statistics” – Users activity for logins, calls played back, and QC’s Completed in a 14-day, 1-month, 6-month view.
- “Show this page at login” – This is ticked by default, if un-ticked you will go directly to the Call Listing page, if you do not have access to the Call Listing Page (Restricted User/Admin/Support User) you will go to the Home Page. This is a global setting across all companies you have access to.
Atmos Menu Bar
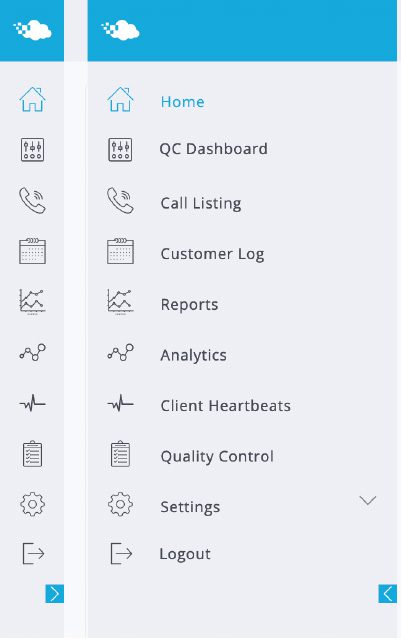
The Atmos Menu Bar is located on the left side of the screen and is abbreviated with icons. The arrow at the bottom of the menu bar expands the Atmos Menu Bar with a listing of options that the user can see, depending upon their user rights in the system.
- QC Dashboard – If your account has a QC Supervisor license, you will have access to this option. The link directs you to the “QC Dashboard Page” where QC Supervisors can see the list of QC calls that were scored and the averages of QC scores, along with trends. The raw data is also available on this page where the QC Supervisor can navigate directly to the QC Analysis and call.
- Call Listing – This link allows the user to navigate to a “Call Search Page” where calls can be accessed through a variety of search and filter options.
- Customer Log – Provides access to the “Audit Log”. Admin users can use this page to see who has logged into the system, what searches have occurred, QC Scoring, Reports and any other functions that other users have performed in the system.
- Reports – Provides access to the “Reports” module of Atmos. Users, depending upon system rights, can run reports on Calls Recorded, Agent Productivity, and QC scoring.
- Analytics – Navigates to the Atmos “Voice Analytics Dashboard”, where users with a Voice Analytics license can review Voice Analytics such as Emotion, Sentiment, Call Transcription, Customer Experience Analysis, and Auto QA Scoring.
- Client Heartbeats – Provides access when Atmos clients are installed on the agent desktop, for instance, Skype for Business, Screen Recording, and PCI Compliance. The “Client Heartbeats” application consistently pings each installed Atmos client to make sure the app is alive and performing as required.
- Quality Control – This page provides QC Admin users access to the “QC Forms Creator”.
- Settings – This page is where Admin users can create, modify, and remove users, change user rights, manage retention periods and other system-wide functions.
Call Listing Page
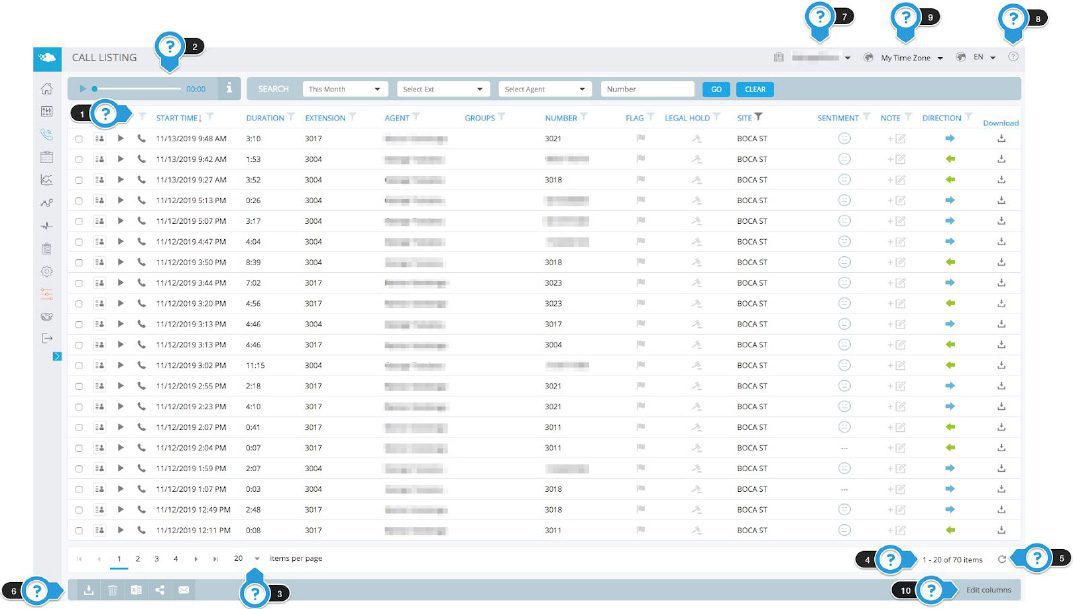
The “Call Listing Page” is the page that allows users to search for, download and playback calls currently stored in your Atmos system. The points below relate to the tab numbers on the image above:
- The call grid displays a single row for each call.
NOTE: Each column in the call grid can be sorted by simply clicking on the column name and filtered by clicking on the funnel icon and completing the dialogue box.
• “Call Details” – This option is available to customers that have Atmos enhanced licenses such as Atmos
• Supervisor Licenses or Atmos QA Supervisor Licenses.
• “Play Button” – This button allows users to listen to the audio of a specific call.
• “Call Type” Icon – This icon represents how the call is being recorded. Example: the above image shows these calls were recorded from a phone, whereas if your account utilizes Skype for Business, your screen would show a Skype icon for a recorded Skype call.
• “Start Time” – This denotes when the call has started.
• “Duration” – The length of the call.
• “Extension” – The extension number of the person who answered the call or made the call.
• “Agent” – Agent Name who answered the call or made the call.
• “Group” – If an agent belongs to a group it would be displayed here.
• “Number” – Calling or called Party Number.
• “Flag” – Calls can be flagged and filtered based on multiple types of designations.
• “Legal Hold” – Any calls that are designated as Legal Hold can be set or filtered in this column. Legal Hold keeps a call longer than the system retention policy.
• “Site” – The Site column will display the site where the agent is associated with. This column can also be filtered to see calls from specific sites.
• “Sentiment” – If Atmos Voice Analytics is utilized, this column will identify calls based on the overallsentiment. Calls are designated as either Very Bad, Bad, Neutral, Good or Very Good.
• “Note” – This column will display whether a call has any notes associated with it or allows the user to add notes to an individual call. Please be advised that after 14 minutes the note will become a permanent record and cannot be deleted.
• “Direction” – The arrow icon represents the direction of the call. A blue icon pointing right is an outgoing call and a green arrow pointing left is an incoming call.
• “Download” – Clicking on this icon will download the call in a non-encrypted mp3 format. - The “Audio Player”, will allow users to play or pause the call and volume control, as well as show the time position within the call.
- Users can change the number of items returned on each page by selecting the “Items per Page” drop-down.
- The “Call Count” will show exactly how many calls match your required search parameters. The results can be refreshed in order to include any recent calls in the returned results.
- Users can refresh the results returned in order to include any recent calls in the returned results.
- The “Bottom Toolbar” provides additional functions, based on user rights, including the download of any call, deletion of call(s), the export of the call’s metadata to an Excel file, sharing of a call, or emailing a call.
- If more than one company is recorded within the Atmos account, the user can switch between them by selecting the “Company Selector”. The drop-down list will also give users the option to log out of Atmos.
- The “Help” icon will take the user to the online Atmos User Guide (this document).
- “Time Zone” allows the user to change the Time Zone for their account.
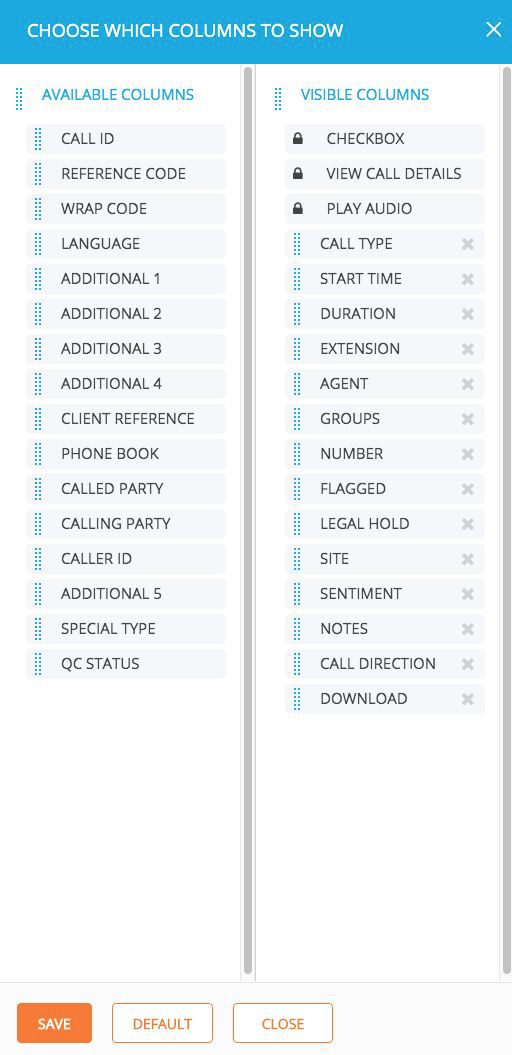
- Columns available on the call listing can be customized by clicking on the “Edit Columns” button. Simply drag options from the “Available Columns” and the “Visible Columns” to set-up your preferred data view. (See Image Below).
Call Details Page (Requires Advanced Supervisor or QA Supervisor license)
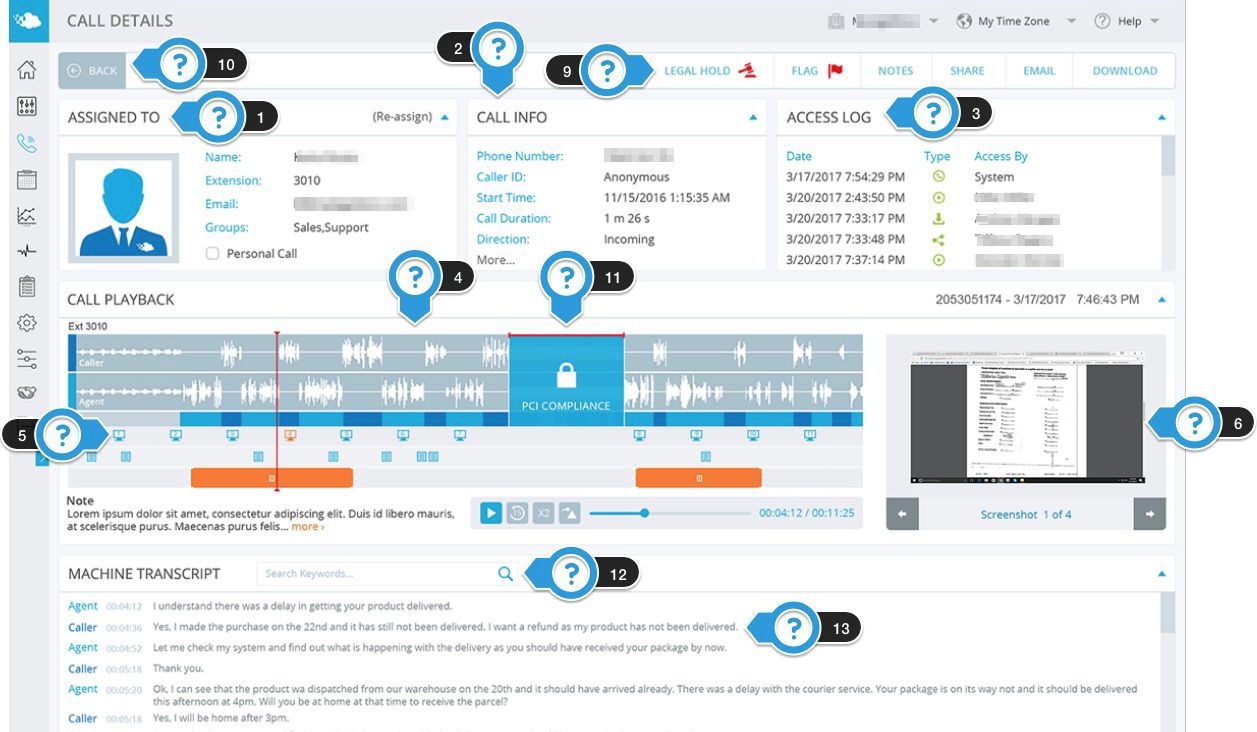
The points below correspond to the numbered arrows above.
- The “Assigned to” section displays the name of the Agent the call is assigned to, their extension number and their email. Also, there is a “Personal Call” checkbox that can be checked off to note that it is not a work-related call so that it doesn’t need to be evaluated. Plus, calls can be reassigned to another supervisor for review.
- The “Call Info” section lists information about the call, including the phone number of the caller, the duration, and the direction of the call.
- The “Access Log” section shows who has interacted with the current call details. It will display who used the playback feature, made a note, shared the call, or downloaded the call.
- The oscillogram wave is a graphical representation of the call during playback in the “Call Playback” section. Users can easily navigate directly to the portion of the call they would like to hear.
- The “Monitor” icon indicates the specific moment in the call in which a screen capture was taken.
- The “Screen Captures” are displayed here. By enlarging (clicking) on the screenshot, users are able to visually review the call to see what the agent was doing on their computer during the call. While the screenshot is enlarged, users are able to “Zoom to Fit”, “Actual Size”, “Download” and “Email” the screen capture.
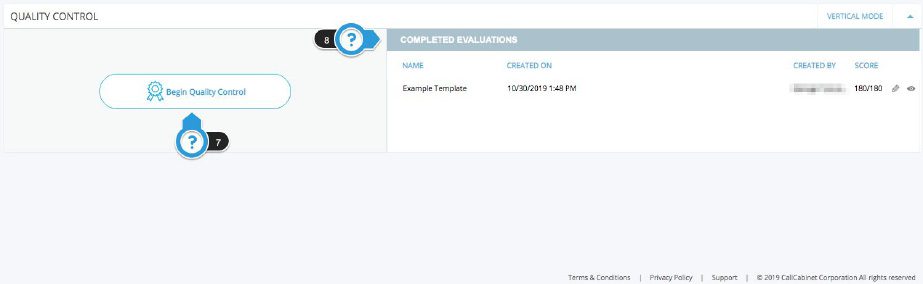
- The “Begin Quality Control” button enables users to evaluate agents. For example, “Was the agent able to help the customer with their problem?” or “Did the agent advise the client that the call was being recorded?”. With the forms users will be able to better evaluate agents and where they need growth, and how and if your client’s needs have been fully taken care of.
- “Completed Evaluations” displays the “Name” of the evaluation, the date it was “Created On” and who it was “Created By” as well as the score of the completed evaluation form.
- This icon will review six features within the upper left navigation bar:
• “Legal Hold” provides the ability to flag the call for “legal hold”. This action will keep the call in the account regardless of the retention policy and the call will never be deleted while in “legal hold” status.
• “Flag” enables users to flag a specific call of choice to refer back to later.
• “Notes” allows the supervisor to leave a note on a call. Please be advised that after 14 minutes the note will become a permanent record and cannot be deleted.
• “Share” enables the user to share a call and information about the call to another email address without breaking compliance. The Share function is available only with the correct user rights and allows the user to select what information such as audio, screen captures, notes on the call, along with permitting the recipient to add notes to the call with notification. The Share function provides an email link to the recipient where they can “tunnel” into a secured section of the Atmos network where they can view and playback the call. The link only provides temporary access and can be selected for a specific time period.
• “Email” enables the user to send the call details related to the call via email.
• “Download” icon enables users to download the call in a non-encrypted mp3 format. - The “Back Button” directs the user back to the “Call Listing” page.
- The “PCI DSS Compliance” redaction section is where the agent took sensitive client information which has been redacted and will not be presented in the call playback. PCI DSS Compliance Redaction is used for Personal Credit Information such as Credit Cards, Social Security Numbers and requires Atmos Voice Analytics.
- “Keyword or Key Phrase Search” of the call transcription provides the ability to search for keywords or phrases throughout the entire call transcript. This function requires Atmos Voice Analytics.
- The “Call Transcription” area provides a full speech-to-text transcription of the recorded call. This area will highlight and sync to show the portion of the call when the caller or the agent is speaking during playback. This function requires Atmos Voice Analytics.
Compliant Call Sharing
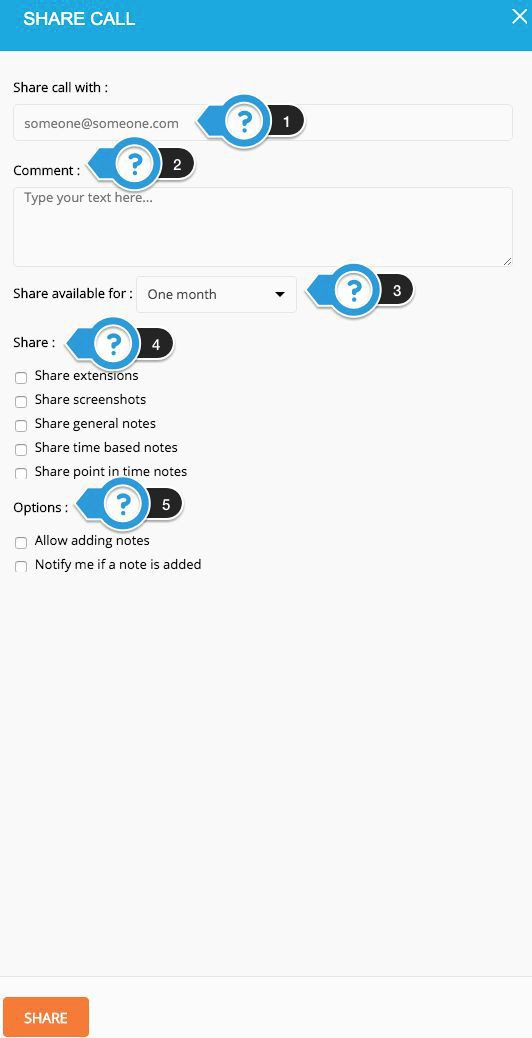
The points below correspond to the numbered arrows above.
- Enter the email address you would like to share the call details with.
- Add a comment that you would like included when sharing the call.
- Set the length of time the recipient has access to the call. For example, if the share availability was set to one hour, and the link is accessed after the hour has passed, the user will be shown a page that indicates the link has expired.
- Choose what abilities you would like the individual you are sharing the call with to have for that specific call. For example, if you would like to share screenshots with the call, check “Share Screenshots”.
- You can enable the recipient to add notes to the call and receive a notification when notes are added by the recipient.
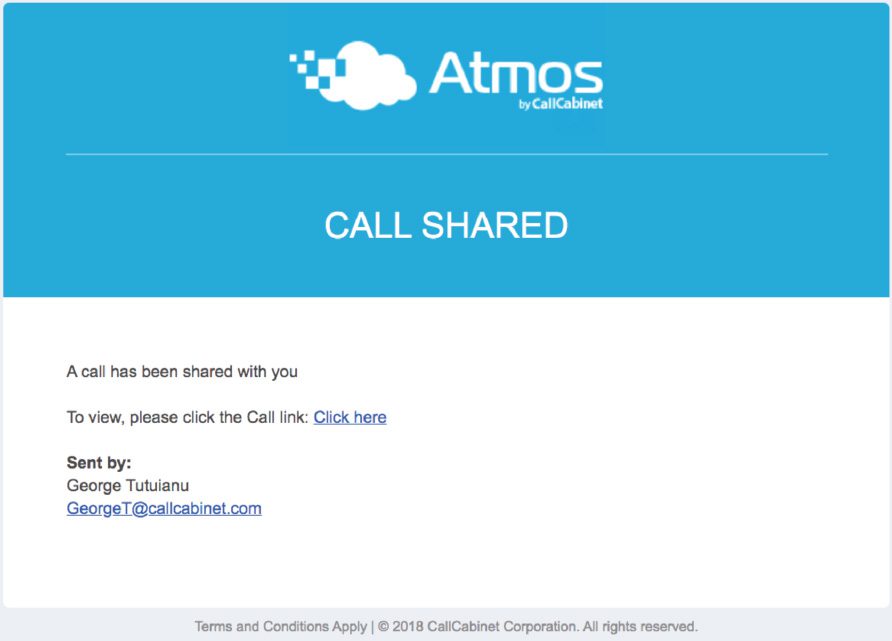
After you have shared a call with the recipient of your choice, they will receive an email with a link to access the call (see below image).
Customer Log Page
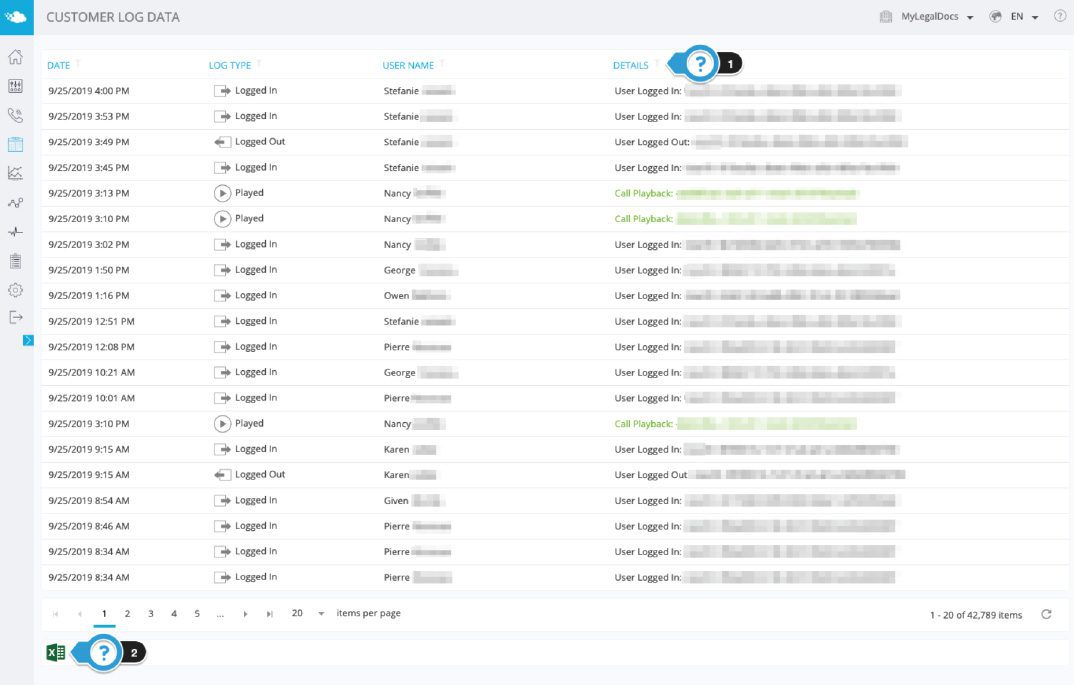
The “Customer Log” page, shows complete information about all changes made to the system as well as access and playback details. The points below correspond to the numbered arrows above.
- The grid will show users the Date, Time, Log Type, Username and Details of every security and playback event that occurs within Atmos.
- Clicking the Excel icon will export all of the data of the page you are currently on. Pages that have this feature include Call Listing, Customer Log, and Heartbeats.
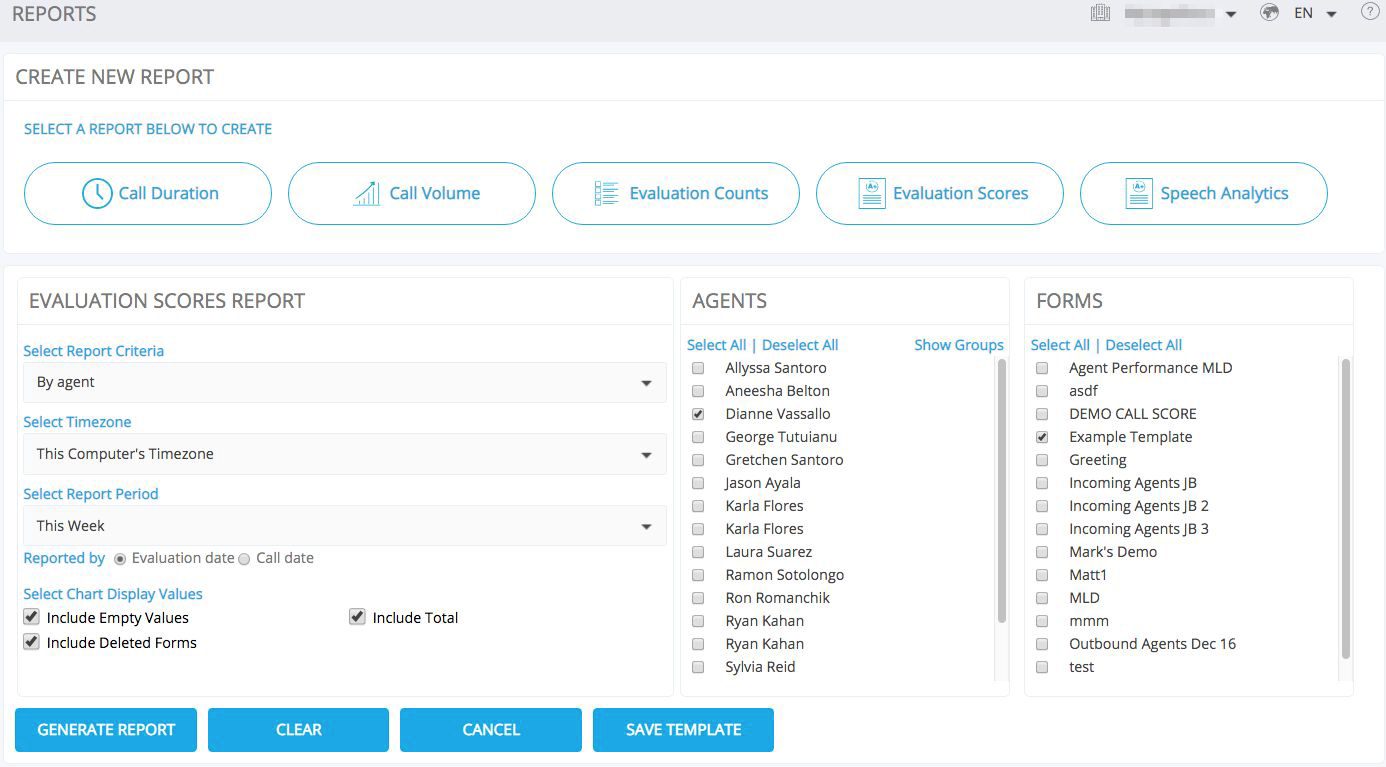
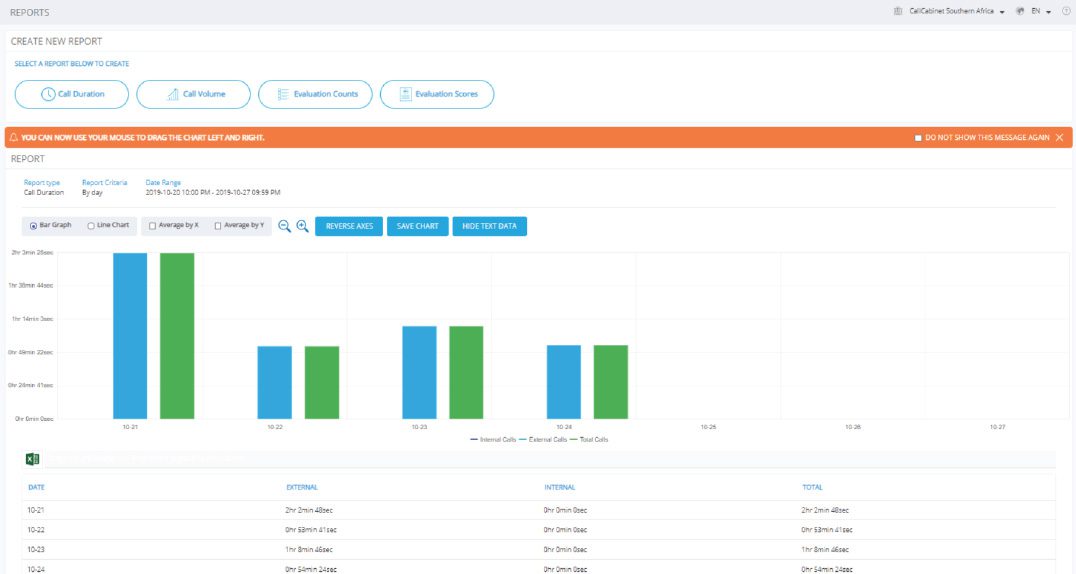
Reports Page (Requires Advanced Supervisor or QA Supervisor license)
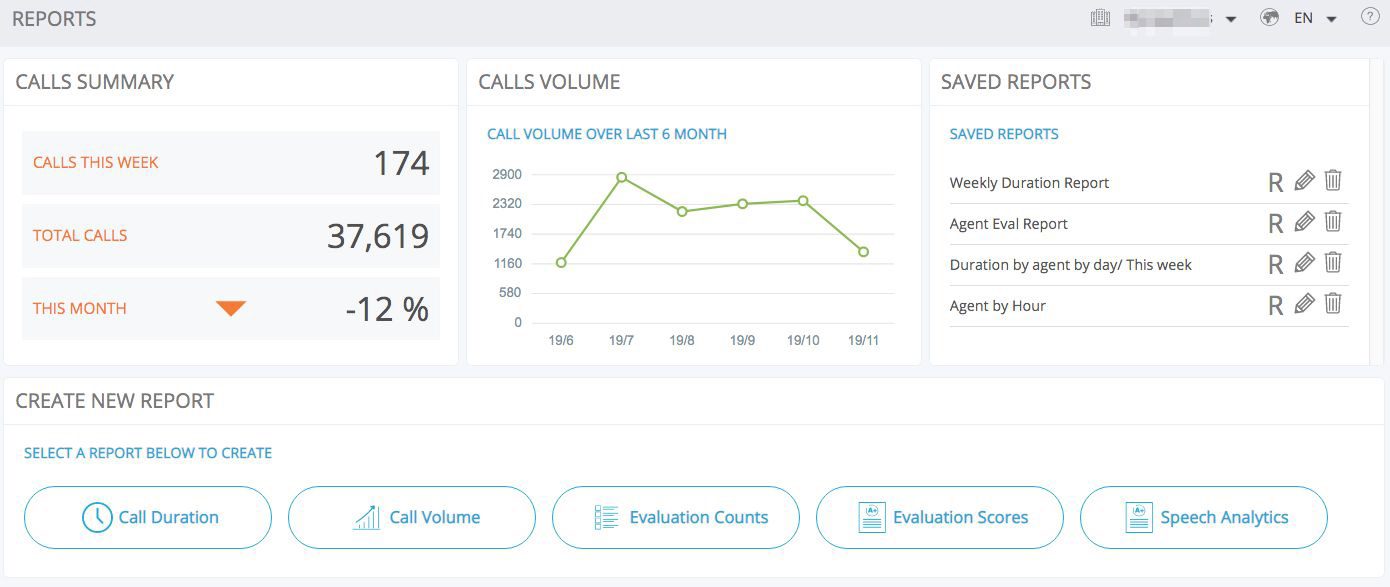
The “Reports Page” is where the user can generate reports. Remember, calls included in these reports are ONLY CALLS THAT HAVE BEEN RECORDED.
It’s important to remember that the Reports Page cannot generate true call statistics since Atmos does not capture abandoned calls, busy signal calls, or agent wrap times.
Users can view weekly “Call Summary” calls, total calls and the -/+ of this month to date vs last month, “Calls Volume” for the past 6 months, as well as edit/delete, and create new reports.
Report types: Call Duration, Call Volume, Evaluation Counts, Evaluation Scores, and Speech Analytics. Report Selection Criteria are customizable. Select the criteria desired and generate the report. Different selections are available depending on the report type. The following images are two examples showing the difference between the selection of a “Call Report” (Call Duration Report) versus a selection on a “QC Report” (Evaluation Scores Report).
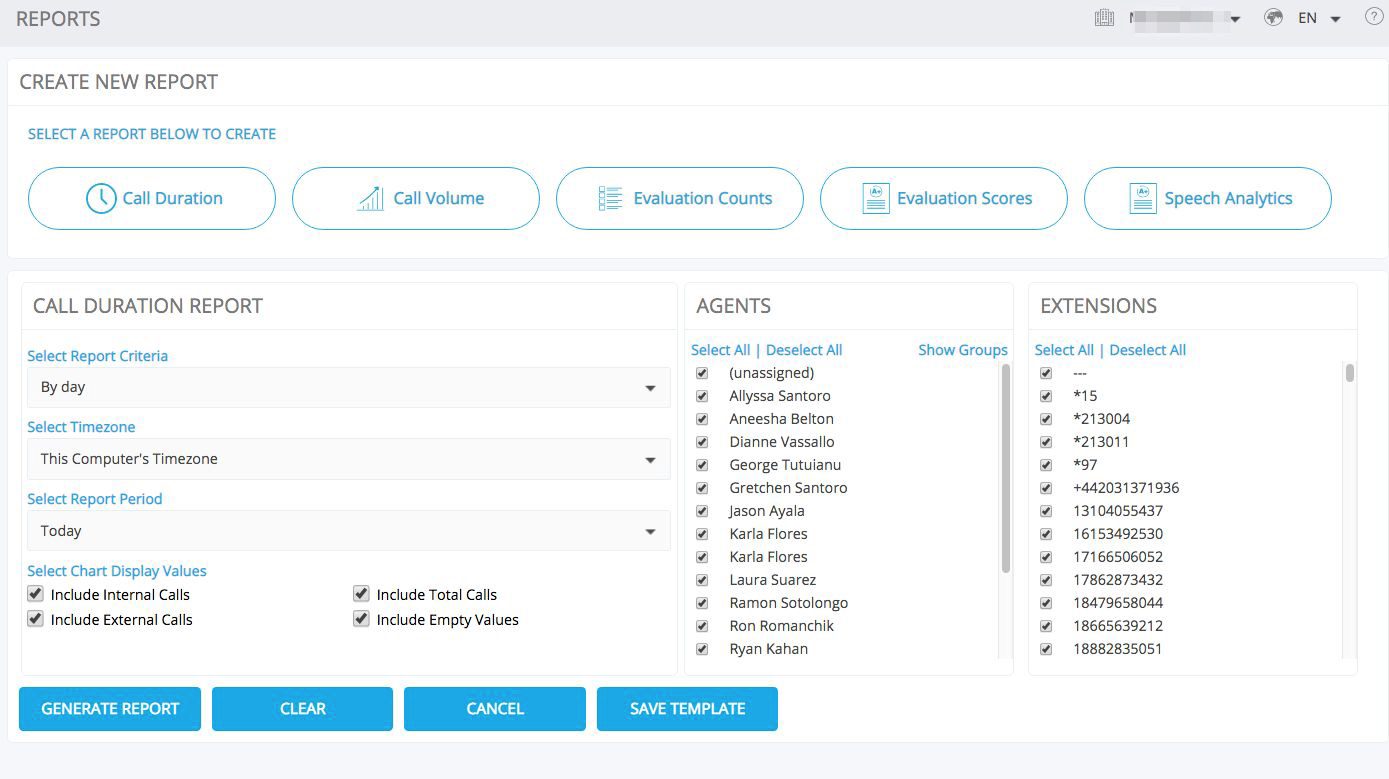
Note: Saved reports can be used as templated reports for daily, weekly, monthly, quarterly and annual reports with a click of a button.
Dependent on the type of report users choose, they will have different options on how to view the data. Bar Graphs, Pie Charts, Line Charts as well as average scoring on the X or Y axes. Users can also reverse the axes to change the horizontal and vertical descriptions. The Excel button on the lower left below the chart exports the text data of the report.
Analytics
All Analytics integrations are custom, please reach out to your CallTower Customer Success Manager for information regarding your specific integration.
Heartbeats Page
This page is not used for installations integrated with Microsoft Teams.
QC Page (Requires QA Supervisor license)
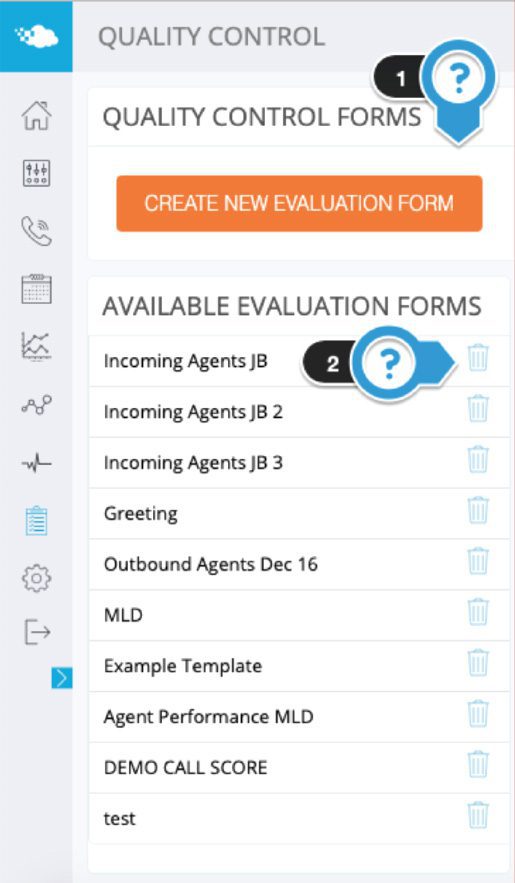
The points below correspond to the numbered arrows above.
- Users can create an unlimited number of custom evaluation forms. They can be as granular or as simple as required to gain insight into any aspect of your business.
- Users are able to edit and delete forms here, the forms listed in the above image are examples
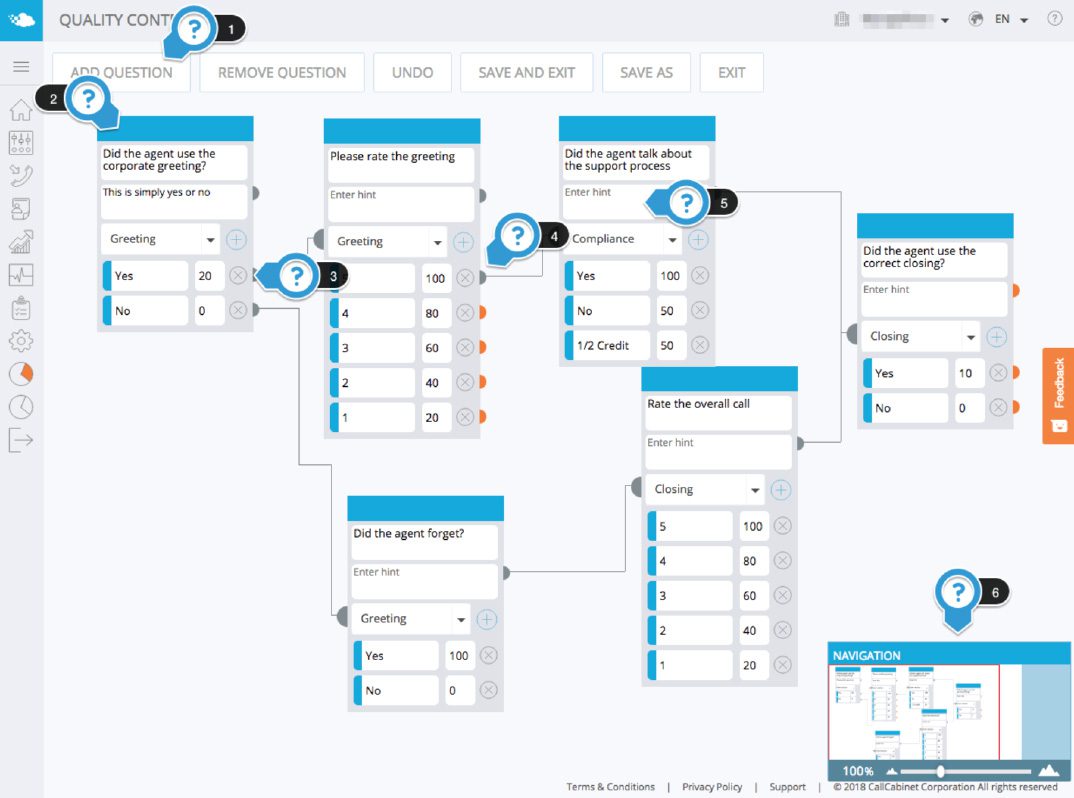
The points below correspond to the numbered arrows above.
- This area allows users to “Add more questions”, “Remove”, “Undo”, “Save & Exit”, “Save As”, or simply “Exit”.
- This area allows users to create questions for QA to evaluate the agent.
- Click the “X” button to delete the answer that you have created. Answer types include (Point Value, N/A, Section Failure, and Total Failure)
- Design the path of a question by leading to the answers you have created.
- Add a hint for your QA in case they are unsure about a certain question.
- This is a “Navigation” window which allows you to see an overview of the form structure.
Settings
General Settings
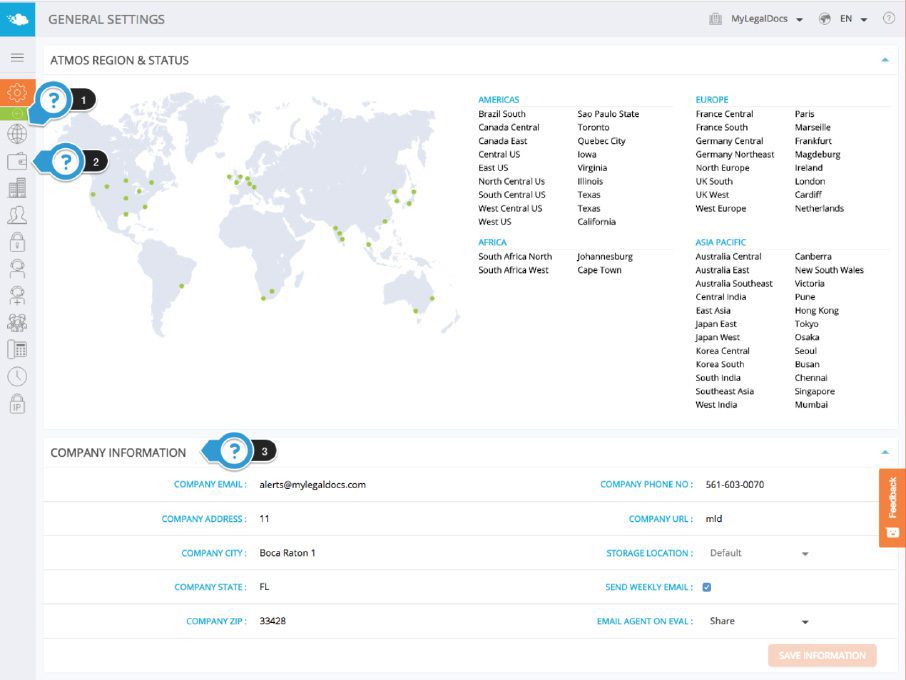
- The “General Settings” page will allow you to set up and view plan details, plan usage, billing, invoice history, and to edit company information such as “Company URL”, “Time Zone” and other Company settings.
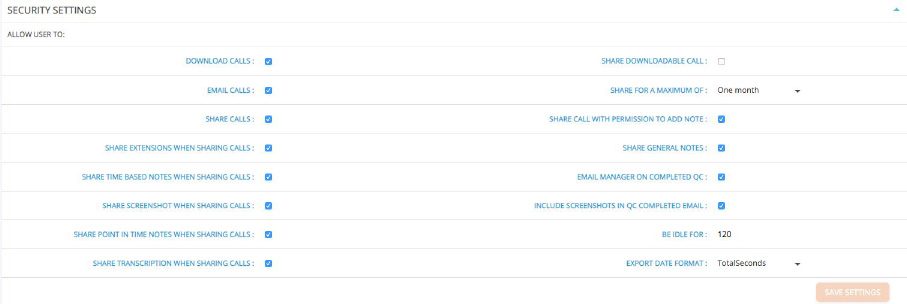
- The “Security Settings” menu is displayed vertically at the top of the page and will remain in position regardless of the settings page selected. The “Security Settings” allow the System Administrator to enable users to perform the following tasks in Atmos, based on a toggle on / toggle off basis. The “Security Settings” also allows the Administrator to set Idle Time, Maximum Time for Secure Sharing of Calls, and Export Date Format.
Billing
Billing for Atmos Call Recording for Microsoft Teams is provided by CallTower. This page is not used when CallTower provides the Atmos recording service.
Site Settings
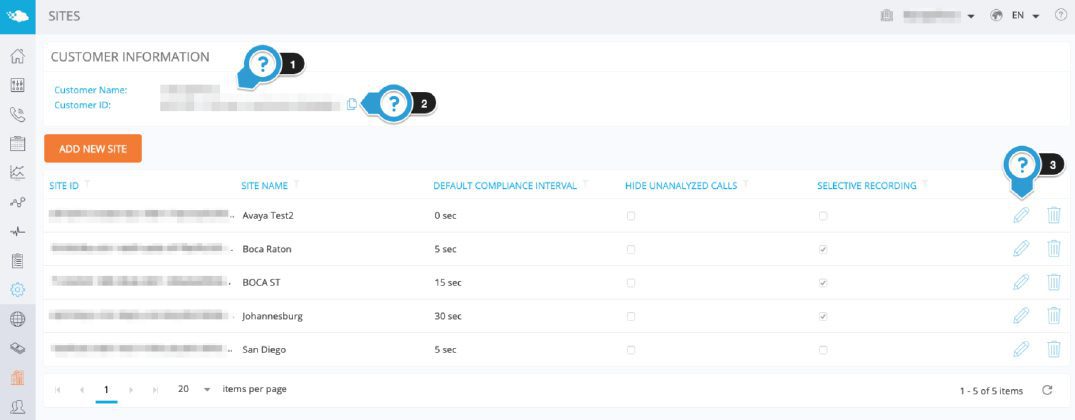
The “Site Settings” page is important in that it displays both the “Customer ID” and “Site ID” that you will need to provide in order to begin uploading calls into Atmos. These values will either be requested by your service provider OR will need to be inserted into the Atmos recorder that you are using. You are able to add multiple sites to your Atmos account, therefore allowing support for calls from multiple locations or services. The points below correspond to the numbered arrows above.
- “Customer Name” – Displays the company that a user is currently logged in to.
- “Customer ID” – This is the ID used to identify the Atmos account a user is currently logged in to.
- Users are able to edit and delete the “Site” by using the buttons displayed.
User Settings
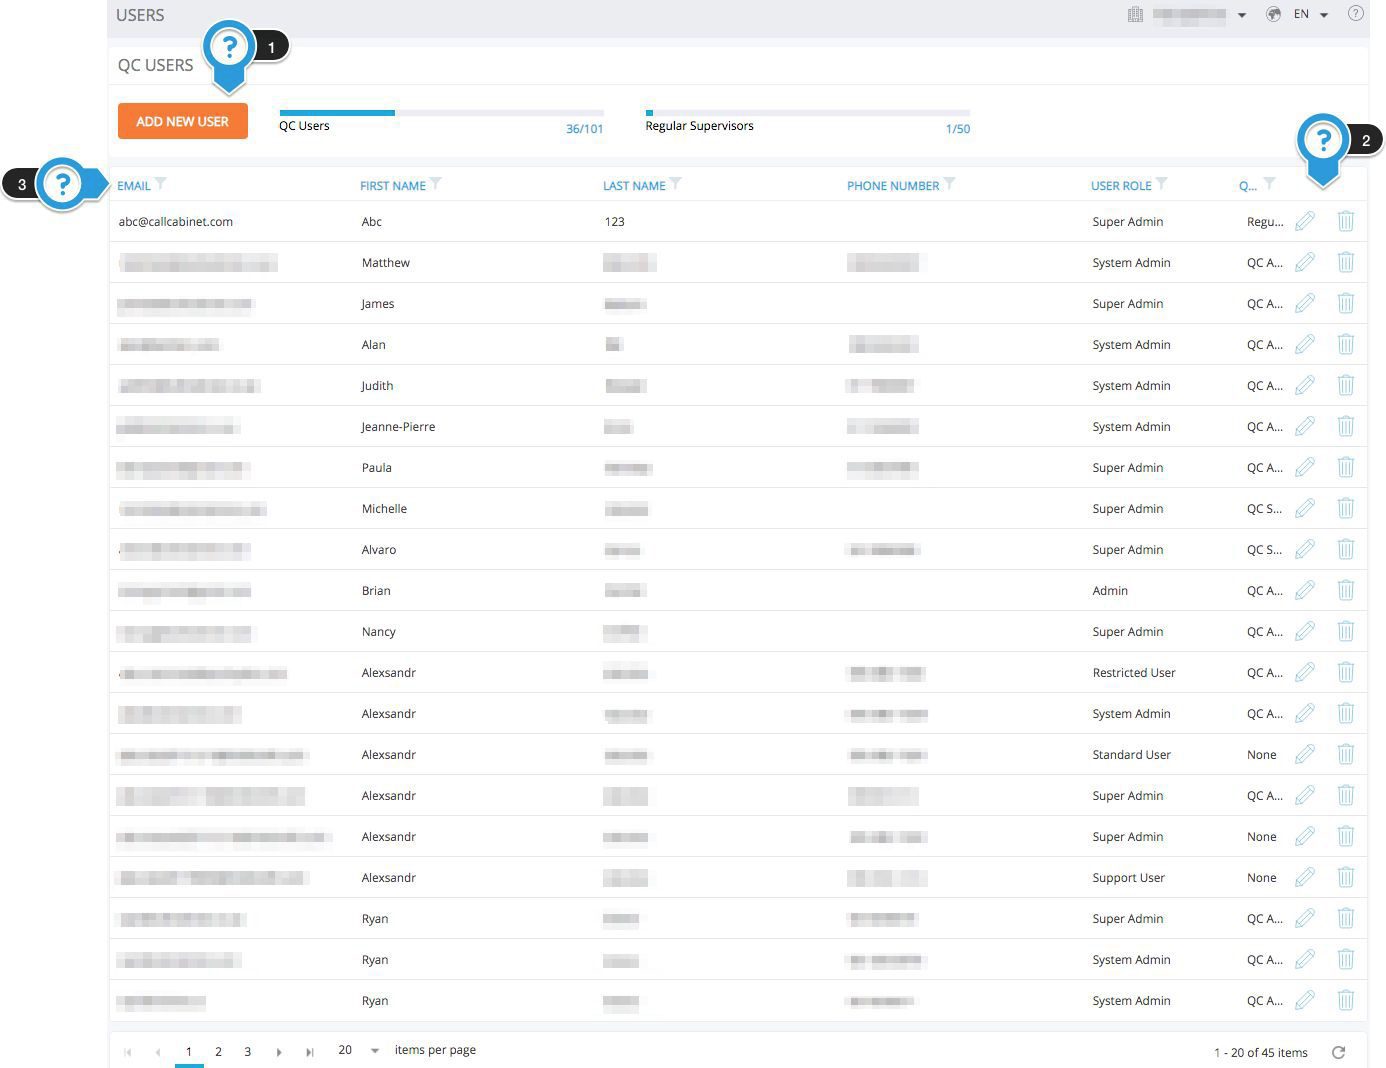
The “User Settings” page allows users to add, edit and delete users (people with access to the Atmos interface). The points below correspond to the numbered arrows above.
- “Add New User” – Use this to create new users. Below you will find a brief description of the different User and QC User Roles and their permissions.
- Use these buttons to edit and delete users from the system.
- The “User Grid” shows the following information for each user: “Email”, “First Name”, “Last Name”, “Phone Number”, “User Role” and “QC Role”. Each of these columns can be sorted and filtered as with the rest of the Atmos system.
NOTE:
There are 3 QC user roles:
- QC Supervisor – This user type has access to the QC section of the “Call Listing” page, they are able to score and view all QC related functions as they relate to the specific call.
- QC Analyst – This user type has the same access as the QC supervisor with the addition of creating and running reports.
- QC Admin – This user type has the same access as the QC Analyst with the addition of being able to make changes to the QC templates.
There are 5 user roles:
- Restricted User – This user type has the ability to login to Atmos and search \ playback calls associated with specific Agents, Groups, and Sites. By default, this user type has no access to any calls.
- Support User – This user type is specifically for support purposes and should not be used in normal operation. Support users have no access to any calls.
- Standard User – This user type has full access to playback and can search through all Calls, but has no access to the Admin pages.
- Admin – An Admin user has full access to the entire Atmos application with the exception of the Company Information and Billing pages.
- Super Admin – A Super Admin user has full access to the entire application and all calls.
Restricted Users (Granular Security)

The “Restricted Users” tab allows users to add granular security access for all restricted users. Once a user has been set up as a “Restricted User”, they will appear in this list.
- By clicking on the “Assign Agent”, “Assign Groups” and “Assign Sites” buttons users are able to select which agents this user will be able to listen to. By default, a restricted user does not have access to playback any of the calls in the system. You can restrict user access to specific Sites, Agent Groups, and Agents.
Agent Settings
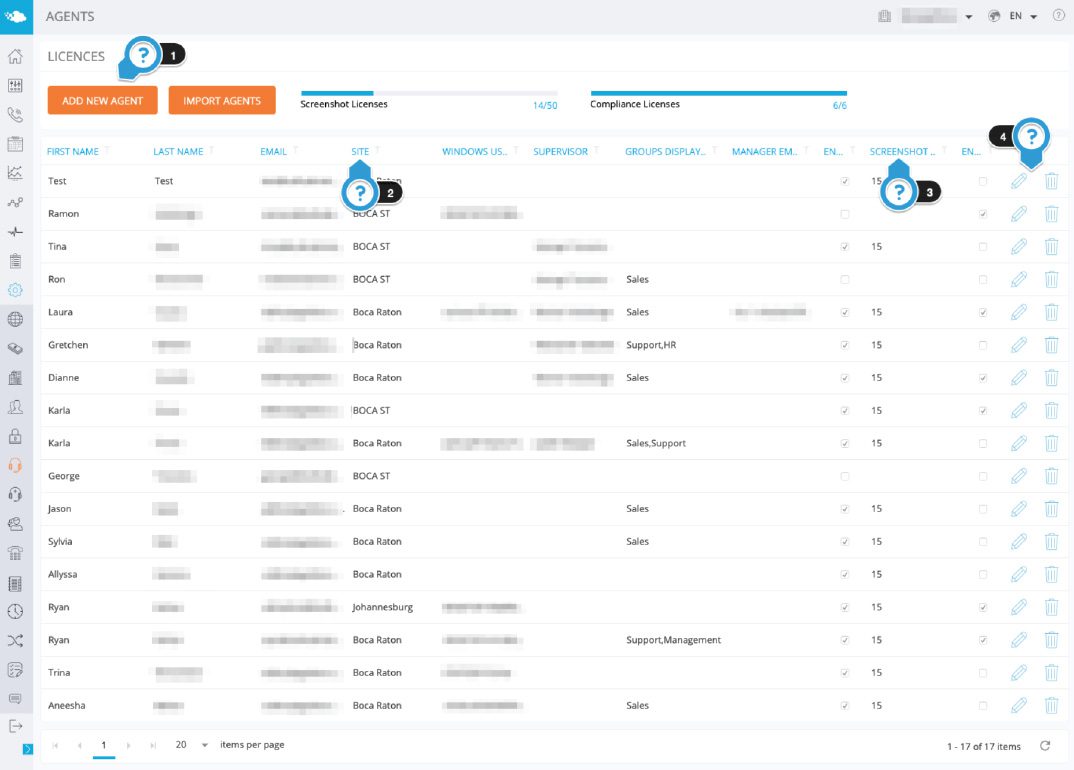
The Agent Settings page allows users to add, edit and delete agents (people whose phone calls you are recording). The points below correspond to the numbered arrows above.
- “Add New Agent” – use this button to add new agents to your Atmos account.
- The Agent grid shows the following information for each user: “First Name”, “Last Name”, “Email”, and “Site” for each of these users. Each of these columns can be sorted and filtered as with the rest of the Atmos system.
- “Screenshot” is an additional option with our Atmos optional add-on licenses. (Helps provide a 360-degree view, along with the voice recording to see the entire customer experience.)
- Use the “Edit” and “Delete” icons to edit agent information, enable screenshots and set intervals, enable PCI DSS Call Masking (Requires additional license,) and delete agents from the system.
Assign Agents
This page is not used for Atmos Call Recording for Microsoft Teams.
Groups
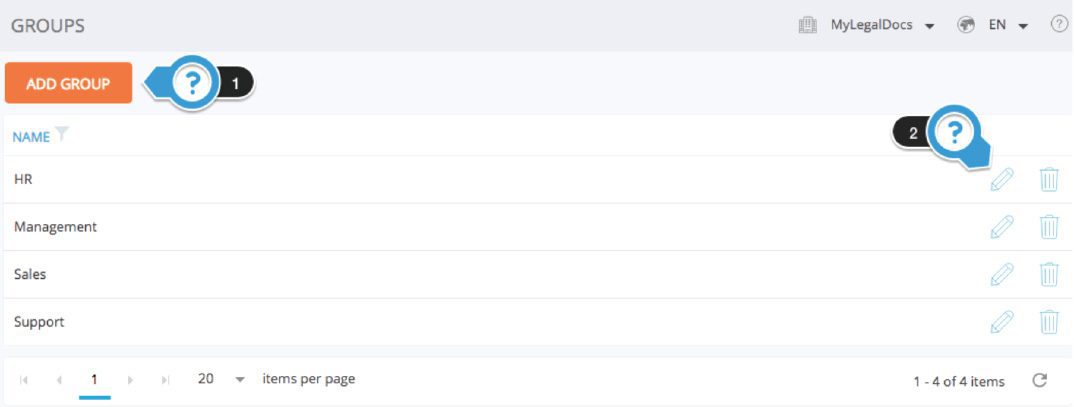
Groups can be used to control which agents / recordings can be viewed by Restricted Users. The points below correspond to the numbered arrows above.
- "Add Group” can be used to create groups and/or categorize agents into groups. You can have multiple agents placed into multiple different groups.
- Use these icons to edit and delete groups.
Extension Settings
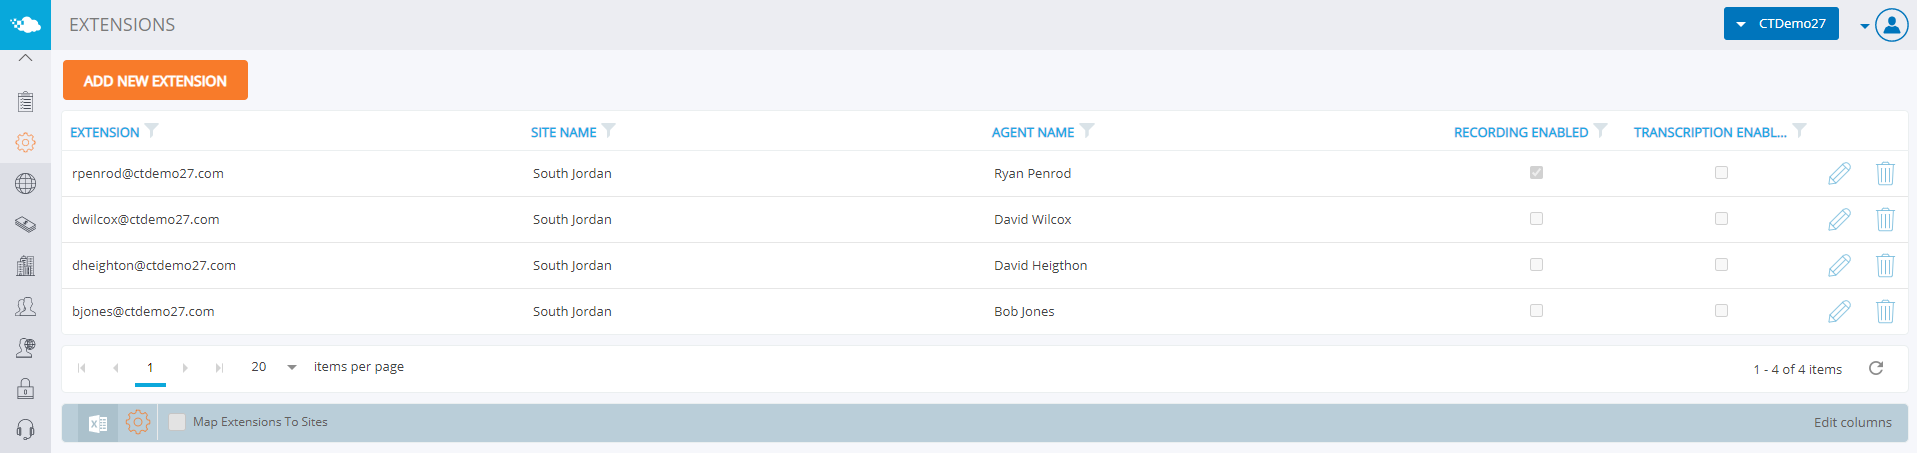
The “Extension Settings” page allows users to add, edit and delete physical extensions (devices or phones that you are recording).
- “Add New Extension” – use this button to add new extensions to your Atmos account. For Microsoft Teams, the Extension field would be the email address associated with the Teams account. For CT Cloud Voice, the user's 10 digit telephone number is used. NOTE: An agent can have multiple extensions and both a Teams and CT Cloud Voice extension can be associated with the same agent.
- The Extension grid shows the following information for each extension: “Extension” (Extension Number) and “Site Name”. Each of these columns can be sorted and filtered as with the rest of the Atmos system.
- Use these buttons to edit and delete extensions from the system.
- “Recording Enabled” – This area is used to enable specific extensions for recording. When the box is “checked” recording is enabled. By default, this setting is enabled and cannot be changed per agent. This can be adjusted with the "Enable Selective Recording" option in Site Settings, but this is not recomemnded.
- “Transcription Enabled” – This area is used to enable specific extensions for transcription. When the box is “checked” transcription is enabled. Recording transcription requires additional licensing.
Phonebook

The points below correspond to the numbered arrows above.
- The “Add New Phone Book” feature allows users to create custom contacts and associate a phone number to first name/last name that will be presented instead of the number on the call listing and call info screens.
- Click here to edit or delete contacts that have been created.
Retention
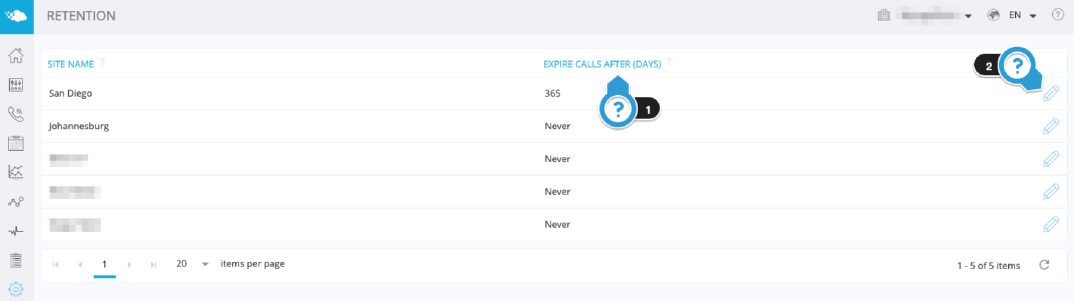
The points below correspond to the numbered arrows above.
- The retention policy that has been assigned per site, calls older than the number of days listed for that site will be automatically deleted.
- Users can use the edit button to change the retention settings for each site. Also, users have the ability to set the number of days of retention or flag it as “Never Expire”.
QC Randomizer
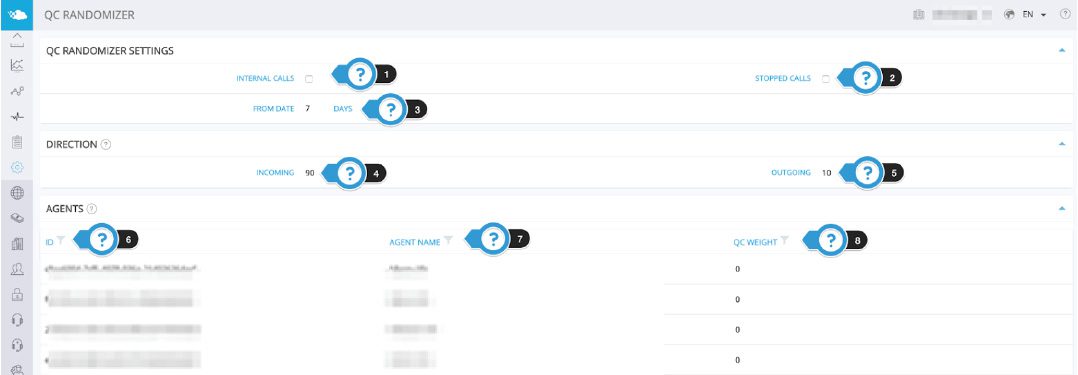
The “QC Randomizer” allows the QC Supervisor to build lists of calls to score. The Supervisor selects specific options for Atmos to sort and build a QC list for scoring. The list is displayed in the QC Dashboard.
- Internal Calls – If this box is selected the QC list will include internal calls.
- Stopped Calls – If this box is selected the QC list will include calls where the recording was stopped.
- From Date – Allows the Supervisor to select from how many days past to build the QC list.
- Incoming – Allows the Supervisor to select a weighting of calls (ie: 90 = 90% of the calls will be incoming calls)
- Outgoing – Allows the Supervisor to select a weighting of calls (ie: 10 = 10% of the calls will be outgoing calls)
- Filter by Agent ID – Supervisor can filter calls based on Agent ID to find specific agents.
- Filter by Agent Name – Supervisor can filter calls based on Agent Name to find specific agents.
- QC Weight – Allows the Supervisor to assign a specific weight to a specific agent based on either Agent ID or Agent Name. By doing this, the selected percentage of calls from that specific agent will be included in the QC Scoring List.
IP Whitelist
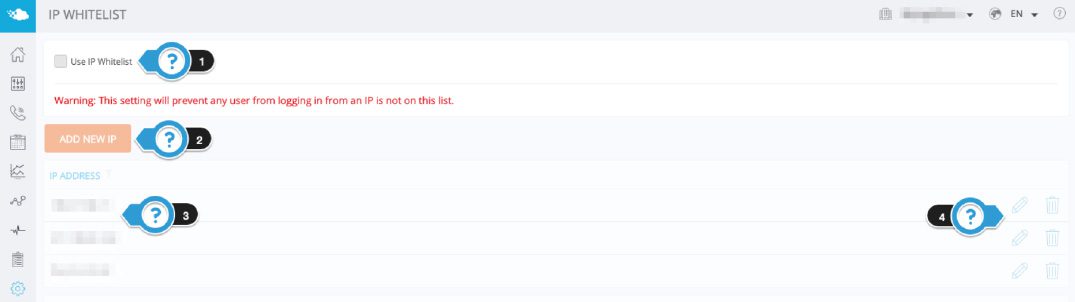
The points below correspond to the numbered arrows above.
- When this feature is enabled/clicked, it allows users to only login from IPs in the list.
- This button allows users to “Add a new IP Address”.
- This is a list of all the whitelisted IP addresses.
- Use these buttons to assign or remove an IP Address from the Atmos system.
Tags

The Tags page allows Supervisors to create preconfigured tags that can be added to calls. Searches can be filtered by tag, allowing the Supervisor to more quickly locate specific calls.