Configuring and Signing into the VVX 500/600 Phone
Connecting a Polycom VVX phone to CallTower Skype for Business
Note: CallTower supports and this document details the configuration of the following Polycom VVX models only: 300, 310, 400, 410, 500, 600
*The 300 and 400 models are identical to the 310 and 410 models except the integrated Ethernet switch port on the back of the phone is 100MB instead of 1GB which means the PC plugged into the phone would be limited to a 100MB connection to the network
Prerequisites
To complete the provisioning steps in this document, you will need the following:
- Power for the telephone, either via a power brick or by connecting the phone’s Ethernet jack to a Power over Ethernet-enabled switch port
- Access to an Internet connection on the local network.
Power and Connect the Phone
- If using a power brick to power the phone, connect the power cable to the back of the phone and to a standard power outlet.
- Connect one Ethernet cable to the phone’s LAN jack and to an available Ethernet jack. If you are using PoE to power the phone, the Ethernet jack must connect to a PoE switch.
- Connect a second Ethernet cable to the phone’s PC jack and to the Windows PC that will be used for configuring the phone.
- The phone will power up automatically once power has been provided.
Adding the phone to the provisioning server
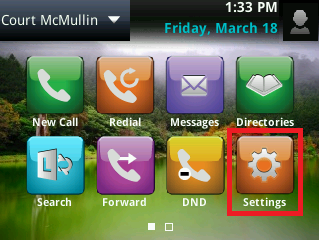
- Select the “Settings” button from the main menu.
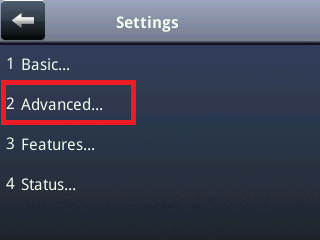
- Select the “Advanced…” option from the settings menu (normally option 2).
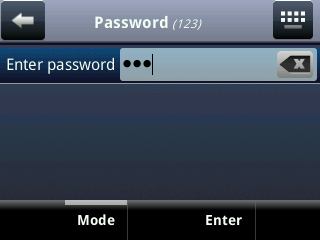
- After selecting the option for advanced settings it will prompt you to enter a password. Enter the admin password for the phone. If the password is unknown, then a factory reset will be necessary to reset it to the default 456. (If 456 doesn’t work, try 654. If the password of 654 works, then the phone is already pointed to our provisioning server and you may skip to the next section on page 4 “Logging into the phone”)
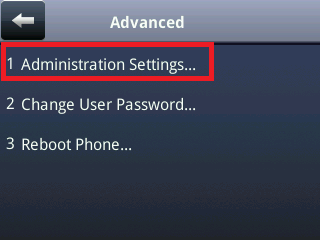
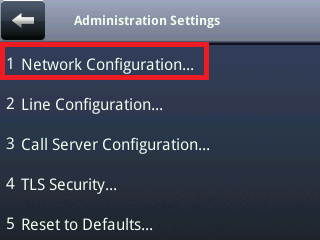
- From the advanced settings menu, select the option for “Administration Settings” (normally option 1).
- In the administration settings, select the option for “Network Configuration…”
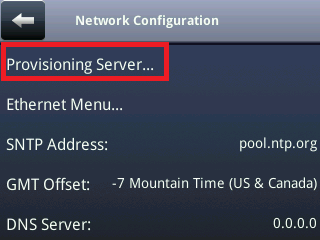
- Select the option for “Provisioning Server…” from the administration settings.
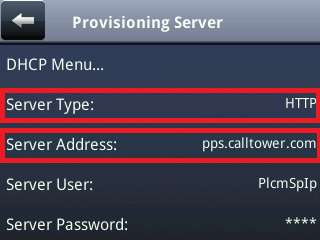
- To add the phone to the server, select the option for “Server Type:” and choose “HTTP”. Then in the field for “Server Address:” input “pps.calltower.com”. The rest of the settings can be left as they are and do not need to match the image below.
Logging into the phone
- If the phone is on version 5.4.0 or higher, there should be an option on the bottom left of the main screen to “Sign In”. If this option does not appear the steps below will guide you through the sign in process.

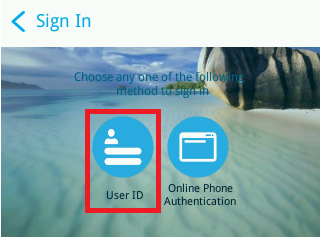
- A new screen will appear asking which sign in method you would like to use. Select the option for “User ID”.
- Enter your Skype for Business credentials using either the phone’s dial-pad or on-screen keyboard (if available) and press “Sign In”. You will only need to enter in the “Sign-in Address”, “User”, and “Password” fields. You may leave the “Domain” blank.
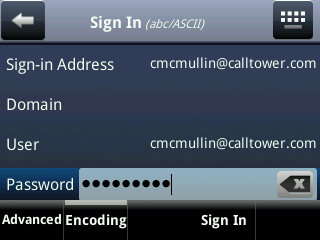
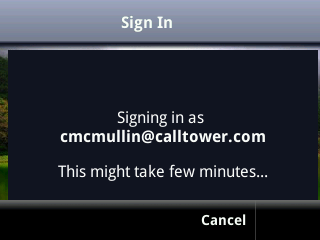
- After pressing “Sign In”. You will see the image below.
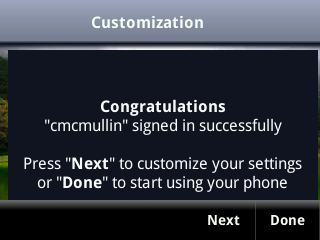
- If the sign-in was successful, you will see the image below and you may proceed to either further customize your setup (setting Time Zone, Format, & Date) or press “Done”.
Logging into the phone using additional methods
Logging in from the phone menus
- Press the Home button.
- Select Settings.
- Select option 3 Features.
- Select option 4 Microsoft Lync.
- Select option 1 User Credentials.
- For the Sign-in Address, enter your Lync username (ie username@company.com).
- Select User and enter your Lync username.
- Select Password and enter your password.
- The rest of the fields can be left blank.
- Select Sign In.
Configure the Phone via the Polycom Web Configuration Utility
Find the IP address of the Telephone
- Press the Home button.
- Select Settings.
- Select option 4 Status.
- Select option 2 Network.
- Select option 1 TCP/IP Parameters.
- Note the IP address listed on the second line as you’ll need it for the configuration steps below.
Connect to the Polycom Web Configuration Utility
- Launch a web browser on the Windows computer attached to the telephone.
- Enter the IP address of the telephone (see the section above to determine the phone’s IP address) in the URL bar.
- On the login page, select the Admin button and enter 456 as the password. Click Submit.
Note: If the phone has been added to our provisioning server at some point in time the default admin password may be 654.
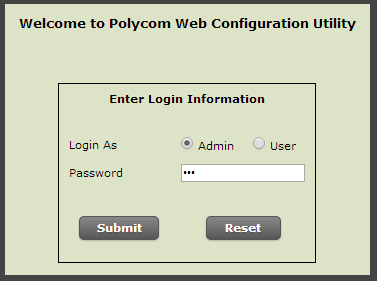
Logging in using the Web Interface
Browse to the phone’s IP address and login to the Web Interface.
- Under the Settings section, select Lync SignIn
- The Authentication Type should read Login Credentials
- For the Sign-in Address, enter your Lync username (i.e. username@company.com).
- Select User Name and enter your Lync username.
- Select Password and enter your password.
- The rest of the fields can be left blank.
- Select Sign In.
Logging in using BToE (if customer is using BToE)
Prerequisites
- A Windows computer with the Skype for Business client installed and administrator privileges on the computer (for installation of the Polycom BToE software)
Note to Macintosh users: You can use this document to configure a VVX phone for use with your Lync account. Because Polycom does not make BToE software for the Macintosh, you will not be able to control the phone from your Lync client on your computer and should skip the BToE section at the end of this document.
Install Polycom BToE (Better Together over Ethernet) on your Computer
- Visit the following Polycom Web Site by clicking here and download the Polycom BToE Connector for your version of Windows (32 bit or 64 bit).
- Launch the BToE Connector installer.
- Accept all the defaults and when the installation is complete and you are prompted to reboot your computer, click Finish and reboot.
Use the BToE Connector to Pair your Phone to your Computer
- Confirm that your computer’s Ethernet cable is plugged into the PC port on the back of the phone. BToE requires that computer is tether to the phone to operate.
- On your computer, launch the Skype for Business client.
- On your computer, launch the BToE Connector that you installed earlier. A BToE icon will now appear on the system tray at the bottom right side of your screen.
- If you entered your Skype for Business credentials on the phone earlier, you are done. If you did not enter your Skype for Business credentials on the phone earlier, the Lync client will now pop-up an authentication window asking for the proper Lync credentials for the telephone.
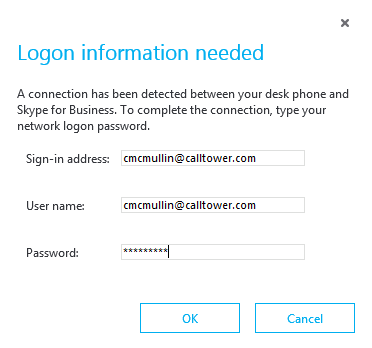
- In the Sign-in address box, enter your Skype for Business username (i.e. username@company.com). In the User name box, enter your Skype for Business username
- Because BToE was already enabled on your phone and the Skype for Business client is running, the BToE Connector will pair with your phone automatically.
- You can review the status of the BToE Connector on your PC by right-clicking the icon in the system tray and selecting BToE Status. You can review the status from the phone by selecting the BTOE option on the main screen.
At this point the phone is connected to your Skype for Business account and can be used to send and receive calls. The remaining configuration steps below enable the Better Together over Ethernet (BToE) feature which allows you to control the telephone with the Skype for Business client on your Windows PC.
