Microsoft - Skype: Log in to Polycom VVX series phones
Goal:
Provide instruction on how to log into a VVX series phone when using CallTower's Hosted Skype for Business Platform
How do I log into a Polycom VVX Series Phone?
The VVX series phones require authentication with your Skype for Business and Exchange credentials in order to connect the device. There are several options on how to log into the device. Each option is listed below with its corresponding benefits and limitations.
Note: VVX phones can store 1 set of credentials. If you receive a warning that Exchange Authentication failed, make certain the passwords match
Use the phone interface for login
Benefits
- No additional software is required
- The device will sign-in independently of a computer and does not require a Windows OS
- Works for customers using Mac Computers
Limitations
- If the device loses connectivity re-entering credentials may be required
- When a password changes on either Skype for Business or Exchange a reboot of the phone is required and credentials are required to sign-in
- Entering credentials using the number keypad can be cumbersome and would be required each time a sign-in is necessary
Sign in via the Polycom Web Utility
Benefits
- Credentials and password can be entered using your computer
- No additional software is required
- The device will sign-in independently of a computer and does not require a Windows OS
- Works for customers using Mac Computers
Limitations
- If the device loses connectivity re-entering credentials may be required
- The steps for initial sign-in are repeated
- If the device loses connectivity
- When a password changes on either Skype for Business or Exchange a reboot of the phone is required and credentials are required to sign-in
Utilize BToE (Better Together over Ethernet) Software
Benefits
- Credentials and password can be entered using your computer
- The Skype for Business Client on the PC can interact with the device and transfer active calls to the device
- If the device loses network connectivity or a password change occurs, credentials are automatically updated via the Skype for Business Client's credentials
Limitations
- Additional software is needed to be installed (administrator credentials may be required to install/operate software)
- Requires the device to be "daisy chained" to the computer
- The device may lose pairing to the computer client requiring additional steps to re-pair the device
- The device will not run independently of a Windows computer for sign-in and integrated functionality
- Will not work on Mac computers
Sign in via the phone interface
- Press the Home button.
- Select Settings.
- Select option 3 Features.
- Select option 4 Microsoft Lync.
- Select option 1 User Credentials.
- For the Sign-in Address, enter your Lync username (ie username@company.com).
- Select User and enter your Lync username.
- Select Password and enter your password.
- The rest of the fields can be left blank.
- Select Sign In.
Key Pad & Special Character Cheat Sheet
1 - ! | ' ^ \ @ : 1
2 - A B C 2
3 - D E F 3
4 - G H I 4
5 - J K L 5
6 - M N O 6
7 - P Q R S 7
8 - T U V 8
9 - W X Y Z 9
* - . * - & % + ; ( )
0 - / , _ $ ~ = ? 0
# - > < { } [ ] " `
To switch between capital and lower case letters you will use the button labeled "encoding".
Sign-in via the Polycom Web Configuration Utility
Find the IP address of the Telephone
- Press the Home button.
- Select Settings.
- Select option 4 Status.
- Select option 2 Network.
- Select option 1 TCP/IP Parameters.
- Note the IP address listed on the second line as you’ll need it for the configuration steps below.
Connect to the Polycom Web Configuration Utility
- Launch a web browser on the Windows computer attached to the telephone.
- Enter the IP address of the telephone (see the section above to determine the phone’s IP address) as a secure sign (https://)
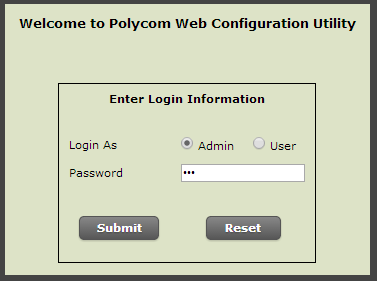
- On the login page, select the Admin button and enter 654 as the password (default).
- Click Submit.
Logging in using the Web Interface
- Under the Settings section, select Lync Sign-in
- The Authentication Type should read Login Credentials
- For the Sign-in Address, enter your Lync username (i.e. username@company.com)
- Select User Name and enter your Lync username (same as step 3)
- Select Password and enter your password
- The rest of the fields can be left blank
- Select Sign In
Logging in using BToE (if customer is using BToE)
Prerequisites
- A Windows computer with the Skype for Business client installed and administrator privileges on the computer (for installation of the Polycom BToE software)
Install Polycom BToE (Better Together over Ethernet) on your Computer
- Visit the following Polycom Web Site:http://support.polycom.com/PolycomSe...e_release.html and download the Polycom BToE Connector for your version of Windows (32 bit or 64 bit).
- Launch the BToE Connector installer.
- Accept all of the defaults and when the installation is complete and you are prompted to reboot your computer, click Finish and reboot.
Use the BToE Connector to Pair your Phone to your Computer
- Confirm that your computer’s Ethernet cable is plugged into the PC port on the back of the phone. BToE requires that computer is tether to the phone to operate.
- On your computer, launch the Skype for Business client.
- On your computer, launch the BToE Connector that you installed earlier. A BToE icon will now appear on the system tray at the bottom right side of your screen.
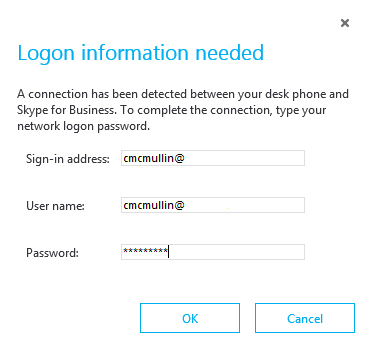
- If you entered your Skype for Business credentials on the phone earlier, you are done. If you did not enter your Skype for Business credentials on the phone earlier, the Lync client will now pop-up an authentication window asking for the proper Lync credentials for the telephone.
- In the Sign-in address box, enter your Skype for Business username (i.e. username@company.com). In the User name box, enter your Skype for Business username
- Because BToE was already enabled on your phone and the Skype for Business client is running, the BToE Connector will pair with your phone automatically.
- You can review the status of the BToE Connector on your PC by right-clicking the icon in the system tray and selecting BToE Status. You can review the status from the phone by selecting the BTOE option on the main screen.
At this point the phone is connected to your Skype for Business account and can be used to send and receive calls. The remaining configuration steps below enable the Better Together over Ethernet (BToE) feature which allows you to control the telephone with the Skype for Business client on your Windows PC.