Unite For Teams - User Guide
Summary
The Unite for Teams software is supplied as an Internet download. It is a self-contained installer that contains the files needed to install a copy of Unite for Teams. Please note that Unite for Teams used the Microsoft Compliance Recording API. Users can only have a single Compliance Recording policy assigned, so individual users can have either Unite for Teams or compliance recording enabled, but not both.
Before you start
Please check you have the following:
• A suitable computer for installation of the client software (please check minimum requirements)
• A valid Access Code and user login credentials for Unite for Teams supplied by your Service Provider
Access Code
After completing the software installation process and depending upon the software configuration, Unite for Teams may present the Access Code input window on the first launch. A valid access code supplied by your service provider is required to proceed to user login. The Access Code is only required on the first launch of the Unite for Teams client and may have been entered during installation, in which case this window will not appear, and the user Login will display.

A shortcut is also placed in the Windows Start Menu program list to return to this step if required.

Mass Deployment
Unite for Teams can be installed on the user desktop in silent mode using the command format:
IntegratorInstaller-4.2.0.2050.exe /quiet
After silent installation, the Setup Access Code shortcut is created, but Unite for Teams will not automatically start up.
Welcome and Login
At the User login window, enter a valid username and password, as supplied by your service provider and click the "Log in" button:

Select "Advanced" for more connection options.

Advanced Options
Access Code Reset
To modify the Access Code, click "Reset" and enter the new Access Code.

NOTE: this should only be performed on the guidance of your service provider.
Options
Select "Use proxy" only if required and instructed to by your service provider:

Tray menu
Unite for Teams runs as a system tray program, displayed as a purple swirl. To open the Tray menu to access tools and settings, right-click the Unite for Teams icon in the
system tray.

Icon Definitions
- Home: Return to the main Tray mode menu

- Exit: Log out or Exit Unite for Teams

To keep the Unite for Teams tray icon visible, drag and drop the icon to the taskbar:

Preview window
The Preview window presents an unobtrusive pop-up notification and information summary when a call is made or received. It also offers actions such as open contact data or writes to the activity log, depending on user and integration configuration:

The Preview window is hidden after 10 seconds by default (this can be changed in Configuration > Interface). Hover the mouse over the Unite for Teams status indicator icon to display the Preview window again.
Positioning
The preview window can be re-positioned to snap to any quarter of the screen. Drag the preview window by the header and drop into the desired quadrant:

*Note: The preview window will snap to a fixed position in one-quarter of the screen.
Preview information
The Preview window can display the contact name, company name, telephone number, and location (if available) along with additional notes, all retrieved from any integrated address book or business CRM integration.

The Preview window provides both call control action buttons as well as contact or CRM integration action buttons.
Actions
The following actions and controls are available from the Preview window when a call is in progress, depending on the address book or business CRM integrations available:


Add Contact
Add the caller to an integrated CRM business application
Open/Pop Contact
Open the full contact details within an integrated CRM business application. The icon shown will relate to the CRM application (e.g. Google, Salesforce).
Create and Show Call Task
Creates and opens a call activity (call log) in an integrated CRM business application. The icon shown will relate to the CRM application (e.g. Salesforce, Dynamics) and also the type of entry: Contact, Account or Lead.
Note: The hold button is not utilized for transferring calls.
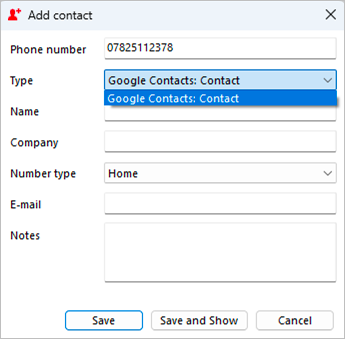
Add Contact 
When the call Preview Window displays a call that is not yet found in any integrated address book (or is found in some but not all integrated address books), the Add Contact icon is displayed. This offers a quick method to insert the contact details into multiple locations.
Entry not found in any address book:
Entry found in all address books except Salesforce:

Select which integrated address book "Type" to add the contact into and either "Save" or "Save and Edit" to also open the contact within the selected address book. The stored details are then used to add to the next selected address book, "Type," to quickly duplicate the contact record into multiple locations.
Multiple calls
When multiple parties or calls are in progress, the Preview window will "stack" each call with the currently active call initially at the front:

Clicking on the window header will bring an inactive Preview window to the front and into view.
Note: Selecting another Preview window does not affect the connected call status.
Close Window
Select "x" to close the preview window:

Note: Closing the preview window does not end the call
Address book search
Enter a contact name, company name or telephone number to search for, then click "Go". Tray Mode Address Book Search

Matching entries are displayed from any integrated CRM business application or the Telephone system User list.
Hovering over the displayed results will present a slide out menu offering click to dial, or click to "Show Contact" (in Edit mode, if authorized).
Advanced Search
Select the Advanced search option to use more specific filters or search on alternative contact details such as contact notes or address details, if supported by the source address book:

New Contact
Select "New contact" to add a new entry to CRM Integration:

Fill in the contact details and select "Save":

Dial / Search
At any time other than searching Help, the Tray menu "Search" bar can be used to Dial any number or search for a contact name within any integrated address book.

Dialing
To make a call, simply type the number to dial and hit Enter:

In Microsoft Teams the following prompt will appear. Click Call

Contact Searching
Contacts can be found by entering characters from the contact name (first, middle, last etc.), company or telephone number.
Any matching contact will be displayed – simply click the number to dial, or hover over the contact and use the slide out toolbar to open the contact within the integrated CRM application.
Hovering over a User entry will open the slide out toolbar offering the option to call or open the contact.

Exit / Session

Use the Exit / Session button to log in as a different user or Exit and close Unite for Teams.

Search and Call for Microsoft Teams Organization Level Install
This method requires administrator level access, and uses a PowerShell script to install Search and Call within the Teams App Store across the organization. Users can then download Search and Call when they click on Apps.
What does the PowerShell Script do
The PowerShell scripts contains 3 commands, or cmdlet's, that do the following:
1. Connect-MicrosoftTeams – this cmdlet will ask the user to sign in using their Microsoft Teams
credentials via the standard Microsoft Teams login process. The credentials used must belong to
someone who has administrator level access to the Microsoft Teams environment for the organization.
2. New-TeamsApp -DistributionMethod organization -Path
C:\Temp\GoIntegratorSearchandCall-1.0.23.zip – this cmdlet will install the Search and Call app in
the Teams App Store for the organization. Change the file location for the -Path parameter to be
the path where you saved the zip file.
3. Disconnect-MicrosoftTeams – this cmdlet disconnects the user from the Microsoft Teams
environment.

How to use the PowerShell script
1. Download the PowerShell script from here: Download
2. Download the Search and Call for Microsoft Teams file: Download
3. Save the provided zip file at a suitable file location that will be accessible from the
PowerShell environment.
4. Save the provided PowerShell file at the same location. Ensure that the path has been changed to
the correct path to the zip file
5. Open Windows PowerShell in Administrator mode.
6. Change File Location to the directory containing the PowerShell script
7. Type in the first few letters of the script filename and press tab. This should populate the
full name of the script in PowerShell.
8. Press Return
9. The script will then run, presenting the user with a login screen for Microsoft Teams
10. Once logged in, the script will create the App in the tenant app store under a heading on Built
for your org
User Instructions following PowerShell Script
1. Click on "Apps" at the bottom of the Microsoft Teams Menu
2. Search and Call for Microsoft Teams will be displayed under "Built for your org"
3. Click on Search and Call for Microsoft Teams, which will display a new screen
4. Click "Add". Search and Call for Microsoft Teams will now install
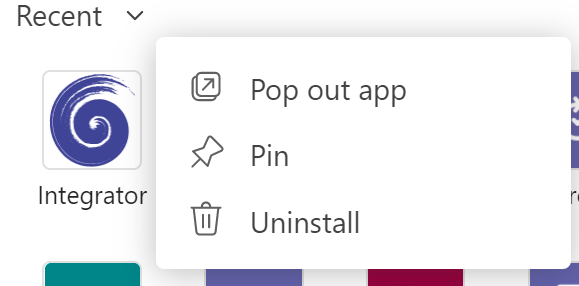
Pinning to App Bar in Microsoft Teams
Search and Call for Microsoft Teams may not immediately appear on the App Bar
1. To pin the app, click on the 3 dots which will bring up a sub menu
2. Right click on Search and Call, and click "Pin"

Uninstalling from Microsoft Teams
To uninstall Search and Call for Microsoft Teams, right-click on the Integrator pin and click uninstall.

Using Search and Call for Microsoft Teams
Unite for Teams client should be installed and running for Search and Call for Microsoft Teams to work.
Searching for Contacts
• To access Search and Call for Microsoft Teams, click on the Pin labeled 'Integrator' on the App
Bar.

• A user can search for a contact using a contact name, company name or telephone number. This is
done by typing one of these either fully or partially in the search for contacts field and pressing
search.
• Results will be displayed from any connected CRM and internal directories.

Display Contact
• By clicking on the icon to the right of the displayed contact name, a user can pop the contact
record from their CRM.

Making a call
• To make a call, click on the phone number from the search results. This will initiate a call within Microsoft Teams. The following prompt will appear - Click Call.

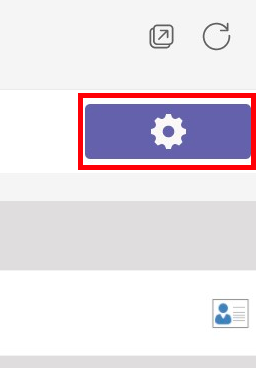
Access Unite for Teams Settings
• Clicking on the settings icon on the top right of the Teams display will display the settings page from Unite for Teams.
Search and Call for Microsoft Teams User Level Install

1. Download the Search and Call for Microsoft Teams file and store it locally: Download.
2. Click on "Apps" at the bottom of the Microsoft Teams Menu.
3. Click "Manage your apps" at the bottom.
4. Click "Upload a custom app", and then "Upload and Custom app". This displays a file menu where you can select Search and Call for Microsoft Teams from the location it was saved in. Click Open.

5. A new search will appear, click add.
Pinning to App Bar in Microsoft Teams
Search and Call for Microsoft Teams may not immediately appear on the App Bar
1. To pin the app, click on the 3 dots which will bring up a sub menu

2. Right click on Search and Call, and click "Pin"
Uninstalling from Microsoft Teams
To uninstall Search and Call for Microsoft Teams, right click on the Integrator pin and click
uninstall.

Configuration
User-defined settings are available within "Configuration" and are grouped into 2 areas: General and Integrations, with support information available via the "About" section.
Note: The parameters available may also vary depending on centrally managed configuration settings.

Configuration > Dialing
Manage outbound calling methods:

Dialing
Select the preferred method(s) for making outbound calls:

Note: Different dialing methods are offered for varying application types. Not all applications will support all dialing types.
Clipboard Dialing
Enables quick dialing by selecting telephone numbers and copying, either by key sequence or mouse click:

After the number is copied to the clipboard, a dial prompt notification appears in the corner of the screen.
Click the call button to initiate the outgoing call:

The pop-up prompt appears in the same location as the Preview Window – drag to a different corner to change where the notification appears
Focus Dialing
Presents a dial icon within compatible applications for any field in focus containing a telephone number:

Click the dial icon to initiate the outgoing call:

Note: The field must first be selected or in "focus" for the dial icon to appear, and the telephone number must be in a valid format
Application Dialing
Presents a dial icon within compatible applications by hovering the cursor over a valid telephone
number.

Click the dial icon to initiate the outgoing call
Note: Application dialing requires configuration using the Application Dialing Wizard, as follows.
Select "Add" to open the Application Dialing Wizard:

With the desired application open, drag the target to the appropriate field:

With the target on the telephone number field, the application details and green check will appear:


Applications configured using the dialing wizard are displayed in the dialing menu:

ScreenRead dialing
Enables any valid telephone number, detected through image analysis, to be dialed:

Move the mouse cursor over the telephone number you wish to dial and hold CTRL-SHIFT. The orange detection box appears and attempts to detect a valid telephone number. If the number is successfully detected, the telephone number will be converted to a Click-to-dial field – just click to initiate the outgoing call.
Note: Telephone numbers are not always detectable within images due to font style, alignment or image clarity.
Dialing Helpers
Select a Browser extension or enable traditional telephony dialing interfaces:

Browser Extention
Web dialing enables Click to Dial of detected telephone numbers directly from a web browser:

Select a web browser extension to install from the drop-down list:

Edge
Select Edge from the list of Dialing helpers in the configuration. The default Windows browser will open from this action. It is recommended to set Edge as the default Windows browser.
Select "Get":

Select "Add extension"

A confirmation will appear:
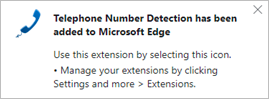
The extension is enabled by default (green):

The extension can be disabled by selecting it (red):

Opera
Select Opera from the list of Dialing helpers in the configuration. The default Windows browser will open from this action. It is recommended to set Opera as the default Windows browser. Select "Add to Opera":

A confirmation will appear:

The extension is enabled by default (green):

The extension can be disabled by selecting it (red):

Chrome
Select Chrome from the list of Dialing helpers in the configuration. The default Windows browser will open from this action. It is recommended to set Chrome as the default Windows browser.
Select "Add to Chrome":

Select "Add extension":

A confirmation will appear:
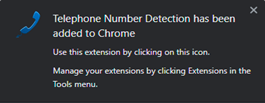
Select "Always allow" upon initial use to remember these settings:

The extension is enabled by default (green):

The extension can be disabled by selecting it (red):

Firefox
Select Firefox from the list of Dialing helpers in the configuration. The default Windows browser will open from this action. It is recommended to set Firefox as the default Windows browser.
Select "Add to Firefox":

Select "Add": Select "Okay, Got It" to confirm:


The extension is enabled by default (green):

The extension can be disabled by selecting it (red):

Traditional Telephony Drivers
Enable TAPI driver (dial only), "CallTo" protocol handler, or TAPI request handler:
Note: Refer to the manual of your TAPI-enabled application to configure dialing.

Configuration > Interface
The most common user-defined parameters are within the "Interface" settings.

Preview window
Controls the behavior of the Preview Window.

By default, the Preview Window is used to present incoming and outgoing call information and controls.
The main Preview Window is designed to be as unobtrusive as possible, so it will automatically hide once a call is answered and in progress. Hovering over the Tray icon will bring the Preview Window back into view during a call.
The default hide delay is 10 seconds but can be increased or disabled (set to "infinite") to keep the Preview window is permanently in view for the duration
The Preview Window will display in front of other windows but without taking focus from the current
application in use. When "Always on top" is enabled the Preview Window will remain in view whilst
continuing to work on the current application.

Actions
Depending on the address book location, matching contacts are displayed in "standard" mode if opened by clicking the contact icon. With "Show Contact in Edit Mode" enabled, the contact is opened in "edit" mode, if available.

Example-Contact open in Salesforce "standard" mode:

Example-Contact open in Salesforce "edit" mode:

Example-Call Activity log open in Salesforce "standard" mode:

Example-Call activity open in Salesforce "edit" mode:

Hot Keys
Assign keystroke combinations to Make call:

Note: All hotkey combinations require CTRL, SHIFT or CTRL+SHIFT to be included
Application load
Enable automatic start up with Windows:

Localization
Set language and formatting options to the appropriate locale:

Note: By default, the software automatically selects the localization of the PC.
Configuration > API
Local Http(s) listener(s) for API connections from other software applications, enabled by default.

Toggle "Secure sockets" as enabled or disabled. Registered applications appear below:

Configuration > Integrations
Integrations connect a CRM or application with the Telephone system. Incoming or outgoing telephone numbers are matched to any contact records in a CRM to present contact information including contact name, company or account name and additional notes.
Users can integrate with a large list of various business CRM applications and address books.
The integration provides address book searching, incoming call preview information, manual and automatic contact popping and in many cases, activity logging.
Setup CRM Integration
Select "(Add new)" to integrate with a business CRM application or address book.
New v4 integrations are marked with a star icon and may include additional features such as the option to "Add Contact" information directly into the address book from the Preview Window.

Note: Only "Standard" integrations are displayed in the list.
Other applications or "Controlled" integrations require an unlock code. Please contact support for assistance.
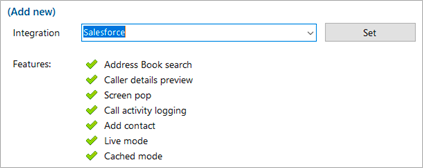
Choose the desired application from the list and select "Set" to view the Features that the selected integration can support (example shown for Salesforce CRM):
Click "Save" to continue to the setup screen for the selected integration. The configuration form varies with the selected integration (example shown for Salesforce CRM):
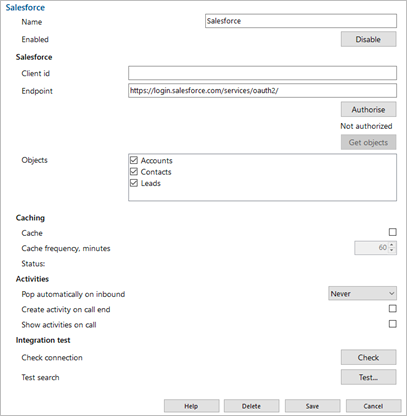
Help
Detailed step-by-step guidance is provided online for each "Standard" integration - click "Help" to open the Integration guide (example shown for Salesforce CRM):

Check
After completing the integration setup, check the connection status of the integration to confirm a the connection can be made:

Test
Test search by selecting "Test," enter the contact number, then select Search:
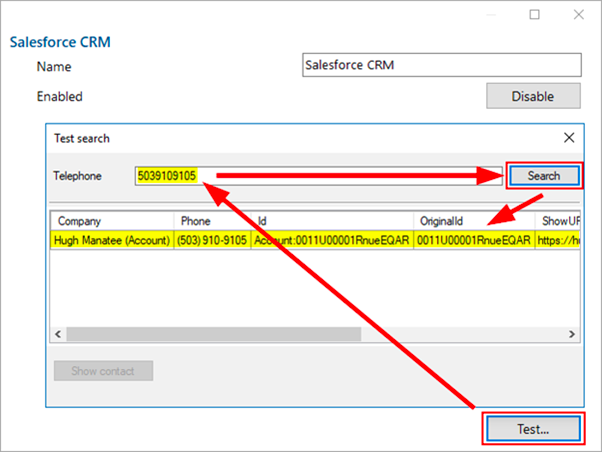
Note: Test search may be unavailable with certain CRMs or applications.
After completing the configuration, select "Save" to finalize the integration. Select "Disable" to temporarily disable the integration. Select "Delete" to completely remove the
integration, if required.
Options
Additional options are available, depending on the specific integration selected:
Caching
If the application allows it, the contact database can be downloaded and cached to accelerate contact searches for matching telephone numbers.
The frequency of downloading the data can be configured between 1 – 100 minutes.

The Status shows when the last download occurred and how many records were downloaded.
Activities
Additional actions can be applied to the integration.

Automatic Popping
Any integration can individually be configured to automatically pop matching contact entries on incoming calls, either during ringing (as soon as the call is presented) or when connected (after answering the call).

Manual contact popping is still available to other integrations. For example, if only 1 out of 4 configured integrations is set to pop automatically, contacts found in any of the other 3 integrations can be manually opened using the associated icon.
Call Activity Logging
For compatible integrations, call activity events can be written directly into the business CRM applica- tion transaction logs either manually by a button press, or automatically at the end of a call.
From Preview Window: Example activity log to Salesforce:


Configuration > Log
The Log section contains important details about the client, user and software configuration:
Identity
Displays current users Name, Depart- ment, Extension number and Direct Dial Number. Note: Depending on initial setup, not all user information will be displayed

Devices
Displays information about connected telephony devices:

Customer Feedback
Send data into the software development team to help improve the product evolution.

Licensing
Displays the licensing detail and included features of both the Telephone system and Unite for Teams user profile
Logs
Select "Show" to open the application log file location for support escalations and issue resolution:

Configuration > Versions
Contains application-specific version details, Notices, and EULA information:

Download
Download the link if a later software version is available and update permissions are enabled.
Notices
Detailed technical information on each component
License agreement
Full End User License agreement detail