CT Cloud Voice Yealink - Provisioning Phone Via The Web Interface
GOAL:
Provide instruction on provisioning a Yealink phone via the Web Interface.
RESOLUTION/STEPS:
Typically, the best practice for provisioning phones on CT Cloud Voice would be to factory reset them, and then have the phones in your network grab their Provisioning URL via Option 66 (this is configured in your DHCP scope). However, this isn't typically an option for remote users and may pose a challenge depending on your technical knowledge and your network's capabilities. This article will walk you through provisioning your Yealink phone when this is not an option.
Step 1: Factory Resetting the Phone
While your phone is displaying the Idle Screen, perform the below steps. If you're in the phone's menu or a message is displaying on your phone, you'll first need to exit the menu (or cancel out of the message)
- Press the OK button and hold for ~10 seconds
- A pop-up will appear asking you if you'd like to 'Reset to factory settings'
- Press the OK soft-key
Your phone should now go through its reset process on its own. After rebooting, it should display "No Service" on the screen.
Step 2: Provisioning the phone
Before beginning, make sure your phone is plugged into your network and it has power (either via a power cable or Power over Ethernet)
You'll also need your phone's IP address. To retrieve this, from the Idle Screen press the OK button once; the menu's status page will display. Take note of the IPv4 address listed.
- Open your browser and enter the IPv4 address assigned to your phone in your browser's address bar
- Log into the phone
- Default credentials to log in
- Username: admin
- Password: admin
- Default credentials to log in
- Navigate to the Settings tab and open the Auto Provisioning page using the link menu on the left.
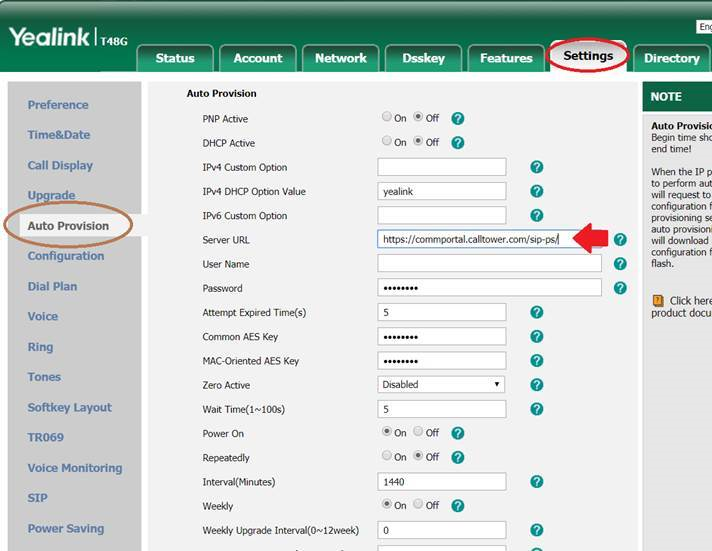
- In the Server URL field, copy/paste the following: https://commportal.calltower.com/sip-ps/
- Scroll to the bottom and hit the Confirm button.
- Next, navigate to the Security tab and open the Trusted Certificates page using the link menu on the left
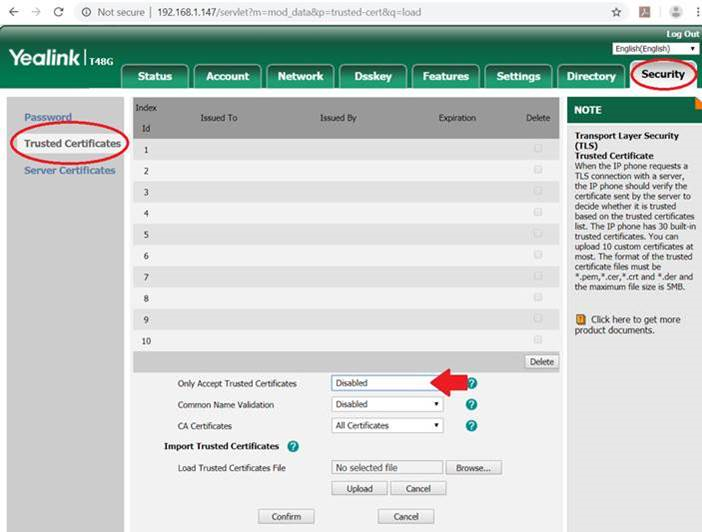
- In the dropdown menu for Only Accept Trusted Certificates select Disabled
- Hit Confirm at the bottom of the page
- A pop-up should appear asking if you’d like to reboot your phone, click yes.
ADDITIONAL INFORMATION:
Your phone may reboot a few times and will most likely update its firmware as part of the process. This can take between 10-15 minutes.
If you find you're having trouble, please engage CallTower Support or the rep you've been working with on setting up your account.