SNOM-PA1 - Set-up
Configuration
1. Ensure the network is configured with DHCP
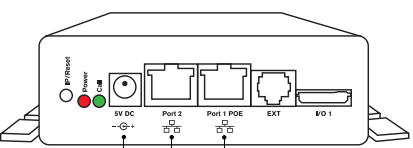
2. Plug the Ethernet cable into the RJ45 connector labelled "Port 1PoE".
a. The second RJ45 connector labelled "Port 2" is for daisy-chaining further Ethernet devices without the need for another Ethernet cable.
.png?revision=1)
Note: If no PoE available: Connect a snom-approved 5 V 10 W power adapter to the power connector labelled "5V DC". (Not included – must be ordered).
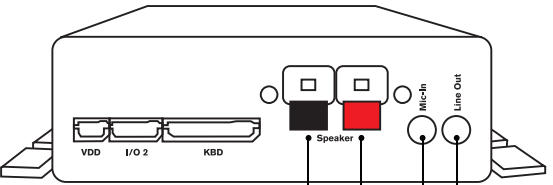
3. Plug a speaker device (speaker wire or audio jack labeled “line out”) into the PA-1.
.png?revision=1)
4. Wait for the red LED light to stop blinking and glow steadily
a. The web interface is available once the Green LED and Red LED are on simultaneously.
b. Quickly press the “IP/Reset” button and the device will announce the IP Address
.png?revision=1)
Note: If the Red and Green LED do not light at the same time, your network did not assign the device an IP. Go back to step 1.
c. Using a web browser navigate to the following: https://XX.XX.XX.XX (Input device assigned IP Address for XX.XX.XX.XX)
i. Click “Advanced”
ii. Click “Update”
iii. In the Administrator Login box enter: 0000
iv. Under Update Policy select “Update Automatically”
v. Under Setting URL enter the following: http://pps.calltower.com/snom/settings/snomPA1.xml
vi. Click “Apply”
vii. Click “Reboot” and “Yes” This reboot process can take up to 5 minutes.
Note: Do NOT remove the device's power supply (Ethernet cable when using PoE, power adapter when not using PoE) when the red light is on or blinking; a firmware update is ongoing. Cutting off the device's power during a firmware update (red LED on, green LED off) will damage the firmware and render the PA1 inoperable. In such cases, it will need to be returned to the vendor for resetting.
5. The web interface is available once the Green LED and Red LED are on simultaneously.
a. Quickly press the “IP/Reset” button and the device will announce the IP Address
b. Using a web browser type in device assigned IP Address XX.XX.XX.XX
i. User Name = admin
ii. Password = 654
c. Sign-In with Skype for Business credentials
Note: The User Credentials must be Standard or Enterprise with Voice enabled.
i. Locate UC Account Data and enter the following:
1. SIP URI: (email address of user)
2. SIP URI: same as above (if device fails to sign into Skype for Business / register try entering the SAM account name)
3. Password:
ii. Hit “Apply”
6. Test the device by calling the assigned user. The device should auto-answer allowing the caller to “page.” Hang up when page is complete.