Password Sync Installation
Password Sync is a tool to synchronize your local Active Directory (AD) passwords to our products and applications such as Connect, Skype for Business, Jabber and Office 365. Password sync is a one direction push software. It is not a single-sign-on solution nor does it incorporate federation. Password Sync only captures password changes; it does not capture existing passwords or sync other AD attributes.
Prerequisites:
- Every Domain Controller in the users’ domain needs to have the Password Sync agent installed. Read Only Domain Controllers (RODCs) do not need the agent installed.
- .NET Framework 4.5 on the domain controllers.
- Domain Controllers need to have outbound access to https://pws.ct450.com:8991
- Windows 2003 Domain Controllers need to have Windows Imaging Component (WIC) installed.
a. 32-bit WIC http://go.microsoft.com/fwlink/?LinkID=162643
b. 64-bit WIC http://go.microsoft.com/fwlink/?LinkID=162644
- Download the Simply Sync Password software
a. 32-bit Installer: PWSyncClientInstaller32.msi
b. 64-bit Installer: PWSyncClientInstaller64.msi
c. Server Core Installer: PWSyncClientCoreInstaller64(3.7).msi
For steps to install on Server Core, click here
- If TLS 1.2 is required, follow additional steps below after the installation.
- Obtain the Client License Key from your Account Executive.
- NOTE: Domain Controllers with a Server Core only install require a different installation procedure, please contact your Implementation Manager or Account Executive.
Installation Steps:
- Log on to the domain controller as a domain admin.
- Install Simply Sync Password client.
Note: Do not restart if prompted
- Launch PWSync Client Configuration from the Start Menu.
Note: If using Windows 2008 or higher, right-click it and Run As Administrator. Do this even if you are logged in as an administrator. Always Run As Administrator or results may be unexpected. If you do not see the option to Run As Administrator when right clicking the install file, open up an administrator command prompt and run the install from that window.
- Click on Tool and select Import Target Configuration. (Highlighted in green in below Image)
- Paste the Client License Key and click OK and confirm.
- Click the ellipses to the right of the Users OU box and select the OU that should be monitored for password changes. If there are multiple containers for users, select the container closest to the root and check the (Sub OU) box. If all containers will be synced, leave the User OU blank and check the Sub OU box. (Highlighted in magenta in below image)
- Verify the Status Box at the bottom of the window shows Active, If showing InActive, toggle the status (Highlighted in red in image below)
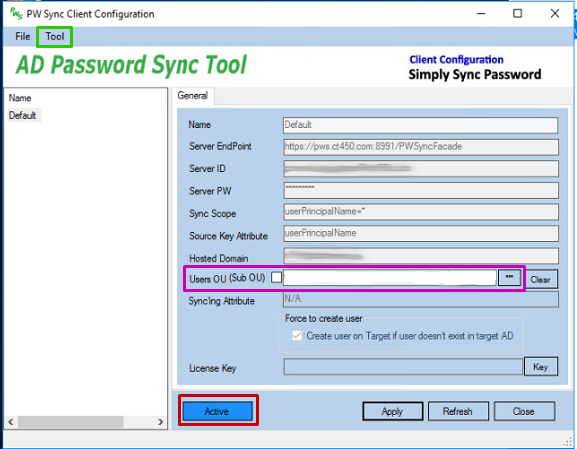
- Click Apply on the main window.
- Click Apply again and close PW Sync Client Configuration.
- Reboot the Domain Controller.
- After it reboots, verify the PWSync Client Service is running and set to Automatic.
- Follow steps 1-3 and 7-10 for all other domain controllers. Because the configuration is stored in Active Directory, you do not need to repeat steps 4-6
- Windows Server 2003 only: A registry key adjustment may need to occur in order for passwords to be captured. Use regedit and navigate to HKEY_LOCAL_MACHINE\SOFTWare\GoodWorks\PWSync. Please change registry value of the "Mode" key to "1".
Optional Steps to Enable TLS 1.2
- Enable TLS 1.2 in Windows. There are 2 ways to do this:
- Recommended: Download IIS Crypto (https://www.nartac.com/Products/IISCrypto) and check the box next to TLS 1.2, then reboot.
- Manual: Set the following registry keys:
- [HKEY_LOCAL_MACHINE\SYSTEM\CurrentControlSet\Control\SecurityProviders\SCHANNEL\Protocols\TLS 1.2\Client]
"DisabledByDefault"=dword:00000000
"Enabled"=dword:00000001 - [HKEY_LOCAL_MACHINE\SYSTEM\CurrentControlSet\Control\SecurityProviders\SCHANNEL\Protocols\TLS 1.2\Server]
"DisabledByDefault"=dword:00000000
"Enabled"=dword:00000001
- [HKEY_LOCAL_MACHINE\SYSTEM\CurrentControlSet\Control\SecurityProviders\SCHANNEL\Protocols\TLS 1.2\Client]
- Edit two files in the GoodWorks SimplySync Password bin folder (default is C:\Program Files\GoodWorks Communications\Simply Sync Password Client v3.7\bin)
- PWSyncClientConfiguration.exe.config
- PWSyncClientWindowsService.exe.config
- Find this line:
<add key="Protocol" value="SSL3|TLS"/>
and change it to:
<add key="Protocol" value="TLS1.2"/> - Restart PWSync Client Service
Notes:
- Password changes are synced in real-time and are not queued. If the PWSync Client Service is not running on a domain controller at the time it processes a password change, the change will not sync.
- If connectivity to https://pws.ct450.com:8991 is unavailable, i.e. Internet access is down, then any password changes during that time will not sync.
- When browsing to this URL, you should expect to see the page return something similar to what is shown below
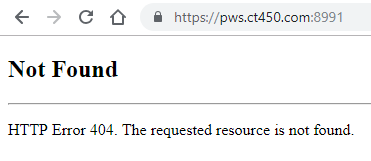

- When browsing to this URL, you should expect to see the page return something similar to what is shown below
- If the UPN of a user does not exactly match their Connect username the password will not sync
Installing Password Sync on Server Core
On another domain controller running the full version of Windows Server (desktop experience):
- Open the Registry Editor
- Navigate to HKEY_LOCAL_MACHINE\SOFTWARE\GoodWorks\PWSync
- Add “ServiceIP” as a String
- The value needs to be set to the local IPv4 address of the server running the full version of Windows Server
i. The server needs to be reachable on the local network by the Server Core domain controller
- Restart the “PWSync Client” service
On the Server Core domain controller:
- Install the PWSyncClient Server Core MSI
- Open the Registry Editor
- Repeat step 2 from above on this server. Use the same value for ServiceIP on this server as well (the IP of the other domain controller running the full version of Windows Server)
- Set HKEY_LOCAL_MACHINE\SOFTWARE\GoodWorks\PWSync\Mode to 1
- Set HKEY_LOCAL_MACHINE\SYSTEM\CurrentControlSet\Control\Lsa\NotificationPackage to the following values:
- scecli
- rassfm
- Restart the Windows Server Core domain controller
- Default Port is 666 to connect to proxy server. You can change it in registry if you want