BLOC Main Screen Layout
BLOC-Main Screen Layout
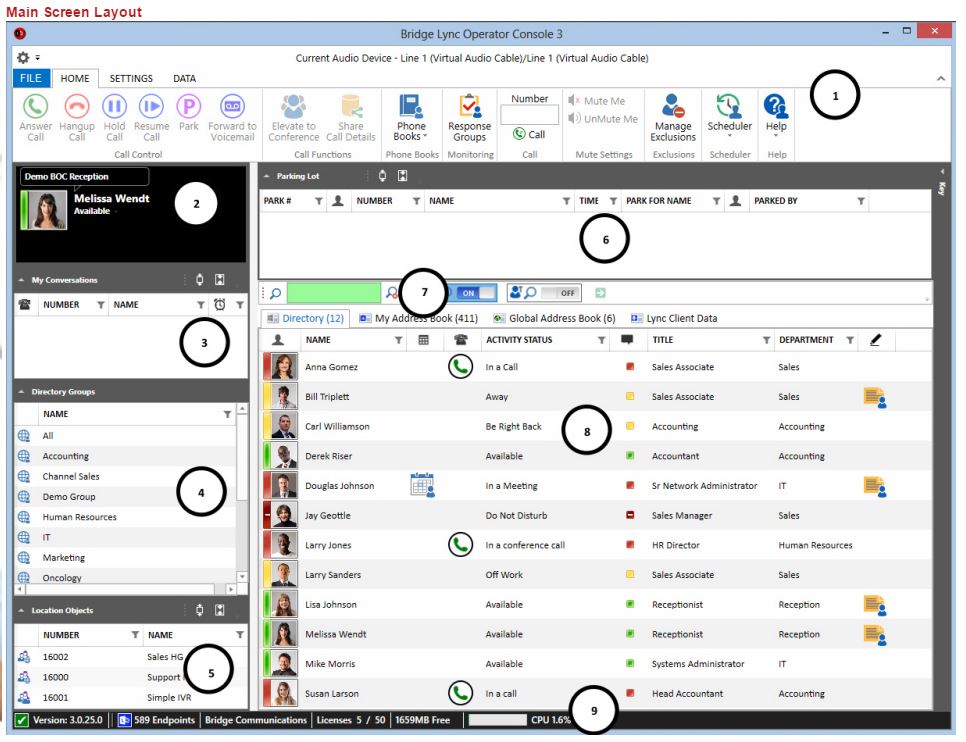
The above image shows the various sections of Bridge Lync (Skype for Business) Operator Console. They can be broken down as follows;
1. The Ribbon
The ribbon is the menu on the top of the window, it should be familiar to Microsoft Office users. The ribbon contains sections for call control, status, phone books, hunt groups, other, group messaging, quick call, company information and logo, font and color settings, and some data tasks. The ribbon will size and scale itself as needed depending on where you positions BOC, and how you size it. The ribbon can be minimized by right clicking on it, or in the BOC settings page.
2. The HUD (heads up display)
The HUD shows you information about the current call you have selected. This is your way of telling BLOC which call you intend to hang up, transfer, answer, hold, resume, park etc. If there is more than one call on your phone, you can change the call selected in the HUD by clicking on the desired call in the My Calls Section (3). The HUD will show your information in the top left, a caller id picture if assigned in the top right, and the call detail below. Call detail will include from left to right; the line on which the call is active (7601) in this case, the state of the call (TALK), the duration of the call (51 seconds), the caller id number (4494894329), the caller id name (Capital One), and the call reason (Direct). The call reason will explain why the call was received, in this case direct means someone called and it rang your phone. If a call rings back you parked in the parking lot, it will have a reason code of [Reminder]. If the call was transferred to you [Transfer]. If you unparked a call [UnPark]. If the call was the result of a forward from another phone [UnconditionalForward].
3. My Conversations
The My Conversations section will give you visibility of the calls on your phone. You can sort it by clicking on any column. You can perform drag and drop functions on any conversation, as well as right click for call control options.
4. Directory Groups
The Directory Groups section allows you to select and view the status of a particular group of directories. Right click options are available here for modification options.
5. Location Objects
Location of objects allow you to call or transfer call to an object that is not a line on someone's phone. These are defined by your system administrator.
6. The Parking Lot
The parking lot will show information about the parked calls on your system. If they are parked using BLOC they will have more status information than if they are parked with the telephone handset. In settings you can define after how much time the calls in park can be color coded to yellow, orange, or red. To get a call out of park, you can double click it.
7. The Search Toolbar
The search tool bar is used for finding objects. It can search globally or in a particular directory group by toggling the Search Global check box. It will also search for Directory, My Address Book entries, and Global Address Book entries simultaneously. You can also enable an option in settings to have it search and filter location objects.
8. The Directory List
The directory list will show the extensions in either the selected directory group, or the search you have done. You can customize the look and feel in the settings screens, change column sizes, sort by clicking on any column, and hover over a graphic for more details. For more information about what a particular status icon means, you can click the key to the very right edge of the program.
9. The Status Bar
The status bar on the bottom will show you information about the version you are running, what mode it's in, whether your database is unreachable, HA failover has occurred, how many licenses you have and how many are in use, and some basic machine performance details.