Unite for Teams - Using the Onboarding Portal
Prerequisites
- Must have a global administrator account.
- Account must have contributor rights to an active Azure subscription. Information on adding contributor rights to an Azure subscription can be found here.
Installation Steps
- From a computer, open a web browser and navigate to https://onboard.ctunite.services/
- Click the “Sign in” button

- After you’ve authenticated your credentials, you’ll be asked to accept permissions for a new app in your Microsoft Online tenant. This application is for the CT Unite for Teams Setup Wizard and not for CT Unite itself. To proceed, check the box to “Consent on behalf of your organization”, then click “Accept”.

- Once you’ve accepted the permissions, you’ll be presented with the first page of the wizard. This page goes over the prerequisites and the general process of the Setup Wizard. Please be sure to read through all instructions carefully. When ready, select “Continue” at the bottom of the page.

- On page 2 of the wizard, you’ll begin to create the bot service that CT Unite will utilize. In the top box, select the Azure subscription you’d like to use for the bot service. In the 2nd box, you’ll select the region most closely associated with your geographic area.

Note: Located just above the “Create” button is the text “Show advanced options”. If you click on this text, you’ll be presented with the option to use custom names for different components of the app.

- After selecting “Create” you’ll be presented with the app registration information. Copy and paste the details into a secure location in the event that they are needed in the future.

- On page 3 of the wizard, you’ll be presented with information about granting application consent to the CT Unite for Teams app registration. Click the button “Grant Admin Consent”

- You’ll now be presented with the list of permissions that the CT Unite for Teams application requires to be able to function. Carefully review the permissions, then click “Accept” to continue.

- Page 4 of the wizard will create the bot identity for your tenant. Click “Create Identity” to continue.
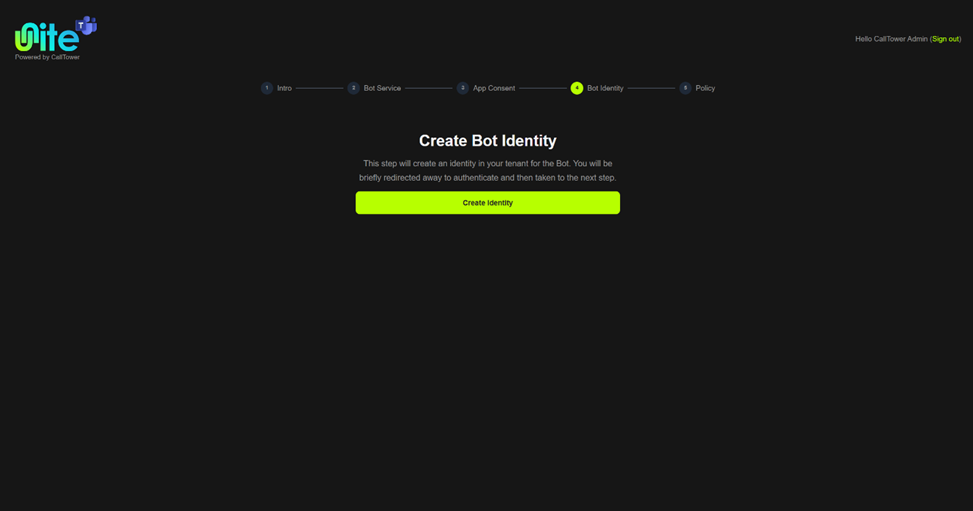
- You’ll be presented again to accept a few additional permissions needed to create this bot identity. Carefully review the permissions, then check the box to “Consent on behalf of your organization” and click “Accept” to continue.

- Page 5 creates the Teams Compliance Recording Policy that CT Unite will use to record and access users’ calls. Click “Configure Policy” to continue.

- Once this final step is complete, you’ll be directed to the CT Unite for Teams management dashboard. From here, you’ll see the status of each resource the app utilizes.
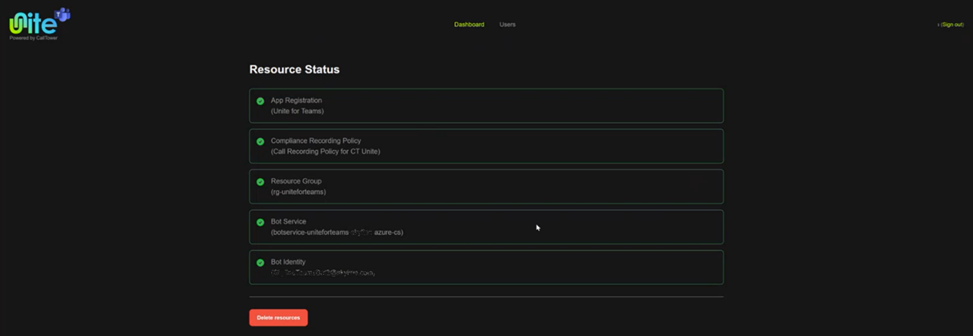
- REQUIRED
- Select “Users” at the top of the portal, you’ll be able to assign the newly created compliance recording policy to the desired users

- To exit, you may either close your browser window or select “Sign out” in the top right corner of the page.