Cisco Webex Calling User Portal - Configure VM
Configure your voicemail settings in the calling user portal
In the calling user portal, you can manage your voicemail settings, such as when to enable voicemail, message storage settings, and notifications of new voicemail messages. You can also set up your voicemail greetings.
Choose When To Send Callers to Voicemail
You can set when you would like to send callers to your voicemail. For example, you may want to send all calls to voicemail when you know you’re going to be out of the office and not taking phone calls.
Want to see how it's done? Watch this video demonstration on how to set when you would like to send callers to your voicemail.
| 1 |
Go to https://settings.webex.com and select Webex Calling. |
||
| 2 |
From the calling user portal, click Voicemail. |
||
| 3 |
Click Voicemail Settings. |
||
| 4 |
Choose when to have your voicemail active:
|
||
| 5 |
Click Save. |
Choose Where To Store Your Voicemail And Fax Messages
You can choose where you would like to store your voicemail and fax messages—in the calling user portal or to a specified email address as a .tiff file.
Want to see how it's done? Watch this video demonstration on how to choose where you would like to store your voicemail and fax messages.
| 1 |
Go to https://settings.webex.com and select Webex Calling. |
||
| 2 |
From the calling user portal, click Voicemail. |
||
| 3 |
Click Voicemail Settings. |
||
| 4 |
Next to Message Storage, use the drop-down menu to select where you want to store your messages:
|
||
| 5 |
Enable the message waiting for indicator for your desk phone by checking the box next to Use phone message waiting indicator on your Cisco IP Phone. |
||
| 6 |
Click Save. |
What to do next:
|
If your location has voicemail transcription enabled, the option Use System Mailbox and Attach new voicemail messages and send via email must be selected for you to receive voicemail transcriptions. For help, see: Voicemail transcription settings. |
Enable voicemail notifications
Want to see how it's done? Watch this video demonstration on how to enable your voicemail notificaitons.
| 1 |
Go to https://settings.webex.com and select Webex Calling. |
||
| 2 |
From the calling user portal, click Voicemail. |
||
| 3 |
Click Voicemail Settings. |
||
| 4 |
Toggle on Notifications. |
||
| 5 |
To receive text message notifications, select Notify me via text message when new voicemail messages are received. If this option is selected, enter the phone number and service provider. |
||
| 6 |
To receive email notifications, select Notify me via email when new voicemail messages are received. If this option is selected, enter the email address to send notifications to. |
||
| 7 |
To send to an email address with the message attached, check the box next to Attach new voicemail messages and send via email. If this option is selected, enter the email address to send the notifications and attached messages to.
|
||
| 8 |
Click Save. |
What to do next
|
If your location has voicemail transcription enabled, the option Use System Mailbox and Attach new voicemail messages and send via email must be selected for you to receive voicemail transcriptions. For help, see: Voicemail transcription settings. |
Voicemail Transcription Settings
Before you begin: With voicemail transcription, the user receives an email with the voicemail transcription in the body of the email and .WAV file as a voicemail attachment.
|
The administrator must enable voicemail transcription for your location. |
| 1 |
Go to https://settings.webex.com and select Webex Calling. |
||
| 2 |
In the Calling User Portal, click Voicemail. |
||
| 3 |
Click Voicemail Settings. |
||
| 4 |
Next to Message Storage, use the drop-down list to select Use System Mailbox. |
||
| 5 |
Toggle on Notifications. |
||
| 6 |
Check the box next to Attach new voicemail messages and send via email and enter the email address to send notifications to.
|
||
| 7 |
Click Save. |
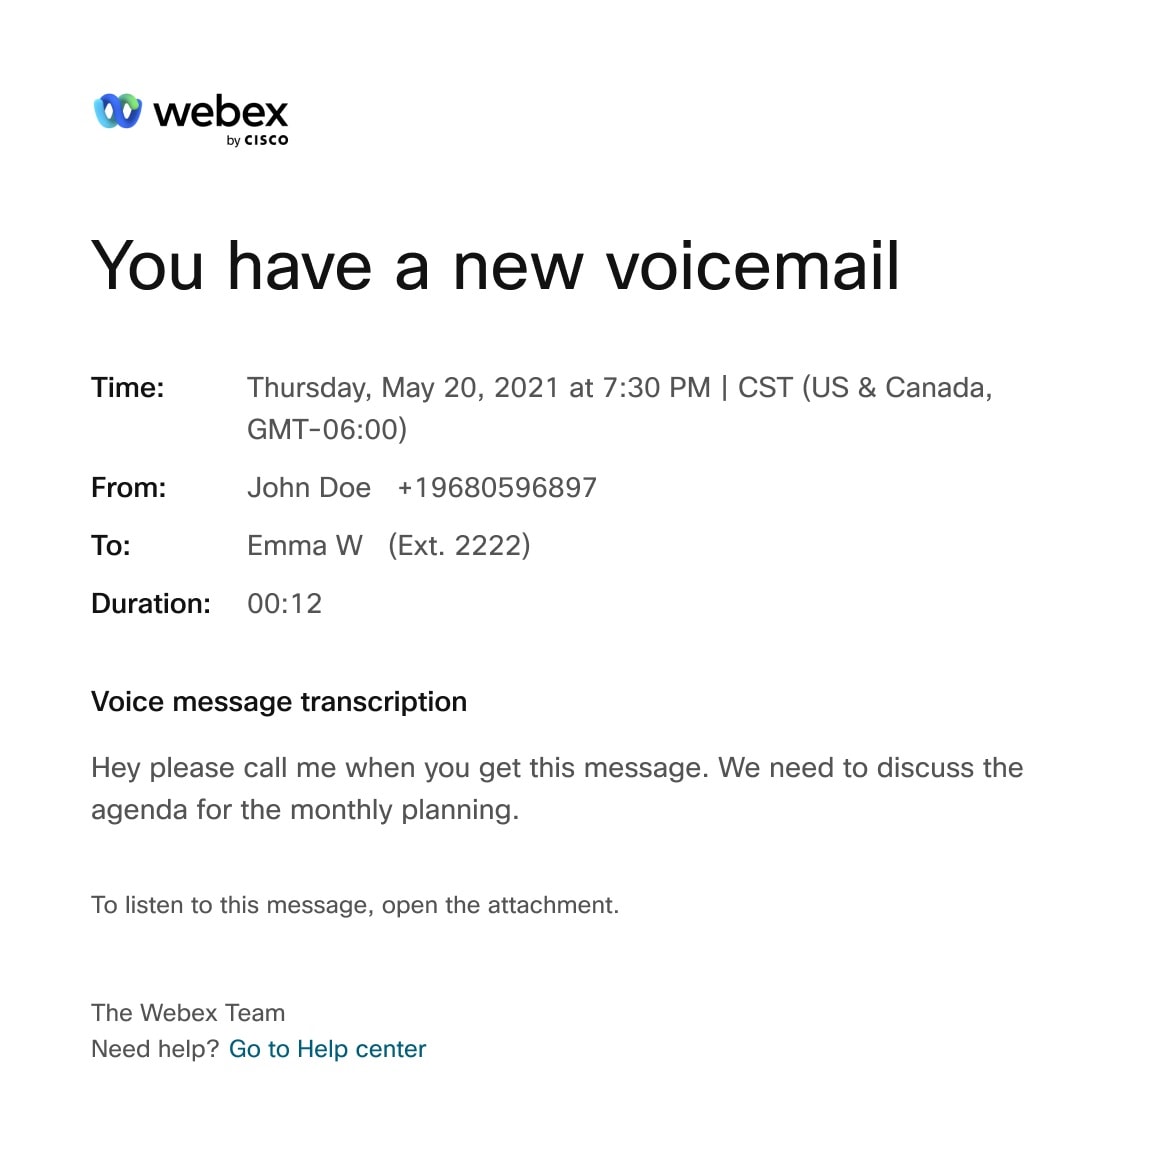
You can use the following diagram as a helpful visual of email notification for voicemail transcription:
Allow callers to transfer from your voicemail greeting
You can allow callers to press 0 and be transferred to another phone number, of your choosing, when they reach your voicemail greeting.
|
If this feature is enabled, be sure to record your voicemail greeting with the appropriate guidance for the caller. For example, “To reach my assistant, press 0.” |
Want to see how it's done? Watch this video demonstration on how to allow callers to transfer from your voicemail greeting.
| 1 |
Go to https://settings.webex.com and select Webex Calling. |
| 2 |
From the calling user portal, click Voicemail. |
| 3 |
Click Voicemail Settings. |
| 4 |
Toggle on Press '0' to transfer to. |
| 5 |
Enter the phone number or extension where you would like calls to be transferred. |
| 6 |
Click Save. |
Your voicemail greeting is the message your callers hear when they reach your voicemail. There are two types of voicemail greetings - Busy and No Answer. The Busy greeting is played when you are on another call and do not have call waiting, and the No Answer greeting is played when you do not answer the call.
You can set up and manage your voicemail greetings in the Calling User Portal.
Want to see how it's done? Watch this video demonstration on how to set up your voicemail greetings.
| 1 |
Go to https://settings.webex.com and select Webex Calling. |
||
| 2 |
From the calling user portal, click Voicemail. |
||
| 3 |
Click Voicemail Settings. |
||
| 4 |
Scroll to Greetings. |
||
| 5 |
Set the number of rings you'd like callers to hear before they hear your voicemail greeting. |
||
| 6 |
Choose your busy greeting from the drop-down menu next to If busy use greeting from:
|
||
| 7 |
Choose your no-answer greeting from the drop-down menu next to If unanswered use greeting from:
|
||
| 8 |
Click Save. |