Cisco Webex Admin - Create Hunt Groups
You can use hunt groups to ensure that all of your incoming calls are answered by the right people or routed to voicemail for later response. Hunt groups route incoming calls to specific employees in a predetermined pattern. This is done by assigning a phone number to a group of employees and then setting rules that define how the call is answered, how long the call remains on hold, and who to forward the call to.
Create a hunt group
Before you begin
You may want to set up hunt groups in the following scenarios:
-
A sales team that wants sequential routing. An incoming call rings one phone, but if there's no answer, the call goes to the next hunt group member in the list.
-
A support team that wants phones to ring all at once so that the first available member can take the call.
| 1 |
From the customer view in https://admin.webex.com, go to Services, and choose Calling > Features. |
||
| 2 |
Click Hunt Group > Create Hunt Group. |
||
| 3 |
In the Basics tab, enter the following information and click Next.
|
||
| 4 |
In the Call Routing tab, choose one of the following options and click Next.
You can check the Advance after a set number of rings check box and use the drop-down to select the number of rings to apply to your call routing choice, if necessary.
|
||
| 5 |
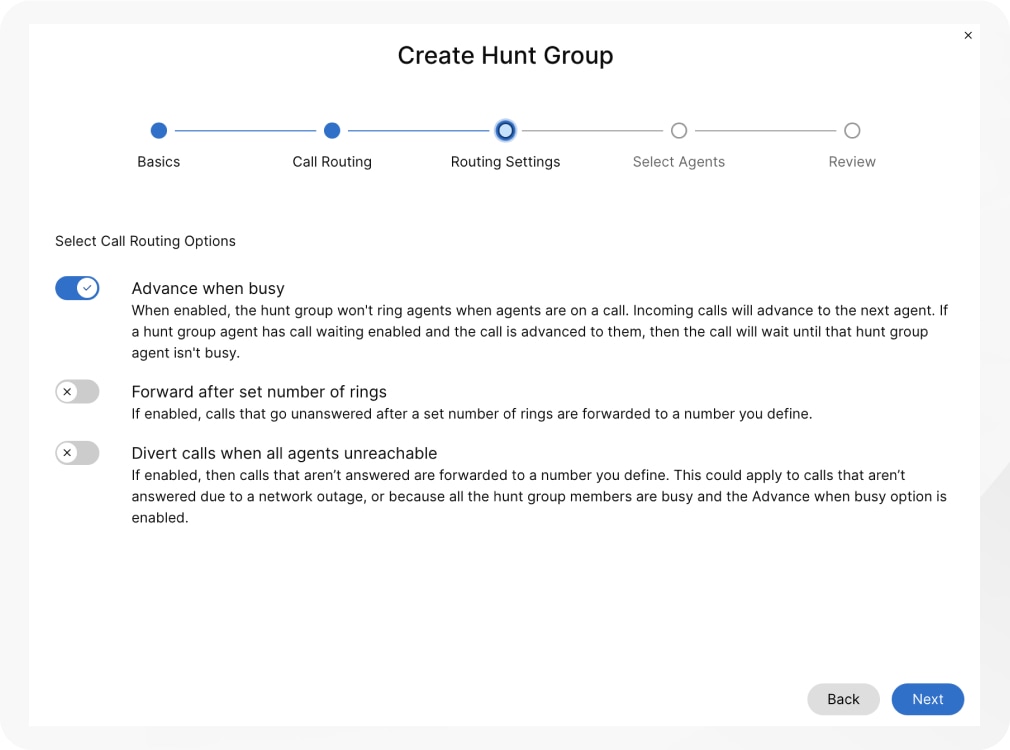
In the Routing Settings tab, you can enable one or more of the following options if necessary and click Next.
|
||
| 6 |
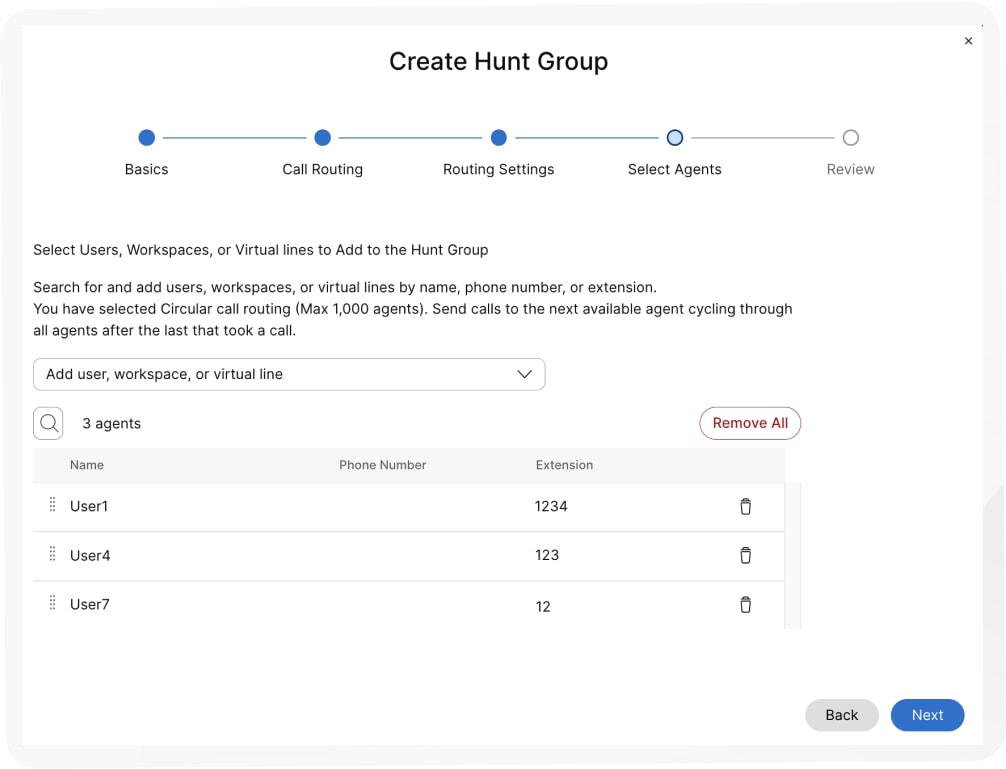
In the Select Agents tab, search and add users, workspaces, or virtual lines to the call list and click Next.
|
||
| 7 |
In the Review tab, you get a chance to review your hunt group settings to make sure you've entered the correct details. |
||
| 8 |
Click Create to create the hunt group. |
Create A Hunt Grou Video:
Want to see how it's done? Watch this video demonstration on how to create a new hunt group in the Control Hub.
Disable a hunt group
| 1 |
From the customer view in https://admin.webex.com, go to Services, and choose Calling > Features. |
| 2 |
Click Hunt Group, and then select the hunt group to disable from the list. |
| 3 |
In the side panel, click the toggle Enable Hunt Group to off to disable the hunt group. |
| 4 |
Click Save. |
Edit hunt group general settings
| 1 |
From the customer view in https://admin.webex.com, go to Services, and choose Calling > Features. |
||
| 2 |
Click Hunt Group, and then select the hunt group you want to edit. |
||
| 3 |
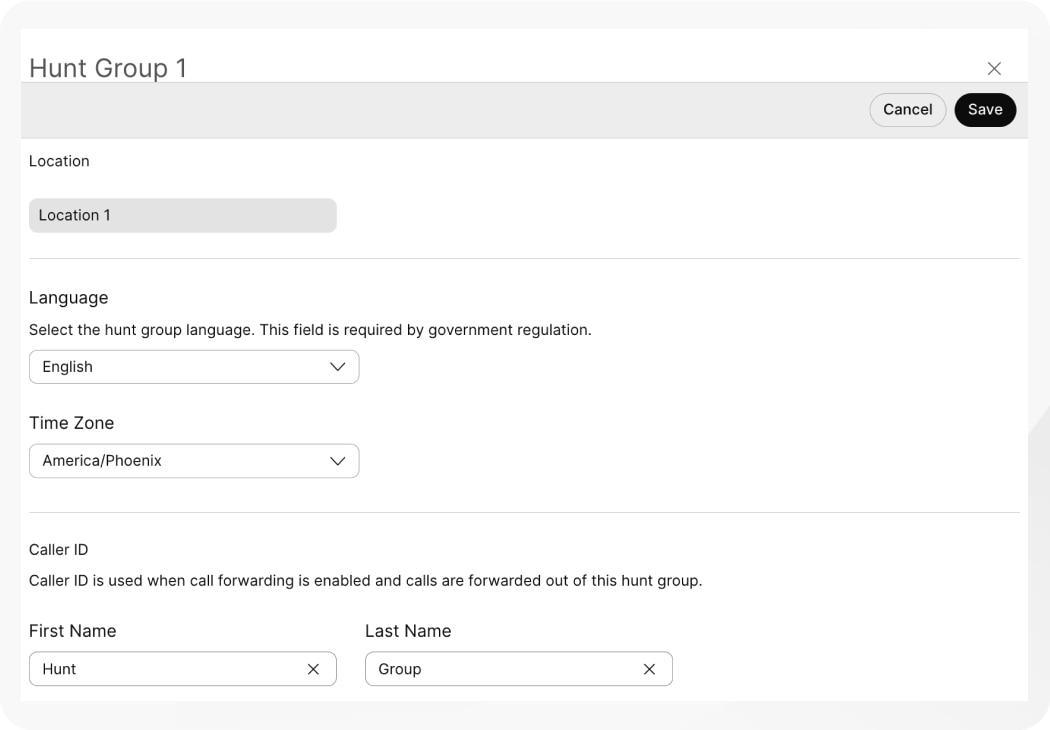
In the side panel, beside General Settings, click Manage. |
||
| 4 |
View or edit the Language from the Language from the drop-down. |
||
| 5 |
View or edit the Time Zone from the Time Zone drop-down. |
||
| 6 |
View or edit the Caller ID.
|
||
| 7 |
Click Save.
|
Edit hunt group phone numbers
Edit phone numbers, alternative numbers, and assign distinctive ring patterns for hunt groups in Control Hub.
| 1 |
From the customer view in https://admin.webex.com, go to Services, and choose Calling > Features. |
||
| 2 |
Click Hunt Group, and then select the hunt group to edit. |
||
| 3 |
In the side panel, beside Phone Number, click the number displayed. |
||
| 4 |
Edit the Phone Number, Alternative Numbers and Distinctive Ring Patterns.
|
||
| 5 |
Click Save. |
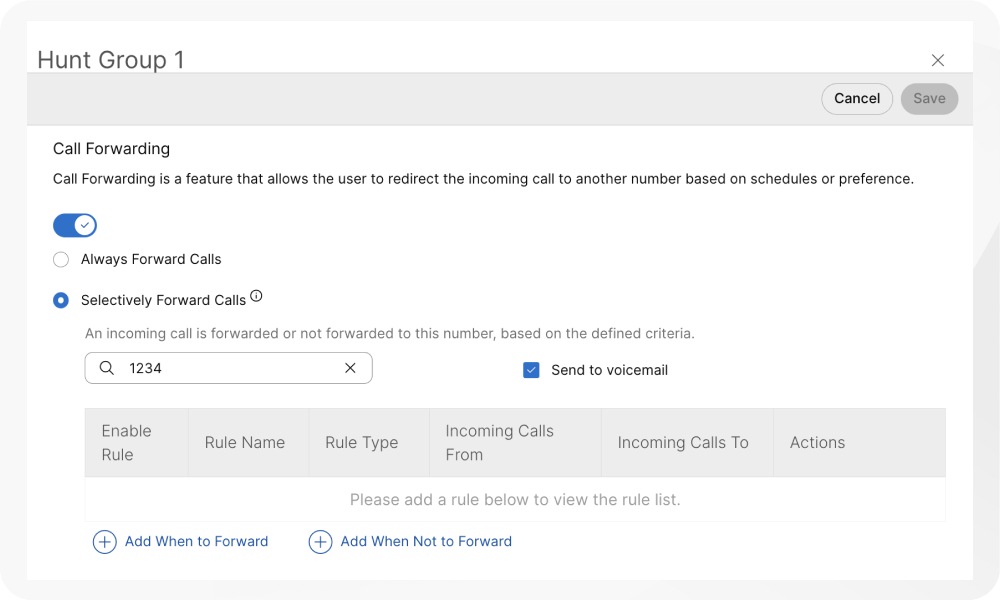
Configure call forwarding for a hunt group
| 1 |
From the customer view in https://admin.webex.com, go to Services, and choose Calling > Features. |
||
| 2 |
Click Hunt Group, and then select the hunt group to edit. |
||
| 3 |
In the side panel, click Call Forwarding. |
||
| 4 |
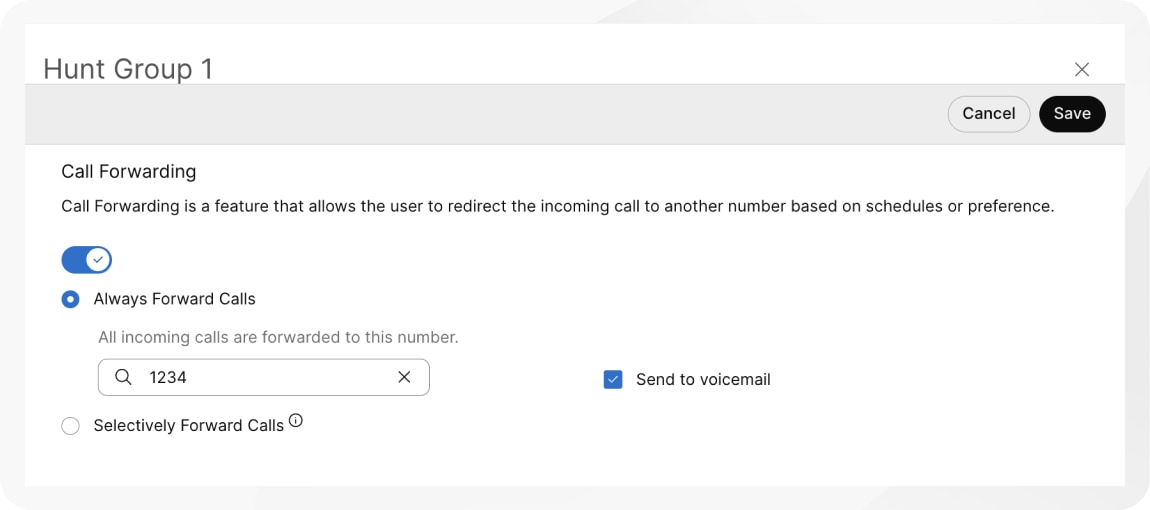
Toggle the Call Forwarding feature on. |
||
| 5 |
Choose from one of the following options:
|
||
| 6 |
Assign the number you want to forward calls to. If you have chosen Always Forward Calls, click Save.
|
||
| 7 |
For Selectively Forward Calls, create a rule by clicking Add When to Forward or Add When Not to Forward.
|
||
| 8 |
Create a Rule Name. |
||
| 9 |
For When to Forward, select a Business Schedule and Holiday Schedule from the drop-down menu. |
||
| 10 |
For Forward To, select at least one option from Default Phone Number or add a Different Phone Number. |
||
| 11 |
For Calls From, select Any Number or Selected Numbers with at least one option from the following:
|
||
| 12 |
For Calls To, calls are forwarded when a call is received by a number or alternate number in your organization that you define. |
||
| 13 |
Click Save. |
-
The rules are sorted in the table by rule name character. Example: 00_rule, 01_rule, and so on.
-
The "Not to Forward" rule always takes precedence over the "Forward" rule.
-
The rules are processed based on the order they are listed in the table.
-
You can create multiple rules. However, if a rule is satisfied, the system no longer checks the next rule. If you want the specific rule to check first, we suggest that you update the rule name with numbers. For example: If you want the holiday rule to check before the business closed hours rule, then name the rule as 01-Holiday and 02-Closed.
To know more about the basic functionality and examples of the selectively forward call, see Configure Call Forwarding Selective for Webex Calling.
What to do next
Once a rule is created, you can enable or disable a rule using the toggle beside the rule in the table. You can also change or delete a rule at any time by clicking Edit or ![]() to delete.
to delete.

Add or delete users, workspaces, and virtual lines in an existing hunt group
| 1 |
From the customer view in https://admin.webex.com, go to Services, and choose Calling > Features. |
||
| 2 |
Click Hunt Group, and then select the hunt group to edit. |
||
| 3 |
Beside Agents, click Manage. |
||
| 4 |
Click the Add User or Workspace or Virtual Line drop-down and select the users, workspaces, or virtual lines that you want to add.
|
||
| 5 |
Click Save when you've made your changes. |
Edit hunt group call routing pattern
Change the pattern of your existing hunt group from the options available.
| 1 |
From the customer view in https://admin.webex.com, go to Services, and choose Calling > Features. |
||
| 2 |
Click Hunt Group, and then select the hunt group to edit. |
||
| 3 |
Beside Call Routing Pattern, click Manage. |
||
| 4 |
For Call Routing, edit the following options.
|
||
| 5 |
Click Add User or Workspace or Virtual Line to edit the list of agents. |
||
| 6 |
Click Save. |
Edit hunt group call routing options
| 1 |
From the customer view in https://admin.webex.com, go to Services, and choose Calling > Features. |
| 2 |
Click Hunt Group, and then select the hunt group to edit. |
| 3 |
Beside Call Routing Options, click Manage. |
| 4 |
Use the toggles to set each of these features on or off.
|
Bulk manage your hunt groups
You can add and manage hunt groups in bulk using a hunt group CSV, see Webex Calling hunt group CSV file format reference.
Webex Help Center
For the latest and greatest, check out the Webex Help Center:
https://help.webex.com/en-us/article/o6rfjeb/Manage-hunt-groups-in-Control-Hub


