Cisco Unity - Auto Attendant Creation
Case Disposition:
Case Record Type: MACD
Type: AMC
Product: Cisco
SubProduct: Voice
Issue: Provisioning
Sub Issue: Add User/Service/Hardware
Priority: Standard
Severity: Low
Urgency: Low
Department: Support
Goal
The goals in this article is to walk through the creation of a auto attendant within unity.
Concepts
Call Handler: A Call Handler is equivalent to a single menu level in an Auto Attendant. Simple AAs may use a single Call Handler, while complex ones use multiple.
Directory Handler: A directory handler is used to provide a dial by name option within an auto attendant.
Call Routing: Call routing rules control what Call Handler, Directory Handler, or Subscriber a call is routed to, based on called number, forwarding number, and time of day. Call routing rules are usually used for auto attendants, and unnecessary for Subscribers. Calls will route to a subscriber mailbox based on the configured extension number.
Schedule: A schedule is a collection of days / hours used to determine whether a Call Routing rule is in effect.
Holidays: Configured Holidays can be used to allow a call to ‘fall through’ to an after hours greeting.
Unity
Configuring an Auto Attendant
Auto attendants are typically built by configuring components in the order listed below.
Public Distribution List (Optional)
- Navigate to Subscribers, Public Distribution Lists and click the plus sign to create a new Distribution List.
- Enter the name of the new Distribution List, and if desired, select an existing object to copy. Click the Add button.
- Select the Members tab. Click the radio button for Add and add the users that should be included in the Distribution List by using the Find dialog box. You can search partial matches by using star. For example, to search for all users whose name starts with E, enter e* in the search box and click the Find button.
- Highlight the User(s) to add to the Distribution List and click on the Add to List button.
Directory Handler (Optional)
NOTE: Subscribers must have a recorded name to show up reliably in a dial by name directory.
- Navigate to Call Management, Directory Handlers and click the plus sign to create a new Directory Handler.
- Enter the name of the new Directory Handler, and if desired, select an existing object to copy. Click the Add button.
- Navigate to the Search Options tab and select whether to search by First Name, Last Name or vice versa. If restricting the directory to a list of specific users, select the Public Distribution List or Class of Service that contains that list of users.
- Navigate to Match List Options and select whether to route automatically or request caller input on a unique match and whether to announce matches using extension or menu format (press 1 for Bill, press 2 for Bob, etc.)
- Select Caller Input and adjust timeout values as desired. Adjust destinations for exceptions as desired.
Call Handlers
- Navigate to Call Management, Call Handlers and click the plus sign to create a new Call Handler.
- Enter the name of the new Call Handler, and if desired, select an existing object to copy. Click the Add button.
- Click on the Greetings tab. You can upload a greeting file in CCITT u-Law, 8.000 khz, 8 Bit, mono format by selecting the Recording radio button and clicking on Paste from File.
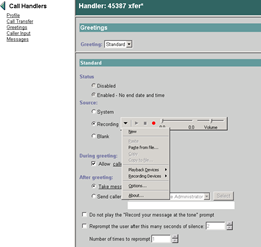
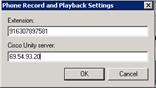
You can also have the system call your phone to record a greeting by selecting Options from the dropdown and entering the telephone number in 91-XXX-XXX-XXXX format and the IP address of the Unity server as shown:
- Select the desired action after the greeting is played. By default, this is Take Message, but typically this is not desired. For most applications, Hang Up is the appropriate after greeting action. That way, if a caller does not choose an option, the call will be dropped, rather than continuing to use a voicemail port for an indeterminate length of time. By selecting the Reprompt the User After This Many Seconds… option, a greeting can be played several times before hanging up on the caller, transferring to another Call Handler or extension, or taking a message.
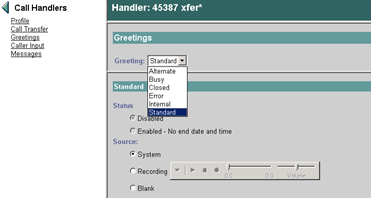
- By default, the Greetings tab opens to the Default greeting. Once you have configured this, you must select the Error greeting from the dropdown and configure the After Greeting action – typically to send the caller back to the same Call Handler. Failure to complete this step can result in unpredictable behavior if a caller selects an invalid option. If desired, the Alternate greeting can be used for a quick, one-time alternate message, like a weather related closing. By using the Alternate Greeting, the Standard Greeting does not need to be changed, and a predefined end time can be specified. For predetermined alternate greetings, a separate Call Handler and Call Routing rule are usually preferred to allow automatic enabling and disabling of the alternate message.
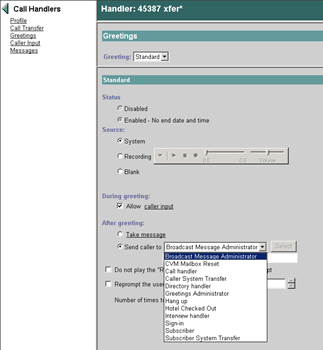
- Click on the Caller Input tab. This is where options for pressing the zero through nine, star, or pound key are configured. The common options used for Caller Input are:
- Call Handler – Send a caller to another Call Handler / Menu level when this key is pressed
- Directory Handler – Send a caller to a dial by name directory
- Subscriber – Forward to a specific user. Upon selecting a user, you can configure the call to be transferred to the user or sent to the user’s voicemail greeting.
- Sign In – This option allows a caller to sign in to his voicemail and retrieve messages, etc. remotely.
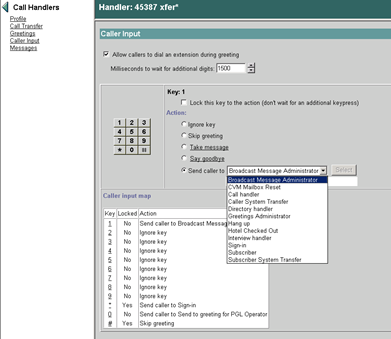
- If the After Message action or one of the Caller Input options is Take Message, use the Messages tab to define the message recipient and after message action.
Schedules
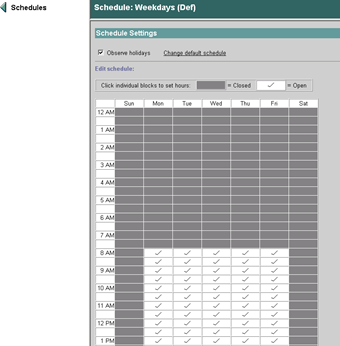
- Navigate to System, Schedules and click the plus sign to create a new Schedule.
- Enter the name of the new Call Schedule, and if desired, select an existing object to copy. Click the Add button.
- Adjust the schedule as necessary by clicking on the boxes for each day / time period. If a box is checked, the schedule is active for that time period.
- Determine whether the schedule will account for configured holidays with the Observe Holidays button.
Holidays
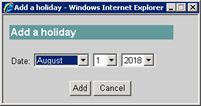
- Navigate to System, Holidays and click the plus sign to create a new Schedule.
- Enter the date of the new Holiday. Click the Add button.
Call Routing Rules
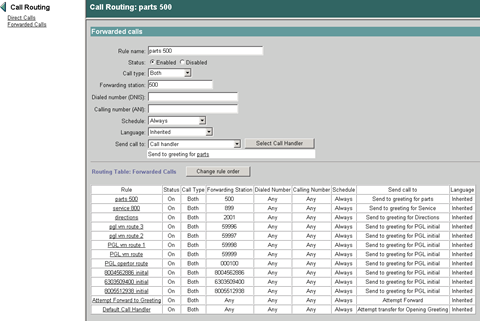
Call Routing rules pull all of the pieces of an auto attendant together and specify when a call is routed to a specific destination. To configure a Call Routing rule for a hunt pilot Ring No Answer or Busy condition, use a Direct Call rule. To configure a Call Routing rule for a directory number forward, use a Forwarded Call rule. The Unity Call Viewer can be used to make a test call and see whether the system identifies it as a direct or forwarded call. Individual Call Routing rules can be enabled and disabled as necessary by using the radio buttons.
Call routing rules are applied in order, so if multiple rules apply to a call, the rule listed closest to the top is the one that will be used to handle that call. This order can be used in conjunction with schedules for typical automated time of day routing. For example, three Forwarded Call rules are configured with the same Forwarding number. The first rule is configured with a schedule with holidays enabled and with the customer’s business hours. This forwards to the customer’s open greeting. The second rule (below the first) is configured with a schedule with holidays disabled and with the customer’s business hours. This forwards to the customer’s holiday greeting, causing the holiday greeting to be played on configured holidays, but only during the customer’s normal business hours. The third rule uses a schedule that has all hours of all days selected and has holidays disabled. This forwards to the customer’s closed greeting.
To configure a call routing rule:
- Navigate to Call Management, Call Routing. Select Direct Calls or Forwarded Calls.
- Click the Plus sign to add a new Call Routing rule. Name the rule and click the Add button.
- Enter the Forwarding Station number if configuring a Forwarded Call rule or the Dialed number if configuring a Direct Call rule. Select the correct Schedule, and configure the destination under Send Call To.
- Click on the Save button to save the rule.
- Adjust the order of the rule if necessary by clicking on the Change Rule Order button, selecting the rule, and using the Up and Down buttons.
- Test the rule by making a test call.
Unity Connection
Configuring an Auto Attendant
![]()
Auto attendants are typically built by configuring components in the order listed below.
System Distribution List (Optional)
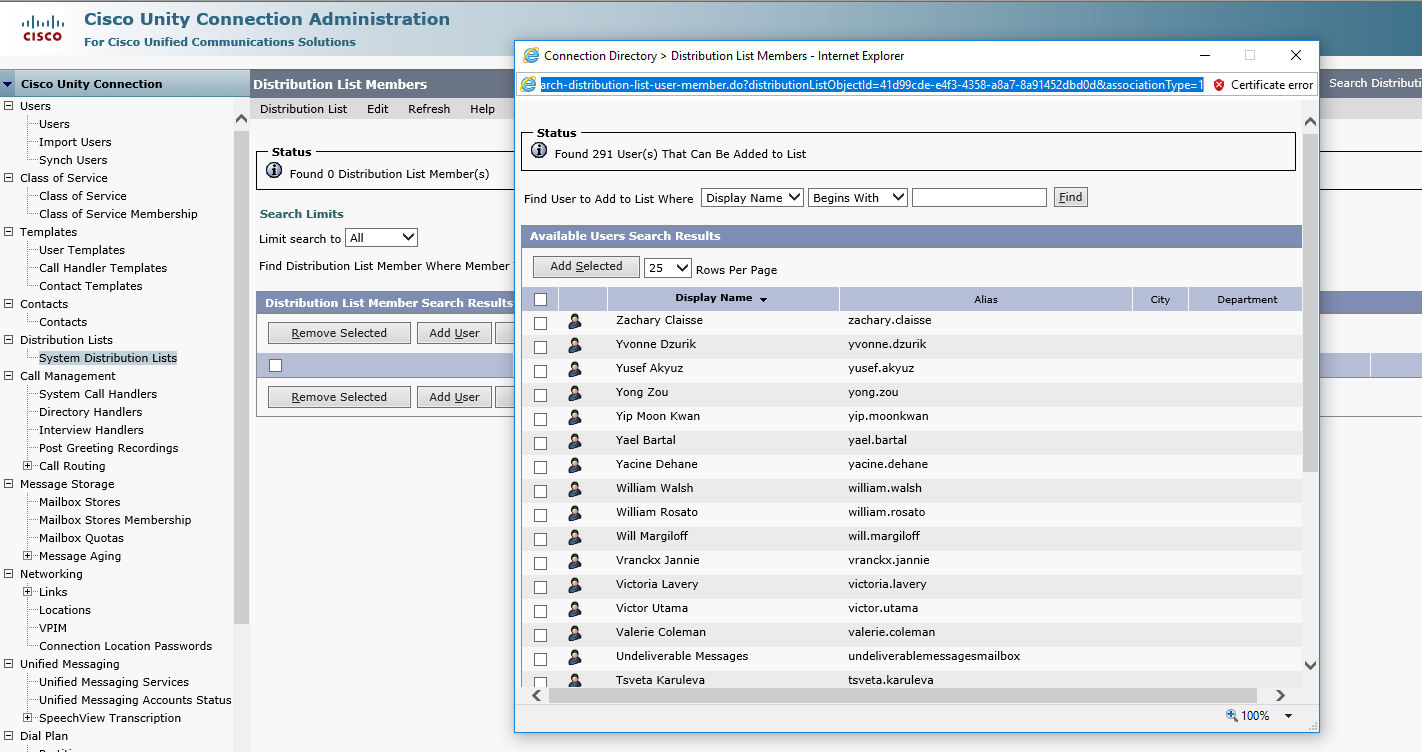
- Navigate to Distribution Lists, System Distribution Lists and click the Add New button to create a new Distribution List.
- Enter the name of the new Distribution List in the Alias and Display Name fields. Click the Save button.
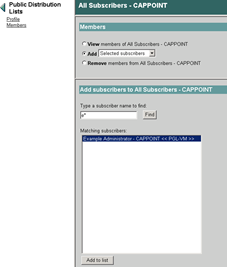
- Click on the Edit dropdown and select Distribution List Members. Click the Add User button and use the Search fields to locate the users that should be included in the Distribution List. Click on the checkbox for each user to select and click the Add Selected button to add the users to the Distribution List.
Directory Handler (Optional)
NOTE: Subscribers must have a recorded name to show up reliably in a dial by name directory.
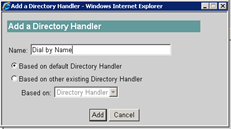
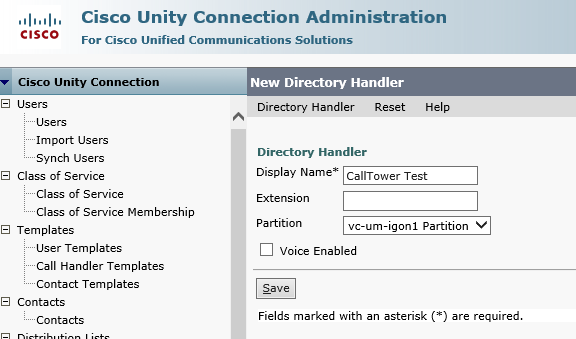
- Navigate to Call Management, Directory Handlers and click the Add New button create a new Directory Handler.
- Enter the name of the new Directory Handler, and if desired, and extension to use for direct access to the Directory Handler. Click the Add button.
- Under Search Critiera Order, select whether to search by First Name, Last Name or vice versa. If restricting the directory to a list of specific users, select the Public Distribution List or Class of Service that contains that list of users under Search Scope.
- Under Search Results Behavior, select whether to route automatically or request caller input on a unique match and whether to announce matches using extension or menu format (press 1 for Bill, press 2 for Bob, etc.)
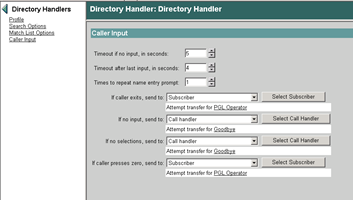
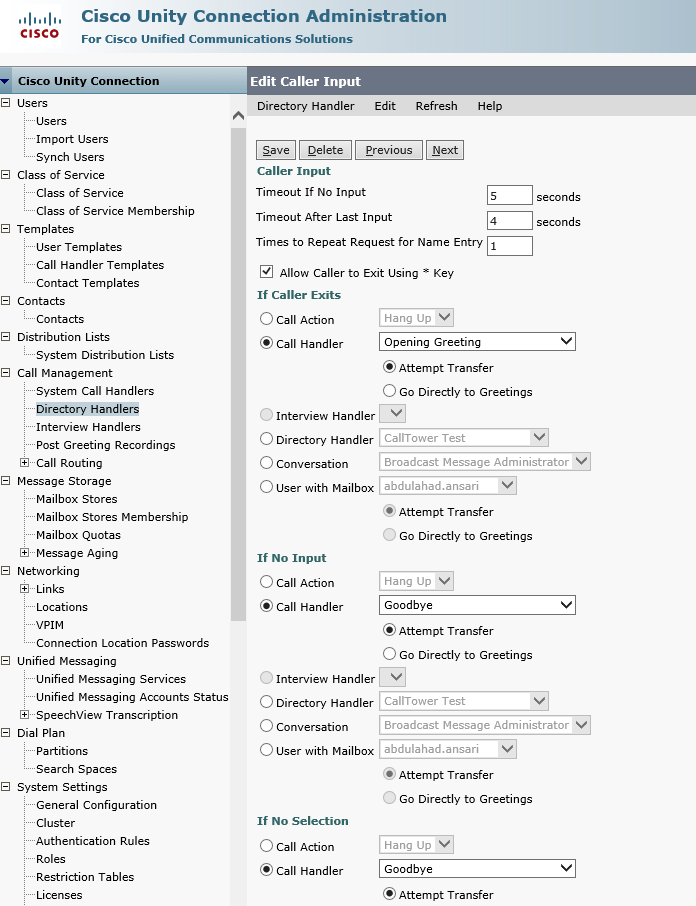
- Click on the Edit dropdown and select Caller Input. Adjust input and timeout values as desired. Adjust destinations for exceptions as desired. Click on the Save button to save changes.
Call Handlers
- Navigate to Call Management, System Call Handlers and click Add New button to create a new Call Handler.
- Enter the name of the new Call Handler, and if desired, an extension to access the Call handler directory. Click the Save button.
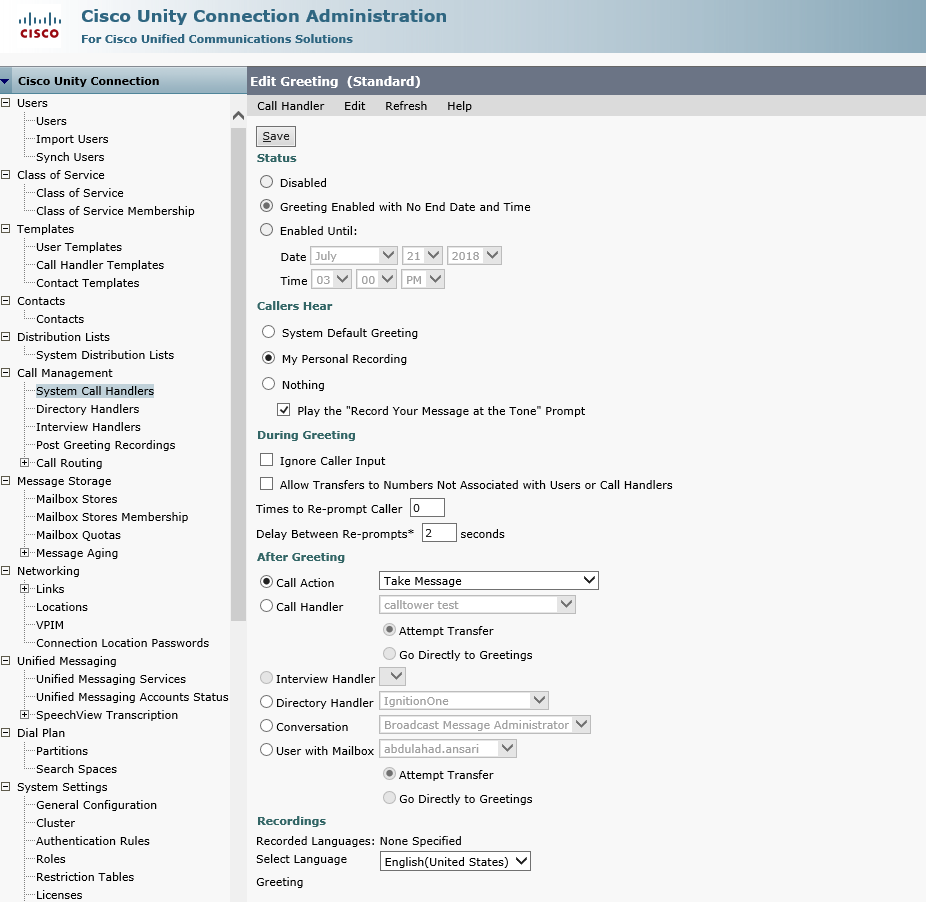
- Click on the Edit dropdown and select Greetings. Select the Standard greeting to configure the normal greeting used by the Call Handler. You can upload a greeting file in CCITT u-Law, 8.000 khz, 8 Bit, mono format by selecting the My Personal Recording radio button and clicking on Paste from File.
You can also have the system call your phone to record a greeting by selecting Options from the dropdown and entering the telephone number in 91-XXX-XXX-XXXX format and the IP address of the Unity server as shown:
- Select the desired action after the greeting is played. By default, this is Take Message, but typically this is not desired. For most applications, Hang Up is the appropriate after greeting action. That way, if a caller does not choose an option, the call will be dropped, rather than continuing to use a voicemail port for an indeterminate length of time. By adjusting the Times to Re-prompt Caller and Delay Between Re-prompts values, a greeting can be played several times before hanging up on the caller, transferring to another Call Handler or extension, or taking a message.
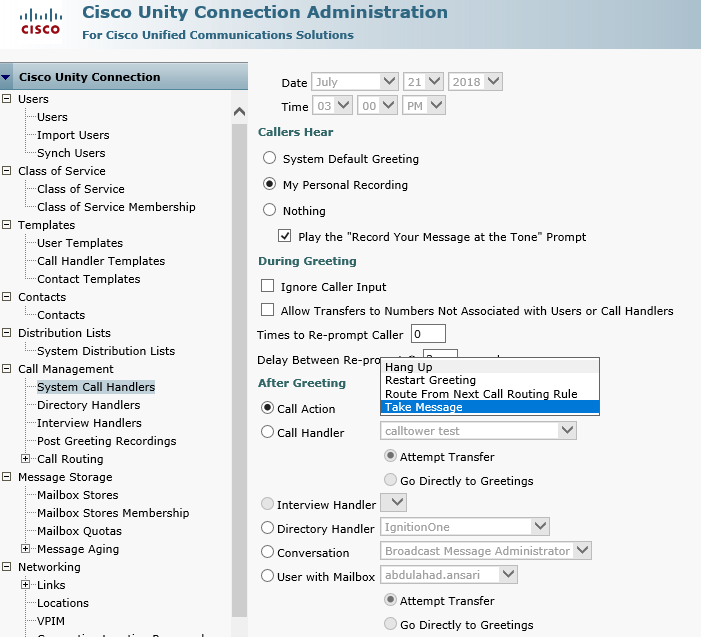
- After configuring the Standard Greeting rule, go back and configure the Error Greeting After Greeting action – typically to send the caller back to the same Call Handler. Failure to complete this step can result in unpredictable behavior if a caller selects an invalid option. If desired, the Alternate greeting can be used for a quick, one-time alternate message, like a weather related closing. By using the Alternate Greeting, the Standard Greeting does not need to be changed, and a predefined end time can be specified. For predetermined alternate greetings, a separate Call Handler and Call Routing rule are usually preferred to allow automatic enabling and disabling of the alternate message.
- Click on the Edit dropdown and select Caller Input. This is where options for pressing the zero through nine, star, or pound key are configured. The common options used for Caller Input are:
- Call Handler – Send a caller to another Call Handler / Menu level when this key is pressed
- Directory Handler – Send a caller to a dial by name directory
- User with Mailbox – Forward to a specific user. Upon selecting a user, you can configure the call to be transferred to the user or sent to the user’s voicemail greeting.
- Conversation, Sign In – This option allows a caller to sign in to his voicemail and retrieve messages, etc. remotely.
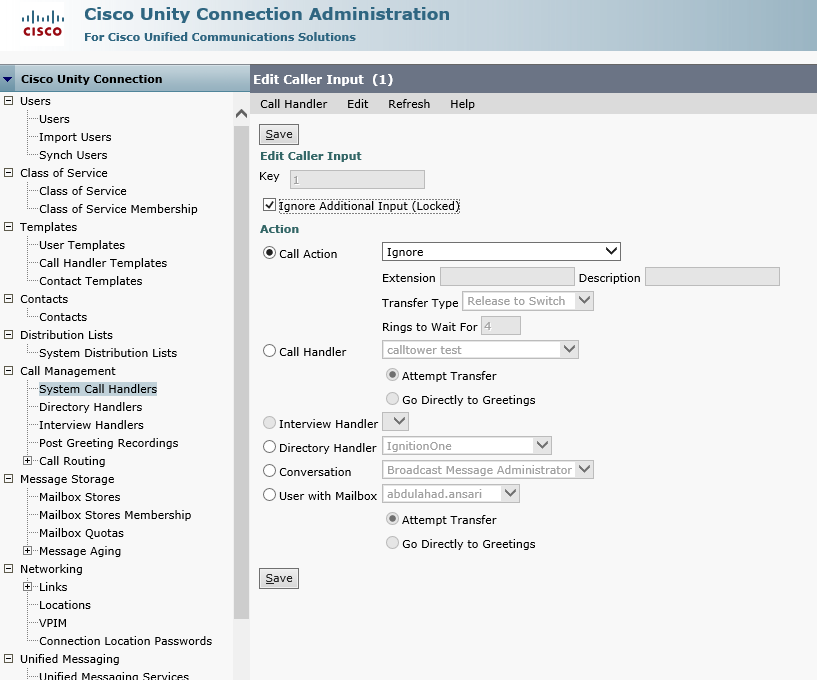
- If the After Message action or one of the Caller Input options is Take Message, use the Edit, Message Settings page to define the message recipient and after message action.
Schedules
- Navigate to System Settings, Schedules and click Add New button to create a new Schedule.
- Enter the name of the new Call Schedule, and whether or not for follow a Holiday Schedule. Click the Save button.
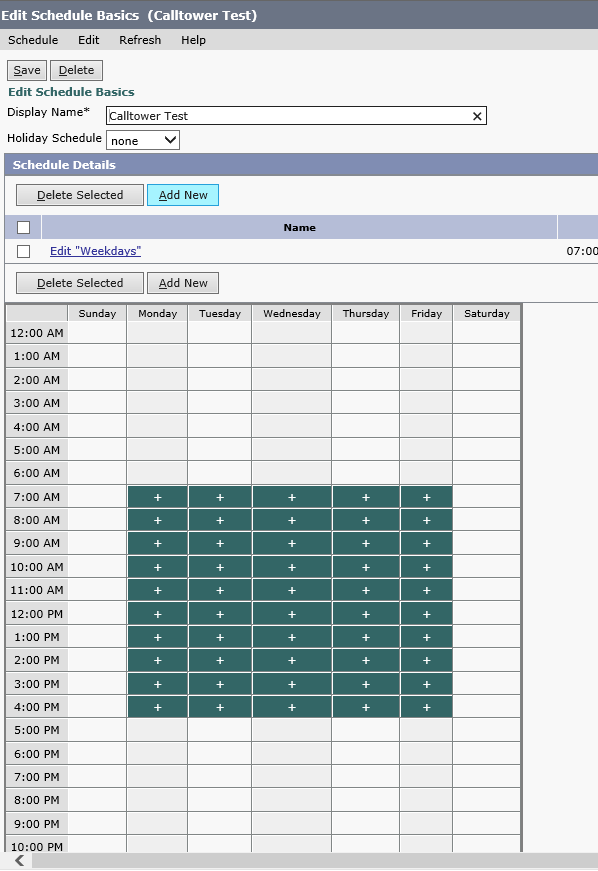
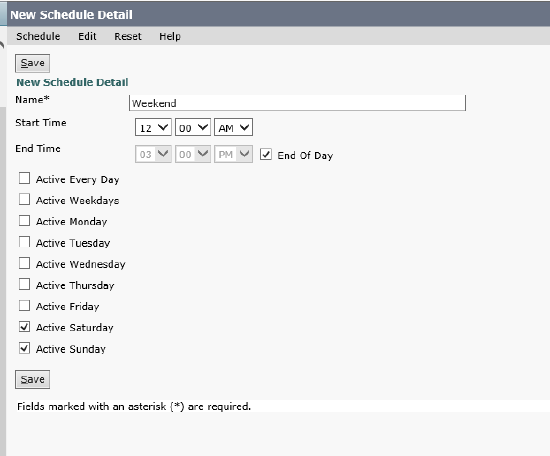
- Adjust the schedule as necessary by clicking Add New to configure each day / time period. Name the schedule period, define the active hours, then select the active days for that schedule period. Click the Save button, then click on the Edit dropdown and select Schedule Basics to return the the main schedule configuration page.
- You can change whether the schedule will account for configured holidays with the Holiday Schedule dropdown.
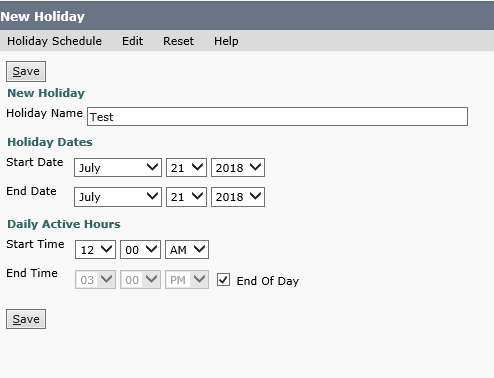
Holidays
Navigate to System Settings, Holiday Schedules and click the Add New button to create a new Schedule or click on an existing schedule to use.
- Once you have created or selected a schedule, click on the Add New button to create a new Hoiday. Enter the date of the new Holiday and Click the Save button to add it to the Holiday Schedule. Click on the Edit dropdown and select Holiday Schedule Basics to return to the Holiday Schedule.
Call Routing Rules
Call Routing rules pull all of the pieces of an auto attendant together and specify when a call is routed to a specific destination. To configure a Call Routing rule for a hunt pilot Ring No Answer or Busy condition, use a Direct Call rule. To configure a Call Routing rule for a directory number forward, use a Forwarded Call rule. The Unity Call Viewer can be used to make a test call and see whether the system identifies it as a direct or forwarded call. Individual Call Routing rules can be enabled and disabled as necessary by using the radio buttons.
Call routing rules are applied in order, so if multiple rules apply to a call, the rule listed closest to the top is the one that will be used to handle that call. This order can be used in conjunction with schedules for typical automated time of day routing. For example, three Forwarded Call rules are configured with the same Forwarding number. The first rule is configured with a schedule with holidays enabled and with the customer’s business hours. This forwards to the customer’s open greeting. The second rule (below the first) is configured with a schedule with holidays disabled and with the customer’s business hours. This forwards to the customer’s holiday greeting, causing the holiday greeting to be played on configured holidays, but only during the customer’s normal business hours. The third rule uses a schedule that has all hours of all days selected and has holidays disabled. This forwards to the customer’s closed greeting.
To configure a call routing rule:
- Navigate to Call Management, Call Routing. Select Direct Calls or Forwarded Calls.
- Click the Add New button to add a new Call Routing rule. Name the rule and click the Save button.
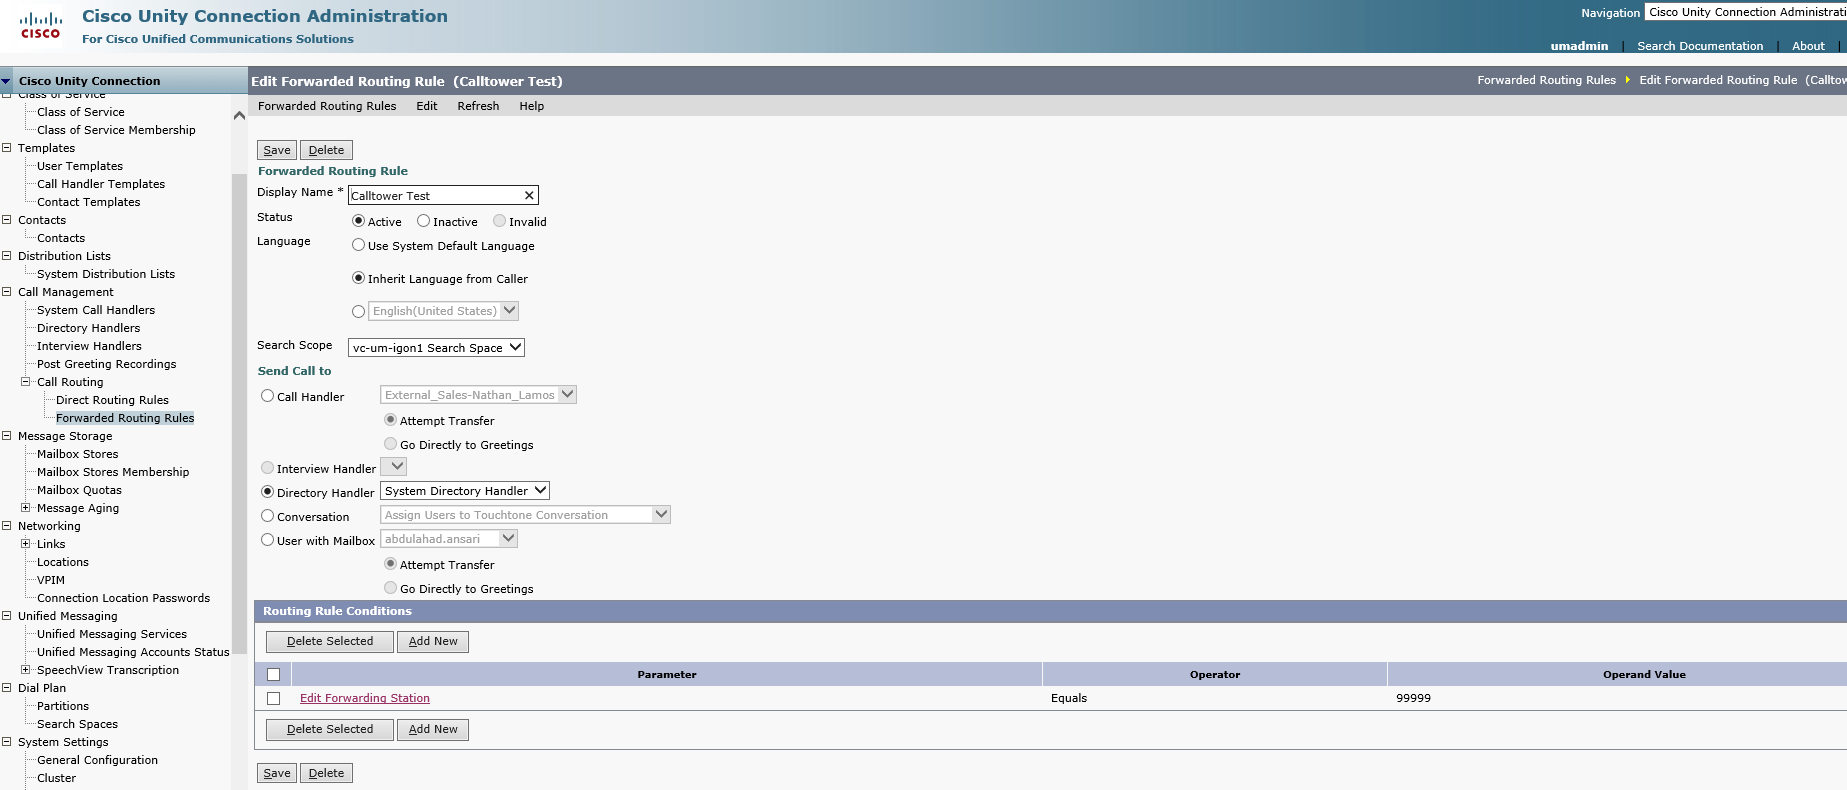
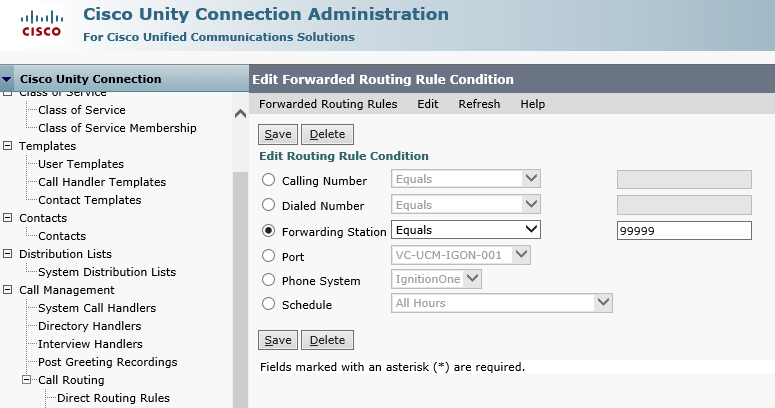
- Under Routing Rule Conditions, click Add New to configure the criteria to match on this rule. Enter Forwarding Station equals and the directory number if configuring a Forwarded Call rule or the Dialed Number equals and the directory number if configuring a Direct Call rule. Click the Save button to add the rule. Click on the Edit dropdown, select Edit Forwarded (or Direct) Routing Rule, and create a second Routing Rule Condition to match the desired schedule for the rule.
- Configure the destination under Send Call To.
- Click on the Save button to save the rule.
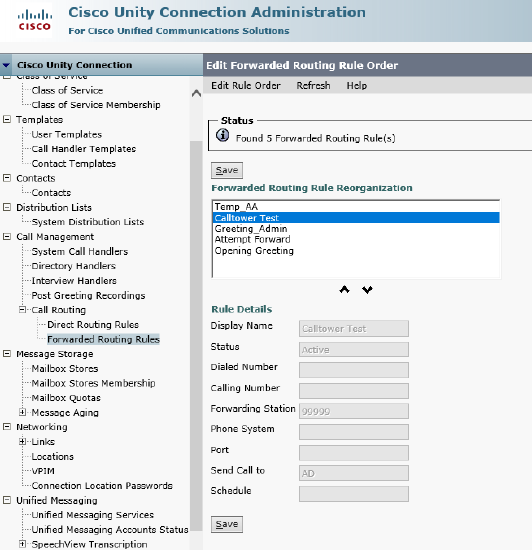
- Adjust the order of the rule if necessary by clicking on the Change Order button, selecting the rule, and using the Up and Down buttons.
- Test the rule by making a test call.