How to Setup Microsoft Surface Hub
Set up Microsoft Surface Hub
Prerequisites
- Windows PowerShell
- Windows Azure Active Directory Module for Windows PowerShell
- Resource Mailbox on Exchange (Office 365)
- Lync/Skype Account (Created in CallTower Connect)
Steps
1. Open PowerShell run as Administrator and create the mailbox
2. Run the commands below. The text in bold italics are the variables that need to be changed.
New-Mailbox -PrimarySmtpAddress username@domain.com -Alias username -Name "Display Name" -Room -EnableRoomMailboxAccount $true -RoomMailboxPassword (ConvertTo-SecureString -String password -AsPlainText -Force)
$easPolicy = New-MobileDeviceMailboxPolicy -Name "SurfaceHubs" -PasswordEnabled $false
get-mailbox "Display Name" | Set-Mailbox -Type Regular
Set-CASMailbox "Display Name" -ActiveSyncMailboxPolicy "surfacehubs"
Set-Mailbox username@domain.com -Type Room
Set-Mailbox username@domain.com -RoomMailboxPassword (ConvertTo-SecureString -String password -AsPlainText -Force) -EnableRoomMailboxAccount $true
Set-CalendarProcessing -Identity username@domain.com -AutomateProcessing AutoAccept -AddOrganizerToSubject $false –AllowConflicts $false –DeleteComments $false -DeleteSubject $false -RemovePrivateProperty $false
Set-CalendarProcessing -Identity username@domain.com -AddAdditionalResponse $true -AdditionalResponse "This is a Surface Hub room!"
3. Only complete this step if you have a password policy that expires
Open Windows Azure Active Directory PowerShell and run as Administrator
Run the commands below. The text in bold italics are the variables that need to be changed.
Connect-MsolService -Credential $cred
(put in Office 365 admin credentials when you see the pop up window)
get-msoluser -title "Display Name" | Set-MsolUser -PasswordNeverExpires $true
4. In Connect - create the Lync/Skype account as Enterprise Plus Voice with the same username, display name, and password as the mailbox.
5. Click the link below to download the certificate package and move it to a thumb drive and then install it on the Surface Hub
Deploy a provisioning package to a Surface Hub
The following two methods for deploying provisioning packages apply to any kind of provisioning package that is being deployed to a Surface Hub. There is no difference in the way cert provisioning packages and app provisioning packages are installed. You may see different description text in the UI depending on what the package is for, but the process is still the same.
Deploy a provisioning package using first run
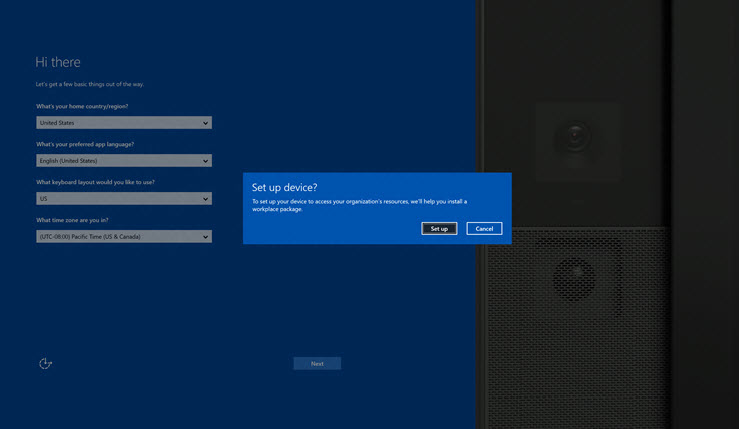
- When you turn on the Surface Hub for the first time, the first run process will display the page titled Hi there. Make sure the settings on this page are correct before you proceed. (See Hi there page for details.) Once you've deployed your provisioning package, the first run process will not return here. It will continue to the next screen.
- Insert the USB drive into the Surface Hub.
- Press the Windows key on the separate keyboard five times. You’ll see a dialog box asking whether you want to set up your device. Click Set Up.
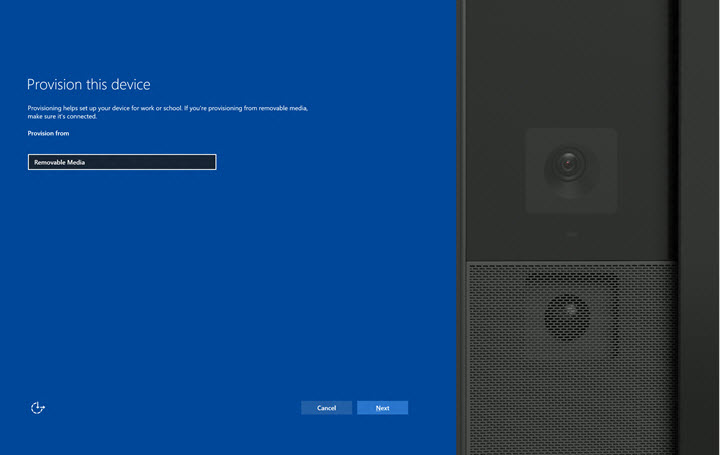
4. Click on Removable Media in the Provision From dropdown list, then click Next.
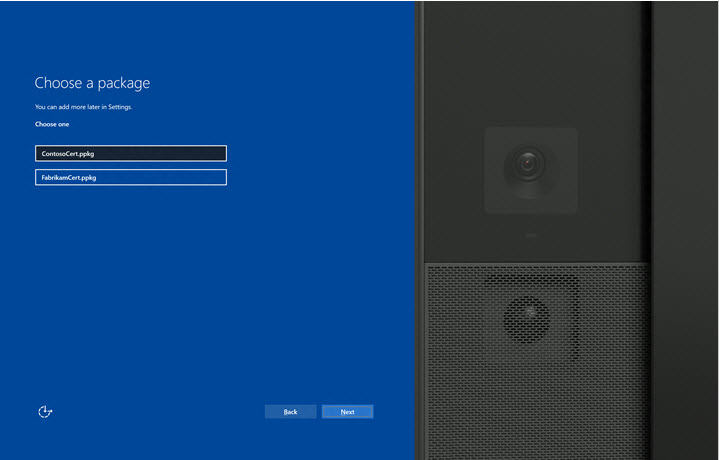
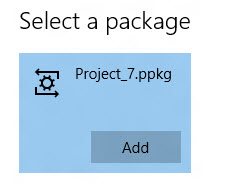
5. The available packages in the root directory of the USB drive will be listed. Note that you can only install one package during first run. Select the package you want to install and then click Next.
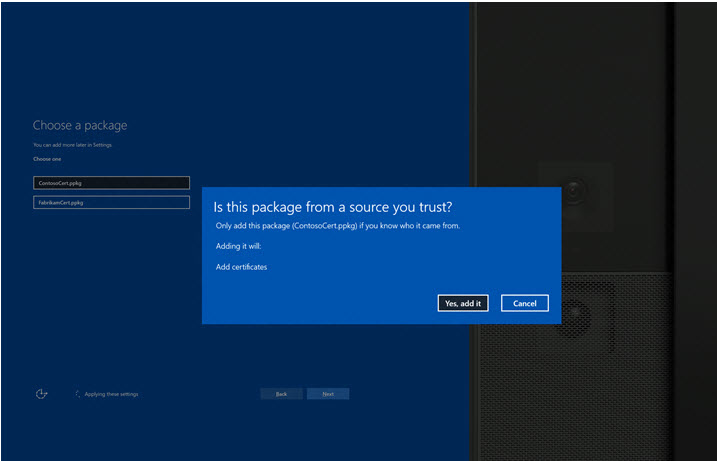
6. You’ll then see a dialog asking if it’s from a source you trust. Click Yes, add it. The certificate will be installed, and you’ll be taken to the next page of first run.
Deploy a provisioning package using Settings
- Insert the USB drive into the Surface Hub you want to deploy to.
- On the Surface Hub, open Settings and enter in the admin credentials.
- Navigate to System > Work Access. Under the header Related settings, click on Add or remove a management package.
- Here, click the button for Add a package.
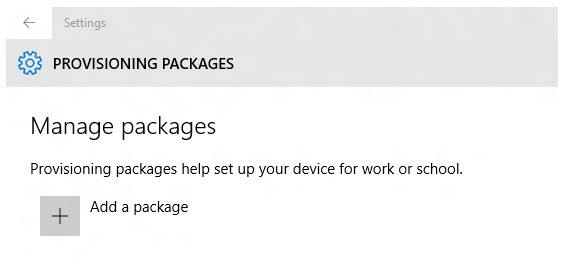
5. Click Removable media from the dropdown list. You will see a list of available provisioning packages on the Settings page.

6. Choose your package and click Add.
7. You may have to re-enter the admin credentials if User Access Control (UAC) asks for them.
8. You’ll see a confirmation dialog box. Click Yes, add it. The certificate will be installed.
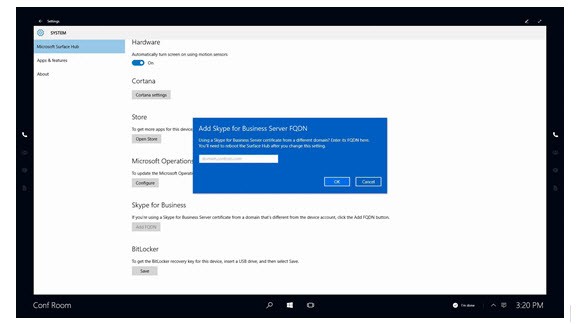
Add FQDN to Surface Hub
You use the Settings app on Surface Hub to add FQDN information. You can add multiple entries, if needed.
To add Skype for Business Server FQDN
- On Surface Hub open the Settings app.
- Navigate to System, Microsoft Surface Hub.
- Under Skype for Business, click Add FQDN.
- Type the FQDN for the Skype for Business certificate. Skype for Business 2015 is ct950.com ; Lync 2013 Hosters Pack Version 2 is ct650.com
Reference Articles
https://technet.microsoft.com/itpro/surface-hub/online-deployment-surface-hub-device-accounts
https://technet.microsoft.com/en-us/itpro/surface-hub/use-fully-qualified-domain-name-surface-hub